Practices of OceanBase Binlog Service
The OceanBase team has recently released an open source edition of the binlog service, which converts clogs in OceanBase into binlogs for downstream tools such as Canal and Flink CDC to consume. Today, we will try the binlog service and check its correctness by using the MySQL binlog tool named mysqlbinlog.
The binlog service is a service mode provided by oblogproxy. When binlog_mode is set to true, the service compatible with native MySQL binlogs is enabled, providing functionalities such as the generation of binlog files that contain SQL statements and binlog dump. To use the binlog service, download oblogproxy in the software center of the OceanBase official website.
Currently, the binlog service documentation is unavailable on the OceanBase official website. You can view it on GitHub: Binlog Service Documentation.
Introduction
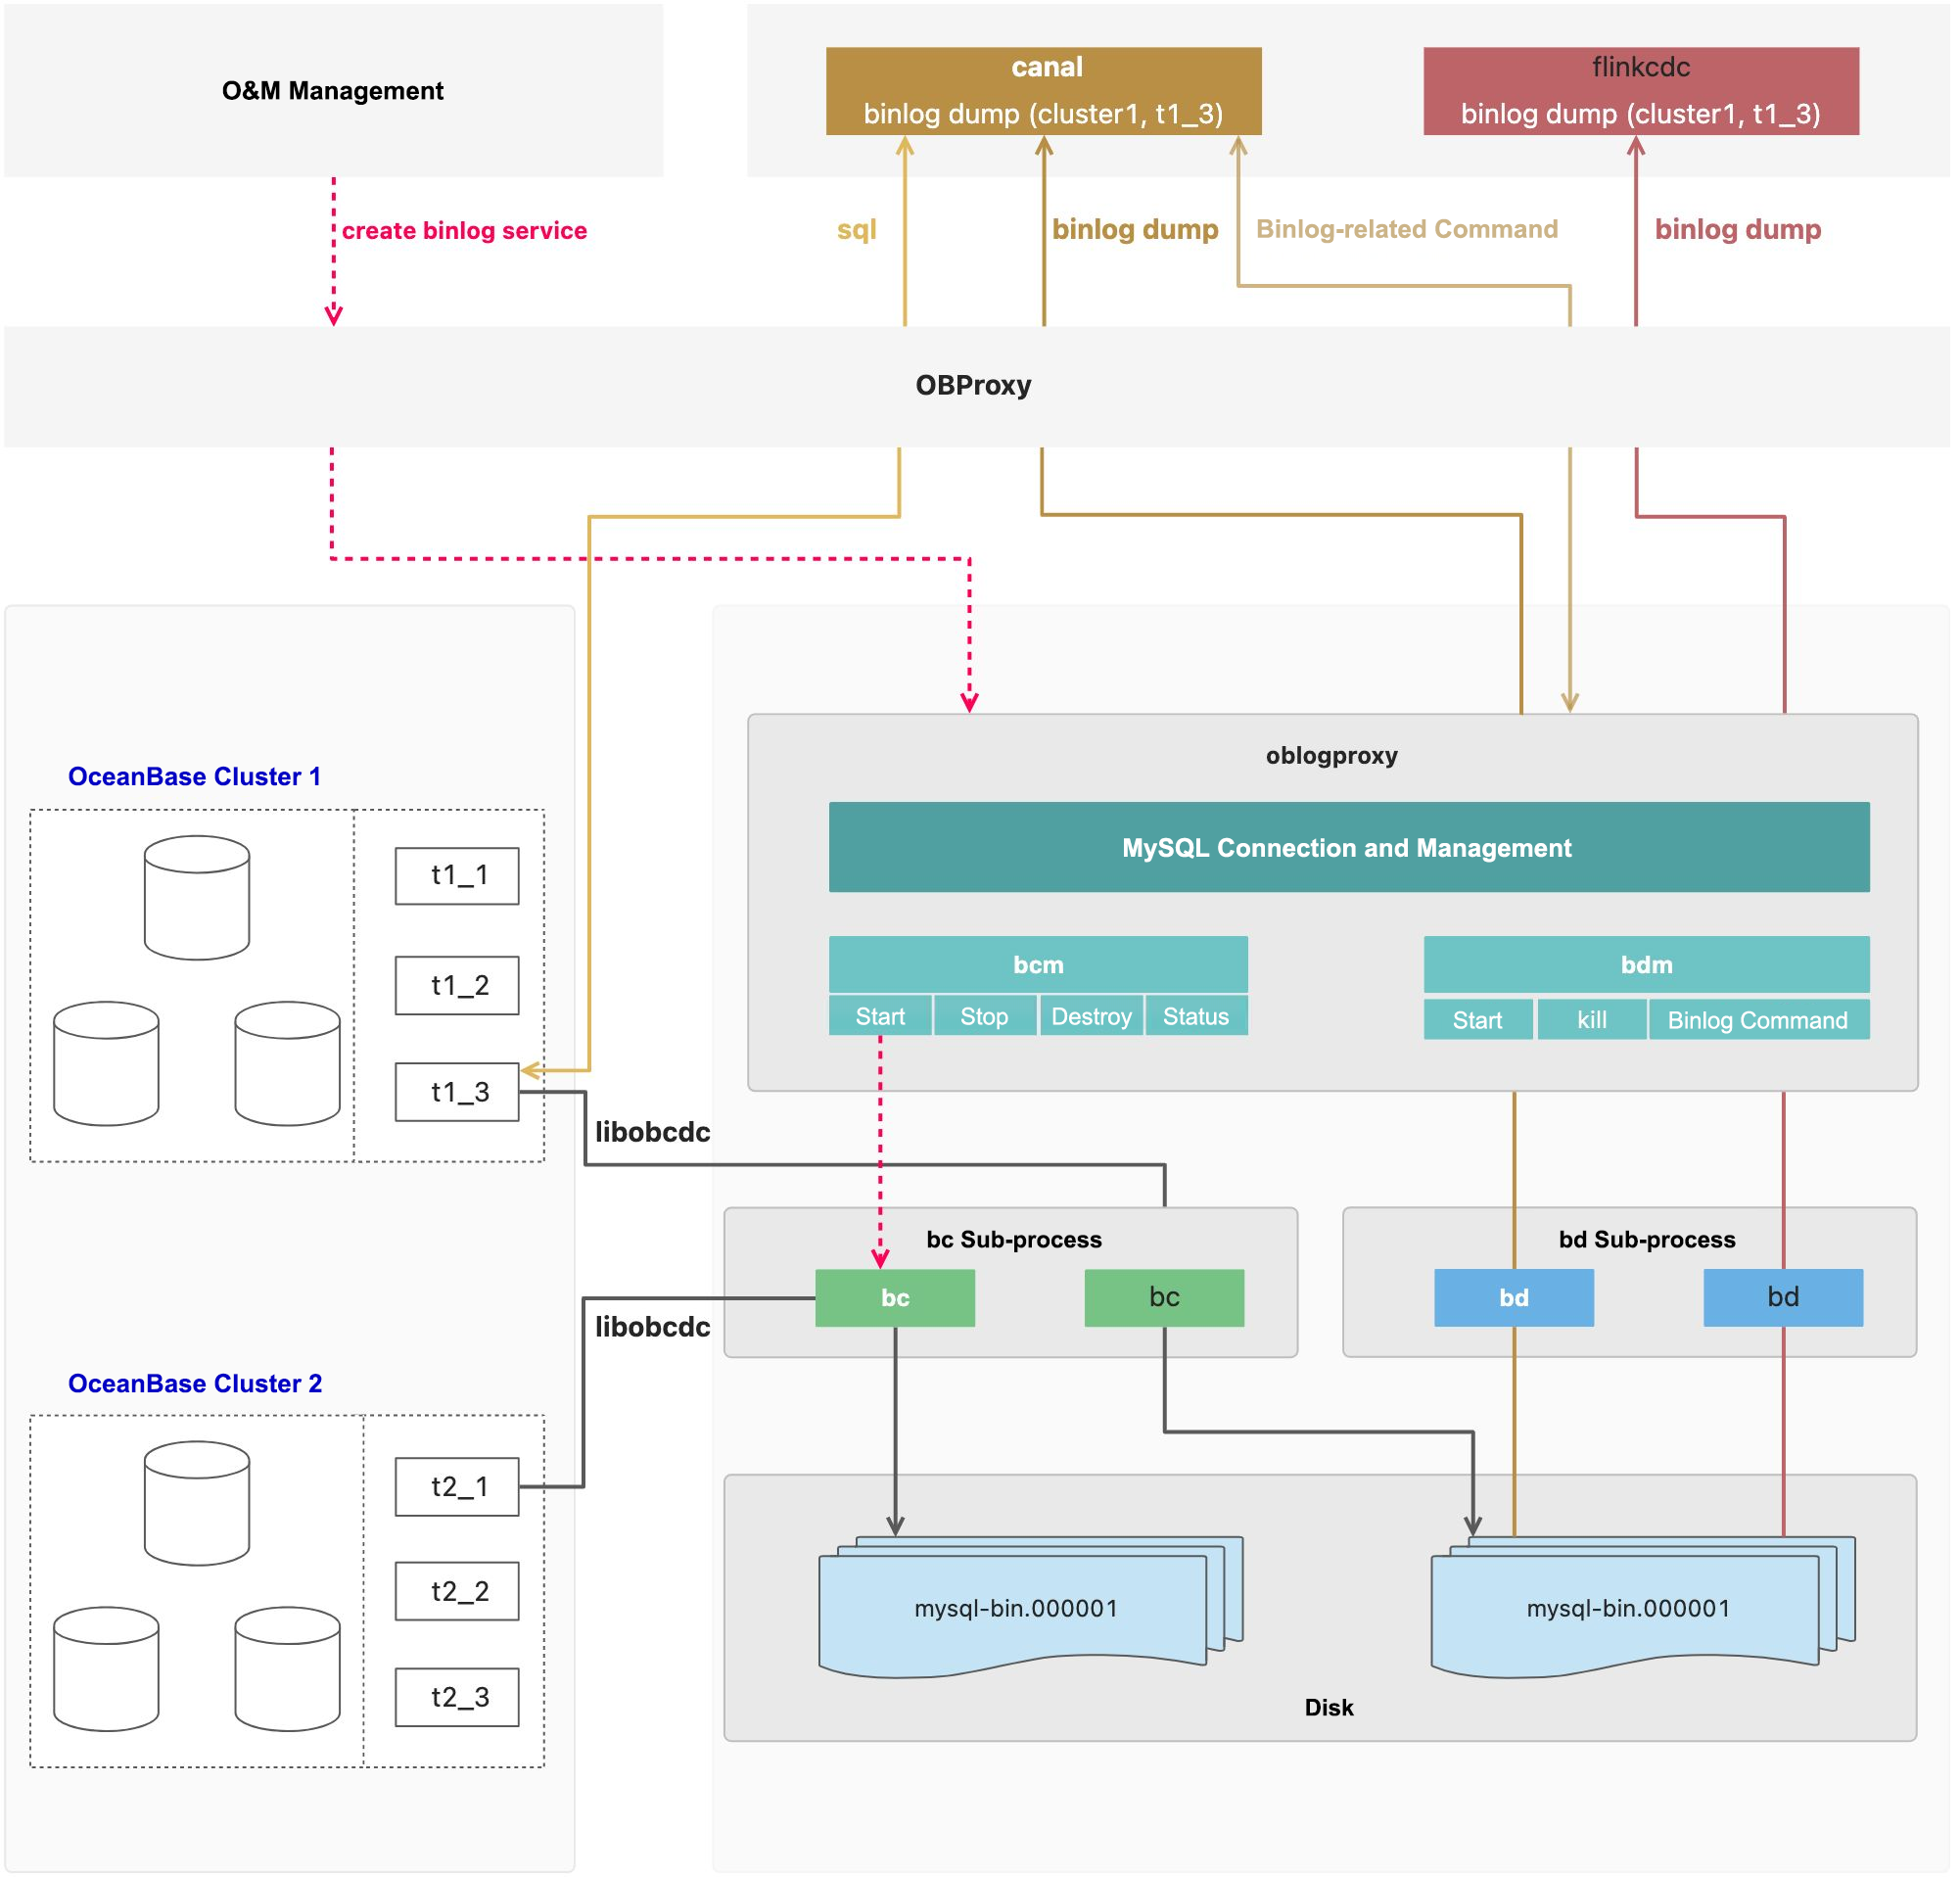
- ODP: OceanBase Database Proxy (ODP) provides SQL statements and binlogs with unified access to OceanBase. The service for binlogs consists of binlog commands such as show binlog events and the binlog replication protocol.
- oblogproxy: oblogproxy ensures compatibility with MySQL binlogs, including compatibility with binlog commands and the binlog replication protocol.
- bc: Binlog converter (bc) is a sub-process of oblogproxy. It pulls and parses clogs through libobcdc to convert clogs into binlogs.
- bd: Binlog dumper (bd) is a sub-process of oblogproxy. It provides binlog event subscription service for binlog dump requests from downstream tools such as Canal and Flink CDC.
- bcm: Binlog converter manager (bcm) is the bc management module of oblogproxy.
- bdm: Binlog dumper manager (bdm) is the bd management module of oblogproxy.
As shown in the following architecture, oblogproxy connects to ODP in the cluster to obtain cluster logs and converts them into binlogs. Downstream tools such as Canal and Flink CDC also connect to ODP to consume binlogs.
Limitations
- Currently, the binlog service requires OBServer and ODP V4.2.1 or later.
- The extended semantics for the ENUM and SET types in OceanBase are not supported. For example, the extended semantics support more than 64 SET definitions, duplication, and insertion of undefined data (such as ") into ENUM.
- Varchar(65536) definitions are not supported.
- Geographic information system (GIS) data types are not supported.
- Differences from some MySQL DDL operations may cause incompatibility between parsed binlogs and MySQL. However, OBServer has resolved this issue. We recommend that you set init_sql in ODP to enable _show_ddl_in_compat_mode at the tenant level. After you do this, the SHOW CREATE TABLE results output by OBServer will be fully compatible with MySQL syntax.
Environment
The environment consists of four servers, with three servers hosting a 3-node OceanBase cluster and one server hosting the oblogproxy service.
| IP address | Role |
|---|---|
| 172.24.255.54 | oblogproxy |
| 172.24.255.56 | OBServer and ODP |
| 172.24.255.57 | OBServer |
| 172.24.255.58 | OBServer |
Installation and Configuration
Configure ODP
As shown in the preceding architecture, oblogproxy, Canal, and Flink CDC all interact with ODP. Canal and Flink CDC are unaware of oblogproxy, the actual binlog service provider. ODP forwards downstream requests to OBServer or oblogproxy.
As a result, you must configure the oblogproxy service address in ODP.
    # Connect to ODP to access the cluster or interact with ODP.
    [root@OB1 ~]# obclient -h172.24.255.56 -P2883 -uroot@sys#myoceanbase -pxxx -Doceanbase -A

    # Query the IP address of the binlog server. Currently, it is empty.
    obclient [oceanbase]> show proxyconfig like 'binlog_service_ip';
    +-------------------+-------+-----------------------------------------+-------------+---------------+
    | name              | value | info                                    | need_reboot | visible_level |
    +-------------------+-------+-----------------------------------------+-------------+---------------+
    | binlog_service_ip |       | binlog service ip, format ip1:sql_port1 | false       | SYS           |
    +-------------------+-------+-----------------------------------------+-------------+---------------+
    1 row in set (0.001 sec)

    # Configure the binlog server address in the format of ip:port.
    obclient [oceanbase]> alter proxyconfig set binlog_service_ip="172.24.255.54:2983";
    Query OK, 0 rows affected (0.004 sec)

    # Enable forwarding for the binlog service.
    obclient [oceanbase]> alter proxyconfig set enable_binlog_service='True';

    # Configure init_sql to set session-level system variables for all sessions passing through the ODP.
    obclient [oceanbase]> alter proxyconfig set init_sql='set _show_ddl_in_compat_mode = 1;';
Install and start the binlog service
Download the installation package, upload it to the server, and start the installation.
[root@OB2 ~]# rpm -ivh oblogproxy-2.0.0-100000012023111521.el7.x86_64.rpm
By default, oblogproxy is installed in the /usr/local/oblogproxy directory.
Modify the conf/conf.json file in the installation directory.
    [root@OB2 ~]# cd /usr/local/oblogproxy
    [root@OB2 oblogproxy]# vim conf/conf.json
    # Modify the following parameters to enable binlogs and specify absolute paths.
    "binlog_mode": true
    "oblogreader_path": "/usr/local/oblogproxy/run"
    "bin_path": "/usr/local/oblogproxy/bin"
    "oblogreader_obcdc_ce_path_template": "/usr/local/oblogproxy/obcdc/obcdc-ce-%d.x-access/libobcdc.so"
    "binlog_log_bin_basename": "/usr/local/oblogproxy/run"
    "binlog_obcdc_ce_path_template": "/usr/local/oblogproxy/obcdc/obcdc-ce-%d.x-access/libobcdc.so"
For more information about the configurations, see Binlog Service Documentation.
Configure an account. As the username and a password cannot be written in plaintext in the configuration file, call the config_sys function to encrypt them and replace the values of ob_sys_username and ob_sys_password in the conf.json file with the encrypted username and password.
    [root@OB2 oblogproxy]# ./run.sh config_sys ${sys_usr} ${sys_pwd}
    # Enter y when a prompt appears to confirm whether to update ob_sys_username and ob_sys_password in the conf.json file.
    DEPLOY_PATH : /usr/local/oblogproxy

    !!DANGER!! About to update logproxy conf/conf.json, Please confirm? [Y/n] y
Note that the username and password you specify must belong to the sys tenant, such as root@sys#cluster_name, and must be enclosed in double quotation marks (").
Start the binlog service.
    # Start oblogproxy.
    [root@OB2 oblogproxy]# ./run.sh start
Check the log file in the log/ directory for errors.
    [root@OB2 oblogproxy]# cat log/logproxy.log
    [2023-12-06 15:51:34] [info] environmental.cpp(27): Max file descriptors: 655350
    [2023-12-06 15:51:34] [info] environmental.cpp(34): Max processes/threads: 655360
    [2023-12-06 15:51:34] [info] environmental.cpp(41): Core dump size: 18446744073709551615
    [2023-12-06 15:51:34] [info] environmental.cpp(48): Maximum number of pending signals: 252872
    [2023-12-06 15:51:34] [info] binlog_server.cpp(66): Start pull up all BC processes
    [2023-12-06 15:51:34] [info] binlog_server.cpp(76): The current binlog converter [myoceanbase,obtest]is alive and the pull action is terminated
    [2023-12-06 15:51:34] [info] binlog_server.cpp(76): The current binlog converter [myoceanbase,obtest]is alive and the pull action is terminated
    [2023-12-06 15:51:34] [info] binlog_server.cpp(89): Finish to pull up 1 BC processes
    [2023-12-06 15:51:34] [info] event_wrapper.cpp(43): Succeed to listen socket with port: 2983
    [2023-12-06 15:51:34] [info] binlog_server.cpp(47): Start OceanBase binlog server on port 2983
Configure the binlog service
After the binlog service starts successfully, specify the tenant whose binlogs you want to obtain. Log in to oblogproxy to create a binlog subscription sub-process using the following official syntax:
    CREATE BINLOG [IF NOT EXISTS] FOR TENANT `cluster`. `tenant` [TO USER `user` PASSWORD `pwd`] [FROM <timestamp>] WITH CLUSTER URL `<cluster url>`[, INITIAL_TRX_XID `ob_txn_id`, INITIAL_TRX_GTID_SEQ `gtid_seq`];

    -- You can specify a username and password for the binlog service, which are used for subscribing to OceanBase logs. In version 4.x, business tenants are allowed.
    [TO USER `user` PASSWORD `pwd`]

    -- You can map an OceanBase transaction ID to the global transaction ID (GTID) of a binlog.
    -- INITIAL_TRX_XID: The OceanBase transaction ID.
    -- INITIAL_TRX_GTID_SEQ: The GTID to map to.
    [, INITIAL_TRX_XID `ob_txn_id`, INITIAL_TRX_GTID_SEQ `gtid_seq`]

    -- Example:
    CREATE BINLOG FOR TENANT `cluster`. `tenant` TO USER `user` PASSWORD `pwd` FROM 1668339370000000 WITH CLUSTER URL 'cluster_url', SERVER UUID '2340778c-7464-11ed-a721-7cd30abc99b4', INITIAL_TRX_XID '97984179', INITIAL_TRX_GTID_SEQ '31';
To obtain the preceding parameters, connect to the target OBServer cluster and run the following commands:
timestamp: select time\_to\_usec(NOW());

cluster\_url:show parameters like '%url%'

SERVER UUID: show global variables like '%uuid';

INITIAL\_TRX\_XID: select \* from GV$OB\_TRANSACTION\_PARTICIPANTS;

INITIAL\_TRX\_GTID\_SEQ: 1 # For the first startup, you can specify any number.
For the first startup, you do not need to specify the timestamp, INITIAL_TRX_XID, or INITIAL_TRX_GTID_SEQ because the system configures them automatically. The following code executes the startup command and queries the status:
    [root@OB2 oblogproxy]# mysql -A -c -h 127.0.0.1 -P 2983
    MySQL [(none)]> CREATE BINLOG FOR TENANT `myoceanbase`. `obtest` TO USER `root` PASSWORD `xxxx` WITH CLUSTER URL 'http://172.24.255.53:8080/services?Action=ObRootServiceInfo&User_ID=alibaba&UID=ocpmaster&ObRegion=myoceanbase', SERVER UUID 'xxxx-xxx-xx-xx-xxxxxx';
    MySQL [(none)]> SHOW BINLOG STATUS\G;
    *************************** 1. row ***************************
    cluster: myoceanbase
     tenant: obtest
     status: {
    	"binlog_files" :
    	[
    		{
    			"binlog_name" : "mysql-bin.000001",
    			"binlog_size" : 178
    		}
    	],
    	"client_id" : "/usr/local/oblogproxy/run/myoceanbase/obtest",
    	"cpu_status" :
    	{
    		"cpu_count" : 16,
    		"cpu_used_ratio" : 0.12666244804859161
    	},
    	"disk_status" :
    	{
    		"disk_total_size_mb" : 503837,
    		"disk_usage_size_process_mb" : 0,
    		"disk_used_ratio" : 0.45975583791732788,
    		"disk_used_size_mb" : 231642
    	},
    	"memory_status" :
    	{
    		"mem_total_size_mb" : 63238,
    		"mem_used_ratio" : 0.0,
    		"mem_used_size_mb" : 735
    	},
    	"network_status" :
    	{
    		"network_rx_bytes" : 0,
    		"network_wx_bytes" : 0
    	},
    	"pid" : 7605
    }
    1 row in set (0.00 sec)
After startup, the subscription sub-process binlog_converter is enabled.

In the run/myoceanbase/obtest/data/ directory under the home directory, mysql-bin files are automatically generated.

Now, the binlog service is configured and started, and all create, read, update, and delete (CRUD) operations on the source OceanBase cluster can be captured and written to the mysql-bin files.
Parse Binlogs
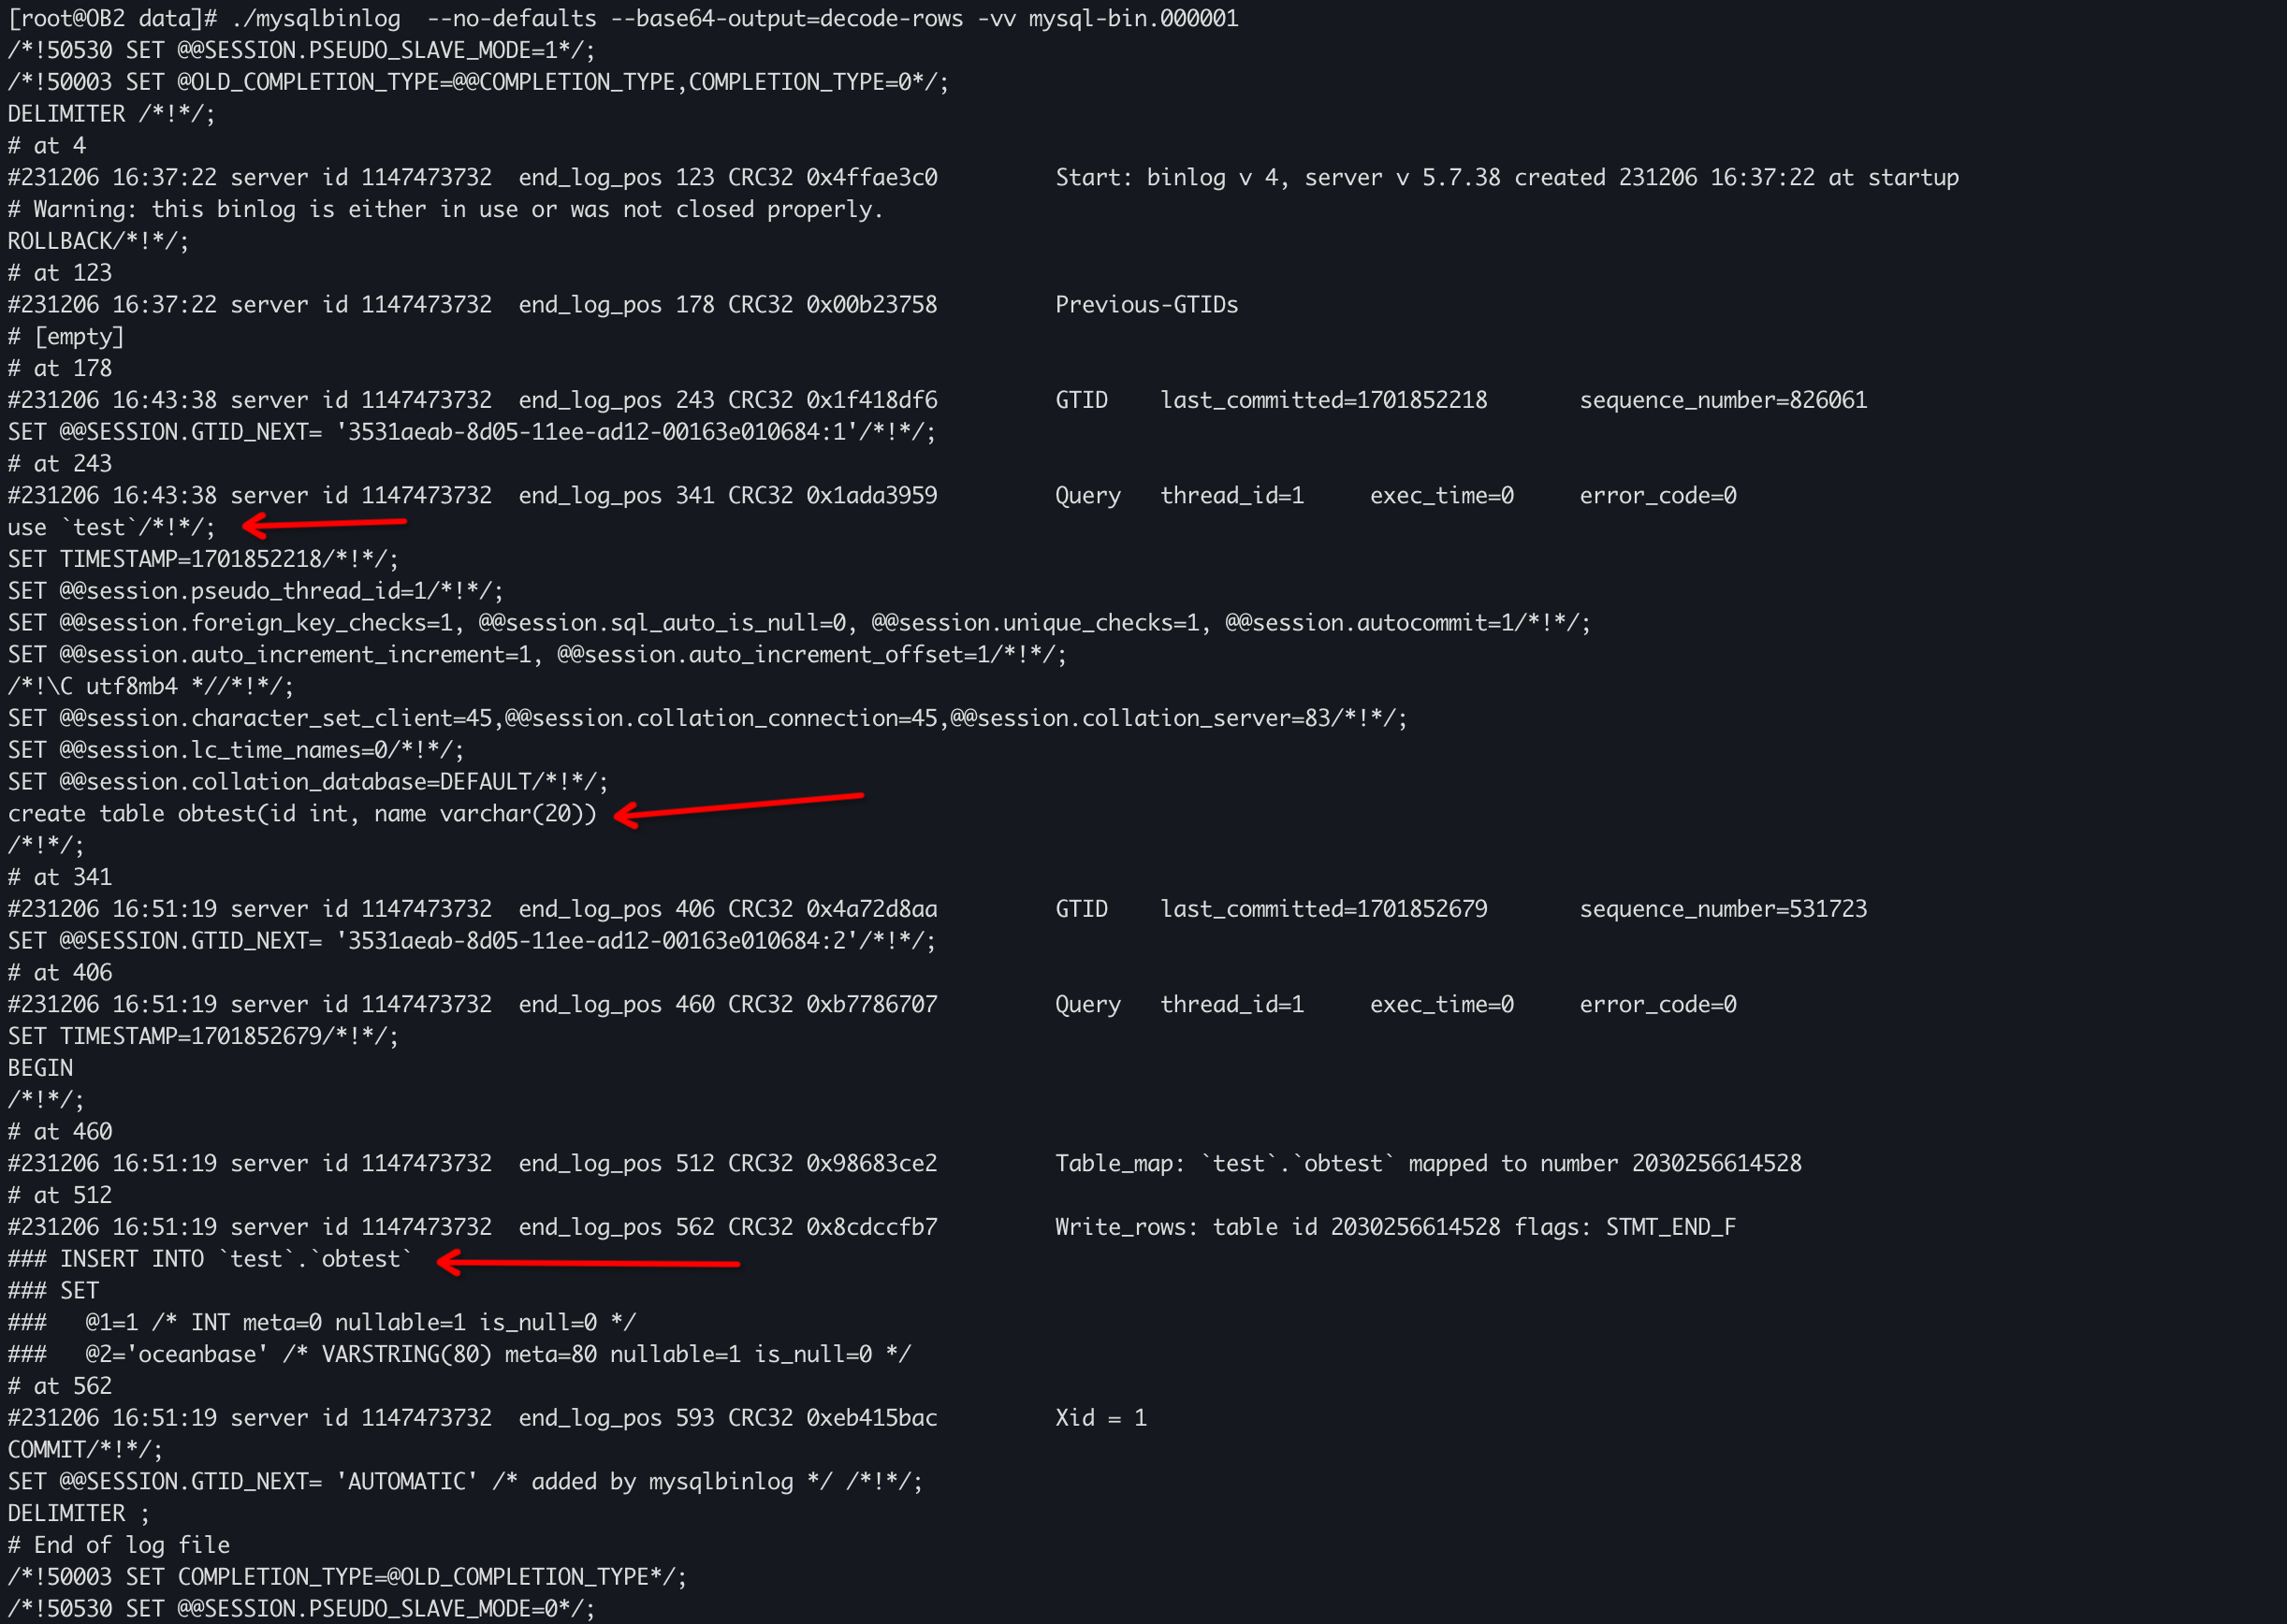
Lastly, write data to the source cluster and use the mysqlbinlog tool to check whether the parsing is correct.
In this example, mysqlbinlog 3.4 is used. The corresponding MySQL version is about 5.7.9.

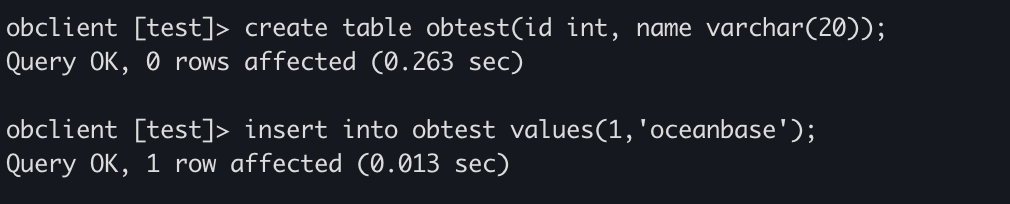
Create a table and insert data in the source cluster to check whether the parsing succeeds.
The parsing results are as follows.
This is a simple test of the binlog service of OceanBase. If you are interested, download, test, and use it. For any questions, contact OceanBase Technical Support. For more information about the commands, view the binlog service documentation on GitHub or stay tuned to the official website.