OceanBase Development Guide
About this guide
- The target audience of this guide is OceanBase contributors, both new and experienced.
- The objective of this guide is to help contributors become an expert of OceanBase, who is familiar with its design and implementation and thus is able to use it fluently in the real world as well as develop OceanBase itself deeply.
The structure of this guide
At present, the guide is composed of the following parts:
-
Get started: Setting up the development environment, build and connect to the OceanBase server, the subsections are based on an imagined newbie user journey.
- Install toolchain
- Get the code, build and run
- Set up an IDE
- Coding Convensions
- Write and run unit tests
- Running MySQL test
- Debug
- Commit code and submit a pull request
More information before you start a big feature developing, you should read content below and it can help you understand oceanbase better.
-
Contribute to OceanBase: helps you quickly get involved in the OceanBase community, which illustrates what contributions you can make and how to quickly make one.
User documents
This guide does not contain user documents.
For user documents, please refer to oceanbase-doc.
Install toolchain
To build OceanBase from source code, you need to install the C++ toolchain in your development environment first. If the C++ toolchain is not installed yet, you can follow the instructions in this document for installation.
Supported OS
OceanBase makes strong assumption on the underlying operator systems. Not all the operator systems are supported; especially, Windows and Mac OS X are not supported yet.
Below is the OS compatibility list:
| OS | Version | Arch | Compilable | Package Deployable | Compiled Binary Deployable | MYSQLTEST Passed |
|---|---|---|---|---|---|---|
| Alibaba Cloud Linux | 2.1903 | x86_64 | Yes | Yes | Yes | Yes |
| CentOS | 7.2 / 8.3 | x86_64 | Yes | Yes | Yes | Yes |
| Debian | 9.8 / 10.9 | x86_84 | Yes | Yes | Yes | Yes |
| Fedora | 33 | x86_84 | Yes | Yes | Yes | Yes |
| openSUSE | 15.2 | x86_84 | Yes | Yes | Yes | Yes |
| OpenAnolis | 8.2 | x86_84 | Yes | Yes | Yes | Yes |
| StreamOS | 3.4.8 | x86_84 | Unknown | Yes | Yes | Unknown |
| SUSE | 15.2 | x86_84 | Yes | Yes | Yes | Yes |
| Ubuntu | 16.04 / 18.04 / 20.04 | x86_84 | Yes | Yes | Yes | Yes |
Note:
Other Linux distributions may work. If you verify that OceanBase can compile and deploy on a distribution except ones listed above, feel free to submit a pull request to add it.
Supported GLIBC
OceanBase and its dependencies dynamically link to The GNU C Library (GLIBC). And the version of GLIBC share library is restrict to be less than or equal to 2.34.
See ISSUE-1337 for more details.
Installation
The installation instructions vary among the operator systems and package managers you develop with. Below are the instructions for some popular environments:
Fedora based
This includes CentOS, Fedora, OpenAnolis, RedHat, UOS, etc.
yum install git wget rpm* cpio make glibc-devel glibc-headers binutils m4 libtool libaio
Debian based
This includes Debian, Ubuntu, etc.
apt-get install git wget rpm rpm2cpio cpio make build-essential binutils m4
SUSE based
This includes SUSE, openSUSE, etc.
zypper install git wget rpm cpio make glibc-devel binutils m4
Get the code, build and run
Prerequisites
Check the Install toolchain guide for supported OS, GLIBC version requirement, and how to install the C++ toolchain.
Clone
Clone the source code to your development machine:
git clone https://github.com/oceanbase/oceanbase.git
Build
Build OceanBase from the source code in debug mode or release mode:
Debug mode
bash build.sh debug --init --make
Release mode
bash build.sh release --init --make
Run
Now that you built the observer binary, you can deploy an OceanBase instance with the obd.sh utility:
./tools/deploy/obd.sh prepare -p /tmp/obtest
./tools/deploy/obd.sh deploy -c ./tools/deploy/single.yaml
This starts the OceanBase server listening on port 10000.
Connect
You can use the official MySQL client to connect to OceanBase:
mysql -uroot -h127.0.0.1 -P10000
Alternatively, you can use the obclient to connect to OceanBase:
./deps/3rd/u01/obclient/bin/obclient -h127.0.0.1 -P10000 -uroot -Doceanbase -A
Shutdown
You can run the following command to shut down the server and clean up the deployment, which prevents disk consuming:
./tools/deploy/obd.sh destroy --rm -n single
Abstract
In order to easily read the code of OceanBase, we suggest using one IDE which is easily index the symbols of OceanBase. In Windows, we recommend Souce Insight can be used, and in Mac or Linux, we recommend that VSCode + ccls can be used to read the oceanbase code. Due to it is very easy to use Source Ingisht, so this document skip introduction how to use Souce Insight.
This document introduce how to setup VSCode + ccls, which is very convenient to read the code of OceanBase. ccls is based on cquery, which is one of C/C++/Objective-C LSPs (In one word, LSP is used to provide programming language-specific features like code completion, syntax highlighting and marking of warnings and errors, as well as refactoring routines).
The number of OceanBase code is pretty huge and OceanBase can't be compiled under Mac or Windows, so we recommend that download the code on the remote server, and start VSCode to access the code under the remote server.
Config ccls on Remote Server
Attention
The following /path/to just means the path example, please replace it with your real path.
Introduction
In the C/C++ LSP domain, the famous tools are clangd and ccls. Here we recommend ccls, because:
- The speed of building index of ccls is slower than that of clangd, but after building, the speed of accessing index of ccls is faster than that of clangd.
- Unity building doesn't be supported by clangd, but OceanBase is being built by unity, failed to build index through compile_commands.json by clangd.
ccls Installation
Install ccls on CentOS
NOTE: if you don't have the permission for
yum, please usesudo yum ...instead.
yum install epel-release
yum install snapd # On centos8: yum install snapd --nobest
systemctl enable --now snapd.socket
ln -s /var/lib/snapd/snap /snap
snap install ccls --classic
And then add the command below into your env source file, such as '/.bashrc' or '/.bash_profile'
export PATH=/var/lib/snapd/snap/bin:$PATH
Now, refresh your environment like this:
source ~/.bashrc   # or
source ~/.bash_profile
Install ccls on Ubuntu
apt-get -y install ccls
NOTE: If you don't have the permission, please use
sudoas the command prefix.
Check the Installation
You can run the command below to check whether the installation was success.
ccls --version
VSCode Configuration
Remote Plugin
Once the source code has been located in the remote machine, it is easy to setup debugging environment in remote machine. At the same time, the application can be run faster because remote machine is more powerful. User can easily access the source code on the remote machine even when something is wrong with the network, just wait reload after reconnect the remote server.
Installation
Download and install the Remote plugin from the VSCode extension store.

Usage
NOTE:Make sure the connection between the local machine and the remote machine is fine. After installation the plugin, there is one icon in the left bottom corner of VSCode.

Press the icon and select Connect to Host, or press shortkey ctrl+shift+p and select Remote-SSH:Connect to Host:
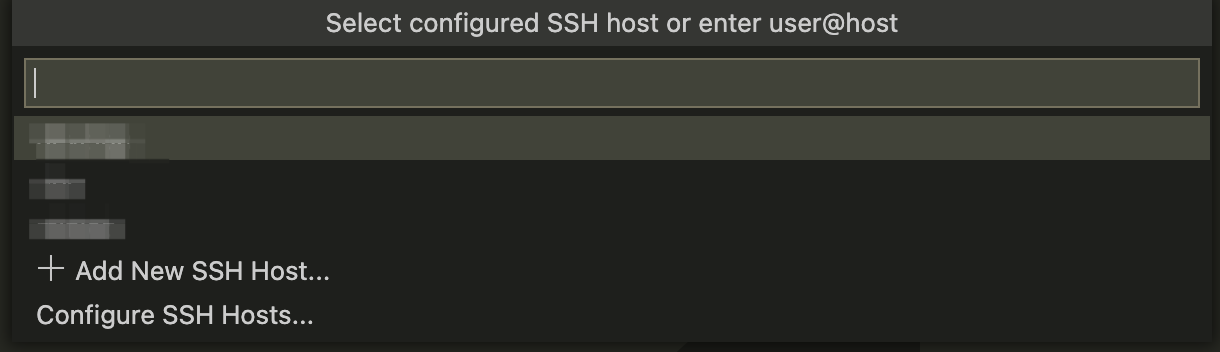
Input user@remote_ip in the input frame, VSCode will create one new window, please input password in the new window:

After input the password, VSCode will connect to the remote server, and it is ready to open the remote machine's file or directory.
If you want to use the specific port, please choose Add New SSH Host, then input ssh command, then choose one configuration file to store the ssh configuration.

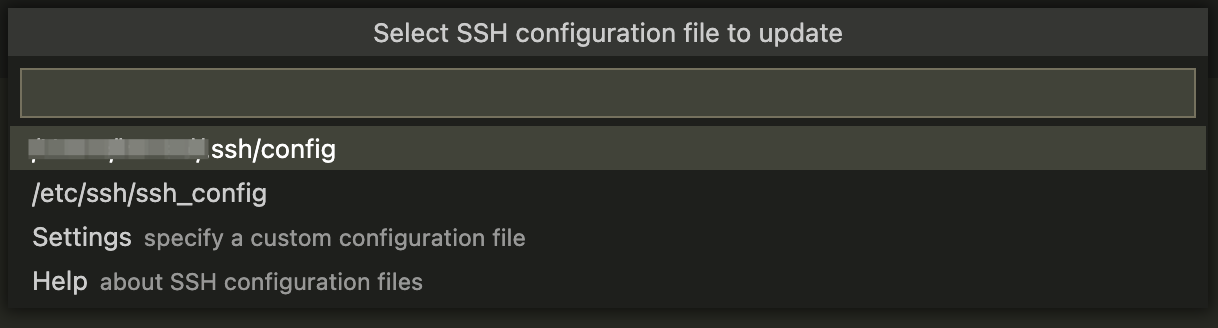 After that, the configured machines can be found in the
 Connect to Host.
Password need to be input everytime. If you want to skip this action, please configure SSH security login with credential.
C/C++ Plugin
We do not recommend using C/C++ plugins as they do not provide good indexing capabilities for OceanBase, and they are not compatible with the ccls plugin.
C/C++ plugin can be download and installed in VSCode extension store in the case of simple scenarios:
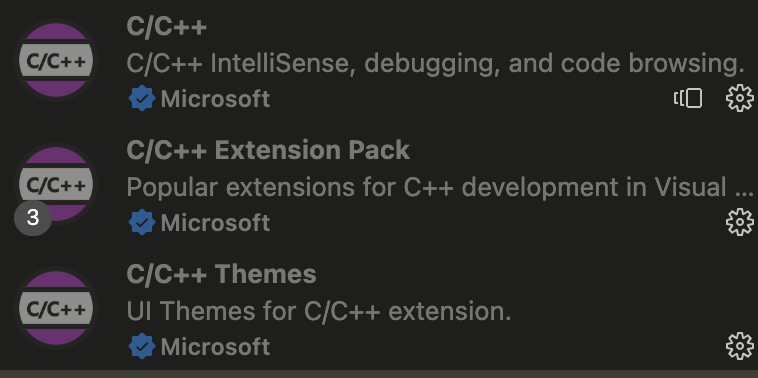 C/C++ plugin can automatically code completion and syntax highlighting, but this plugin failed to build index for OceanBase, it is hard to jump the symbol of OceanBase.
ccls Plugin
Install ccls Plugin
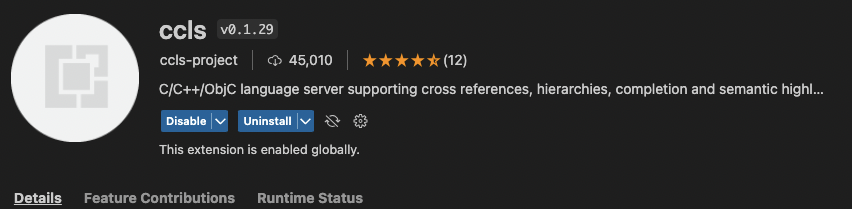
if ccls will be used, it suggest to uninstall C/C++ plugin.
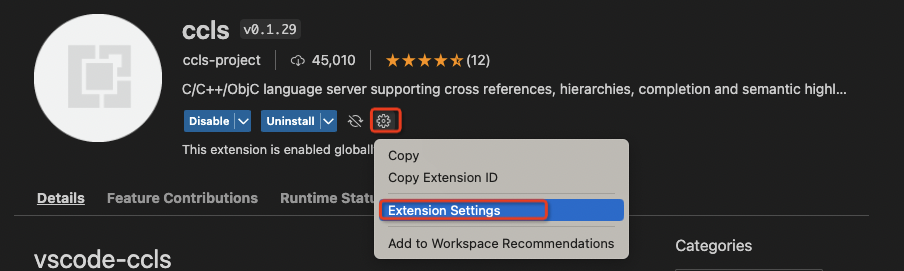
Configure ccls Plugin
- press the setting icond and choose Extension Settings
- Set config ccls.index.threads. CCLS uses 80% of the system cpu cores as the parallelism in default. We can search
threadsin vscode config page and set the number like below.
As default, oceanbase built in unity mode and it costs more memory than usual case. The system maybe hangs if the parallelism is too high such as 8C 16G system.

Usage
-
git clone the source code from https://github.com/oceanbase/oceanbase
-
Run the command below to generate
compile_commands.jsonbash build.sh ccls --init
After that, compile_commands.json can be found in the directory of code_path_of_oceanbase.
After finish previous steps, please restart VSCode, the building index precedure can be found at the bottom of VSCode:

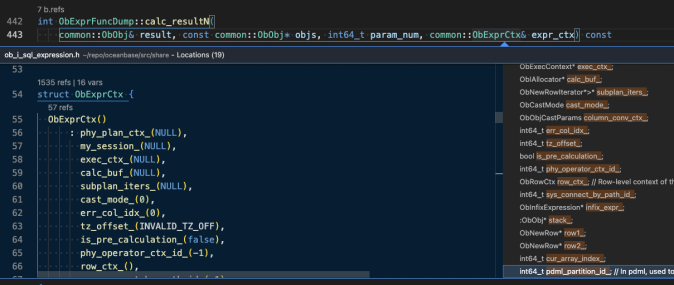
After finish building index, the function's reference and class member can be easily found for any opened file as the following example:
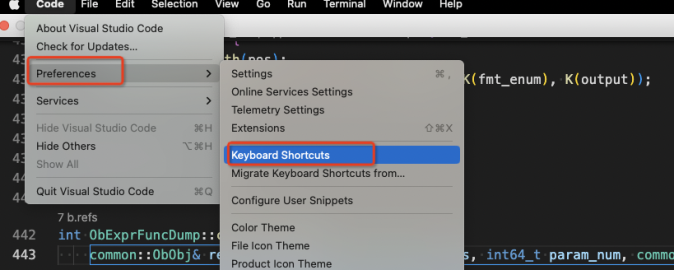
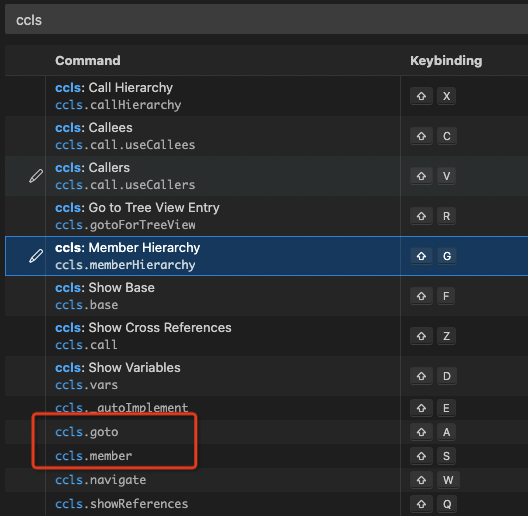
Recommend ccls shortkey settings:
OceanBase is a giant project that has been developed for more than ten years and contains millions of lines of C++ code. It already has many unique programming habits. Here are some OceanBase programming habits to help people who come into contact with the OceanBase source code for the first time have an easier time accepting and understanding. For more detailed information, please refer to "OceanBase C++ Coding Standard".
Naming Convention
- File naming
Code file names in OceanBase all start with ob_. But there are some old exception files.
- Class naming
Classes all start with Ob and use camelCase/Pascal form, and there are also some exceptions for old classes.
- Function names, variables, etc.
Both function names and variables use lowercase naming separated by _. Member variables also have _ added as a suffix.
Coding Style
OceanBase uses some relatively simple coding styles to try to make the code readable and clear, such as adding necessary spaces for operator brackets, not too long codes, not too long functions, adding necessary comments, reasonable naming, etc. Since the coding style has many details, new developers can just refer to the coding style in the current code to write code. This is also a suggestion for participating in other projects for the first time. We should try to keep it consistent with the original style.
There is no need to worry about the styles that you are not sure about. You can discuss it with us, or after submitting the code, someone will give suggestions or code together.
Functional Coding Habits
Prohibitting STL Containers
Since OceanBase supports multi-tenants resource isolation, in order to facilitate memory control, OceanBase prohibits the use of STL, boost and other containers. At the same time, OceanBase provides its own containers, such as ObSEArray, etc. For more information about OceanBase containers, please refer to [OceanBase Container Introduction] (./container.md).
Be Caution with the New C++ Standard
OceanBase does not encourage the use of some syntax of the new C++ standard, such as auto, smart pointers, move semantics, range-based loops, lambda, etc. OceanBase believes that these will bring many negative effects, such as
- Improper use of
autocan cause serious performance problems, but it only brings syntactic convenience; - Smart pointers cannot solve the problem of object memory usage, and improper use can also cause performance problems;
- The use of move is extremely complex, and it will lead to deeply hidden BUGs without ensuring that everyone understands it correctly.
Of course, OceanBase does not exclude all new standards, such as encouraging the use of override, final, constexpr, etc. If you are not sure whether a certain syntax can be used, you can search and confirm in "OceanBase C++ Coding Standard".
Single Entrance and Single Exit
It is mandatory for all functions to return at the end, and it is prohibited to call global jump instructions such as return, goto, and exit midway. This is also the most confusing part for everyone who comes into contact with OceanBase code for the first time.
In order to achieve this requirement, there will be a lot of if/else if in the code, and there are many less intuitive conditional judgments such as OB_SUCC(ret) in the for loop. At the same time, in order to reduce nesting, the macro FALSE_IT will be used to execute certain statements. for example
int ObMPStmtReset::process()
{
  int ret = OB_SUCCESS;
  ...
  if (OB_ISNULL(req_)) {
    ret = OB_INVALID_ARGUMENT;
    LOG_WARN("invalid packet", K(ret), KP(req_));
  } else if (OB_INVALID_STMT_ID == stmt_id_) {
    ret = OB_INVALID_ARGUMENT;
    LOG_WARN("stmt_id is invalid", K(ret));
  } else if (OB_FAIL(get_session(session))) {
    LOG_WARN("get session failed");
  } else if (OB_ISNULL(session)) {
    ret = OB_ERR_UNEXPECTED;
    LOG_WARN("session is NULL or invalid", K(ret), K(session));
  } else if (OB_FAIL(process_kill_client_session(*session))) {
    LOG_WARN("client session has been killed", K(ret));
  } else if (FALSE_IT(session->set_txn_free_route(pkt.txn_free_route()))) {
  } else if (OB_FAIL(process_extra_info(*session, pkt, need_response_error))) {
    LOG_WARN("fail get process extra info", K(ret));
  } else if (FALSE_IT(session->post_sync_session_info())) {
  } else if (FALSE_IT(need_disconnect = false)) {
  } else if (OB_FAIL(update_transmission_checksum_flag(*session))) {
    LOG_WARN("update transmisson checksum flag failed", K(ret));
  } else {
    // ...
  }
  return ret;
}
A lot of if/else if are used in the code, and the FALSE_IF macro is used to minimize the nesting of ifs.
It is worth mentioning that similar functions will write int ret = OB_SUCCESS; at the beginning of the function, using ret as the function return value, and many macros will also default to the existence of ret.
Function Returns Error Code
For most functions, the function is required to have an int return value, and the return value can be explained using the error code ob_errno.h.
Most of the functions mentioned here include some functions for obtaining values, such as the at function of ObSEArray
int at(int64_t idx, T &obj);
Which functions do not need to return int values?
Relatively simple functions that return class attributes, such as ObSEArray's function:
int64_t get_capacity();
The value will be returned directly without the int error code. Or similar simple judgment functions do not need to return int error codes.
Need to Determine the Validity of All Return Values and Parameters
OceanBase requires that as long as the function has a return value, the return value must be tested, and "check if possible." Function parameters, especially pointers, must be checked for validity before use.
For example:
int ObDDLServerClient::abort_redef_table(const obrpc::ObAbortRedefTableArg &arg, sql::ObSQLSessionInfo *session)
{
  int ret = OB_SUCCESS;
  ...
  obrpc::ObCommonRpcProxy *common_rpc_proxy = GCTX.rs_rpc_proxy_;
  if (OB_UNLIKELY(!arg.is_valid())) { // Check the validity of the parameters passed in
    ret = OB_INVALID_ARGUMENT;
    LOG_WARN("invalid arg", K(ret), K(arg));
  } else if (OB_ISNULL(common_rpc_proxy)) { // Before using pointers, check it first
    ret = OB_ERR_UNEXPECTED;
    LOG_WARN("common rpc proxy is null", K(ret));
  } else {
  ...
  }
  return ret;
}
Memory Management
Memory management is a very troublesome issue in C/C++ programs. OceanBase has done a lot of work for memory management, including efficient memory allocation, memory problem detection, tenant memory isolation, etc. OceanBase provides a set of memory management mechanisms for this purpose, and also prohibits the direct use of C/C++ native memory allocation interfaces in programs, such as malloc, new, etc.
The simplest, OceanBase provides the ob_malloc/ob_free interface to allocate and release memory:
void *ptr = ob_malloc(100, ObModIds::OB_COMMON_ARRAY);

// do something

if (NULL != ptr) {
  // release resource
  ob_free(ptr, ObModIds::OB_COMMON_ARRAY);
  ptr = NULL;  // set the pointer to null after free
}
OceanBase requires that the pointer must be assigned to null immediately after the memory is released. For more information about memory management, please refer to OceanBase Memory Management.
Some Conventional Interfaces
init/destroy
OceanBase requires that only some very lightweight data initialization work can be implemented in the constructor, such as variables initialized to 0, pointers initialized to nullptr, etc. Because in the constructor, it is not easy to handle some complex exception scenarios, and the return value cannot be given. Most classes in OceanBase have an init function, which is usually executed after the constructor and has an int error code as the return value. Do some more complex initialization work here. Correspondingly, the destroy function is usually provided to do resource destruction.
reuse/reset
Memory caching is a very effective way of improving performance. Many classes in OceanBase will have reuse/reset interfaces to facilitate the subsequent reuse of an object. Reuse usually represents lightweight cleanup work, while reset will do more resource cleanup work. But you need to look at the specific implementation class and cannot generalize.
Operator Overloading
C++ provides operator overloading functions that are very convenient for writing programs, but these overloadings often bring a lot of burden, making the code difficult to read and the functions misused. For example, operator overloading may lead to implicit type conversion without the programmer's knowledge, or a seemingly simple operation may have a relatively high overhead.
In addition, try to avoid using operator= and try to copy objects using deep_copy and shallow_copy.
Commonly Used Macros
OB_SUCC
Determine whether a statement returns successfully, equivalent to OB_SUCCESS == (ret = func())
ret = OB_SUCCESS;
if (OB_SUCC(func())) {
  // do something
}
OB_FAIL
Similar to OB_SUCC, it just determines whether a certain statement fails to execute:
ret = OB_SUCCESS;
if (OB_FAIL(func())) {
  // do something
}
OB_ISNULL
Determine whether the pointer is null, equivalent to nullptr == ptr,
if (OB_ISNULL(ptr)) {
  // do something
}
OB_NOT_NULL
Determine whether the pointer is non-null, equivalent to nullptr != ptr,
if (OB_NOT_NULL(ptr)) {
  // do something
}
K
Usually used in output logs, the usage K(obj), where obj can be a common type variable or a class object (must implement to_string), will be expanded into "obj", obj, and will eventually be output in the log "obj=123". for example:
LOG_WARN("fail to exec func, ", K(ret));
DISALLOW_COPY_AND_ASSIGN
Used in a class declaration to indicate that operations such as copy assignment are prohibited.
class LogReconfirm
{
  ...
private:
  DISALLOW_COPY_AND_ASSIGN(LogReconfirm);
};
Write and run unittest
How to build and run all unittest?
OceanBase has two unittest directories.
-
unittest. These are the main unittest cases, and it tests the code in thesrcdirectory. -
deps/oblib/unittest. Cases for oblib.
First, you should build unittest. You should enter the unittest directory in the build directory and build explicitly. When you build the oceanbase project, it does't build the unittest in default. For example:
bash build.sh --init --make # init and build a debug mode project
cd build_debug/unittest  # or cd build_debug/deps/oblib/unittest
make -j4 # build unittest
Then you can execute the script file run_tests.sh to run all test cases.
How to build and run a single unittest
You can also build and test a single unittest case. You can enter the build_debug directory, and execute make case-name to build the specific case and run the binary file built. For example:
cd build_debug
# **NOTE**: don't enter the unittest directory
make -j4 test_chunk_row_store
find . -name "test_chunk_row_store"
# got ./unittest/sql/engine/basic/test_chunk_row_store
./unittest/sql/engine/basic/test_chunk_row_store
How to write unittest
As a C++ project, OceanBase uses google test as the unittest framework.
OceanBase use test_xxx.cpp as the unittest file name. You can create a test_xxx.cpp file and add the file name into the specific CMakeLists.txt file.
In the test_xxx.cpp file, you should add a header file #include <gtest/gtest.h> and the main function below.
int main(int argc, char **argv)
{
  testing::InitGoogleTest(&argc, argv);
  return RUN_ALL_TESTS();
}
You can then add some functions to test different scenarios. Below is an example from test_ra_row_store_projector.cpp.
///
/// TEST is a google test macro.
/// You can use it to create a new test function
///
/// RARowStore is the test suite name and alloc_project_fail
/// is the test name.
///
TEST(RARowStore, alloc_project_fail)
{
  ObEmptyAlloc alloc;
  ObRARowStore rs(&alloc, true);

  /// ASSERT_XXX are some testing macros help us decide the results are
  /// expected, and it will terminate the test if failed.
  ///
  /// There are some other testing macros begin with `EXPECT_` which
  /// don't terminate the test if failed.
  ///
  ASSERT_EQ(OB_SUCCESS, rs.init(100 << 20));
  const int64_t OBJ_CNT = 3;
  ObObj objs[OBJ_CNT];
  ObNewRow r;
  r.cells_ = objs;
  r.count_ = OBJ_CNT;
  int64_t val = 0;
  for (int64_t i = 0; i < OBJ_CNT; i++) {
    objs[i].set_int(val);
    val++;
  }

  int32_t projector[] = {0, 2};
  r.projector_ = projector;
  r.projector_size_ = ARRAYSIZEOF(projector);

  ASSERT_EQ(OB_ALLOCATE_MEMORY_FAILED, rs.add_row(r));
}
Please refer to google test document to get more details about TEST, ASSERT and EXPECT.
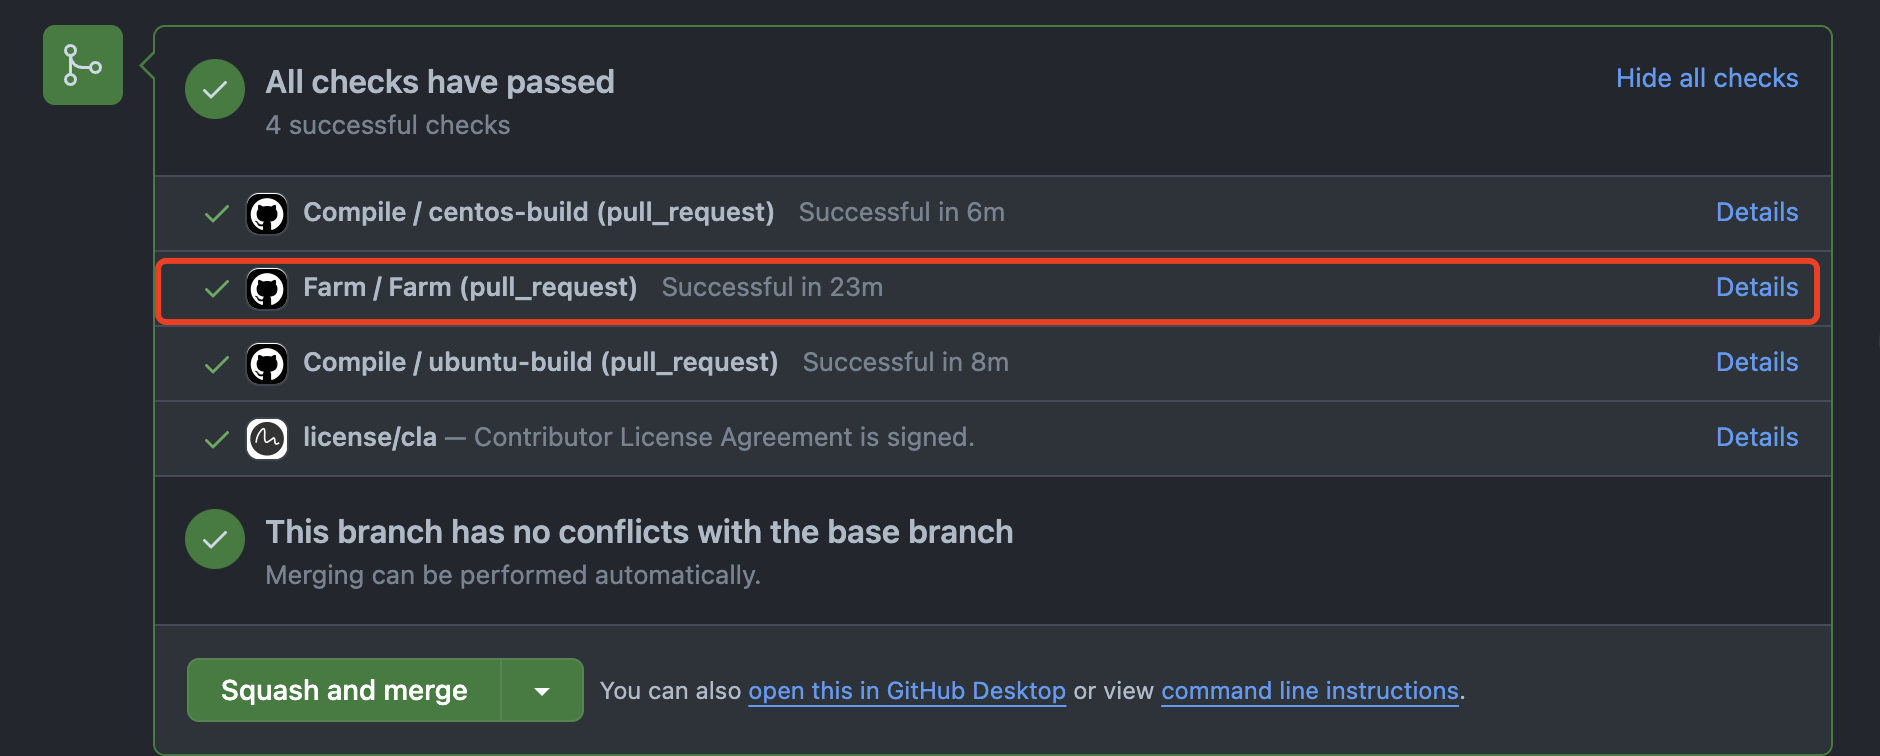
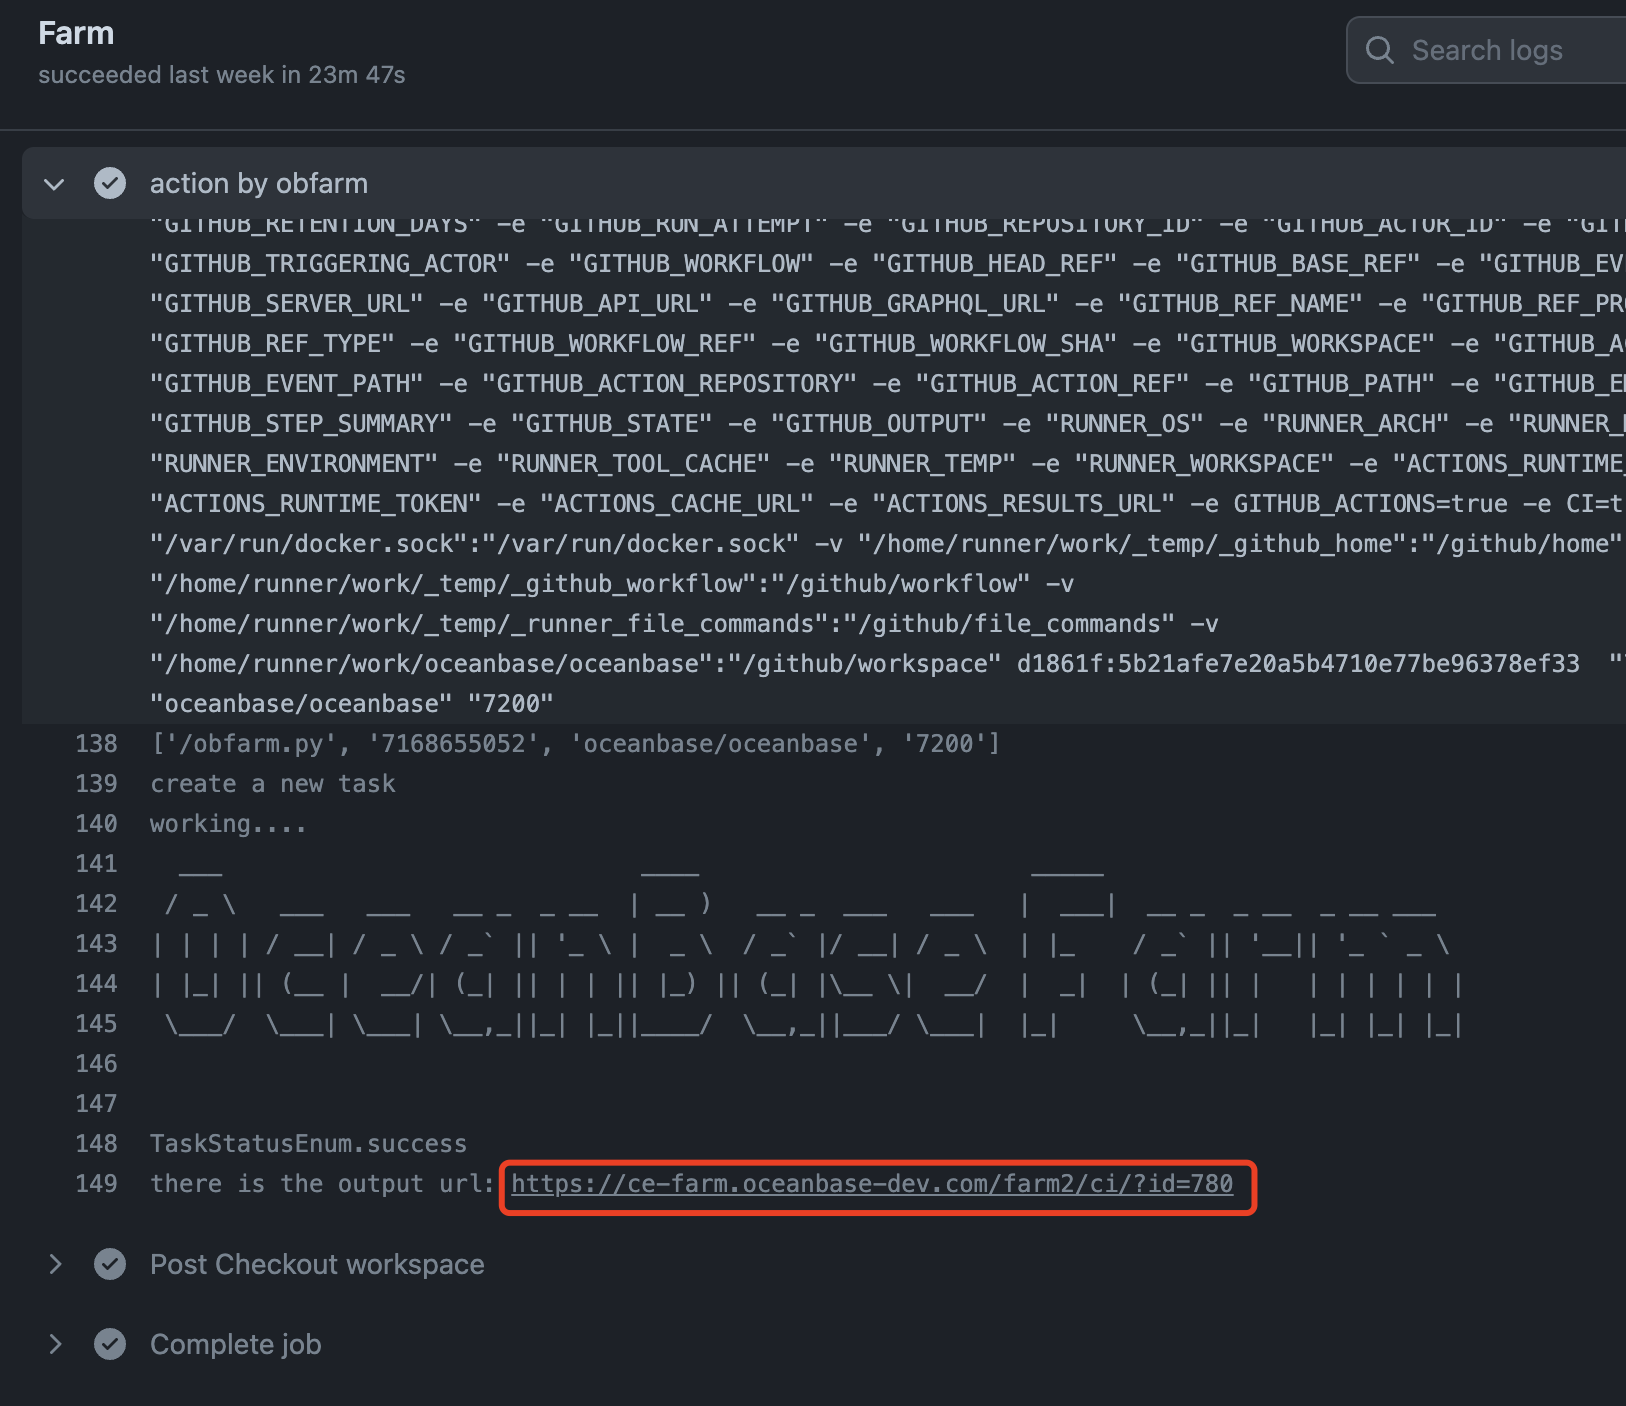
Unittest on GitHub CI
Before a pull request is merged, the CI will test your pull request. The Farm will test the mysql test and unittest. You can see the details follow the Details link like below.

Running mysqltest by obd.sh
When using obd.sh to run the mysqltest test, you need to use the OceanBase database deployed through obd.sh. This article uses examples to introduce how to use obd.sh to deploy the OceanBase database and run the mysqltest test starting from compiling the source code.
Background
In order to simplify the operating steps for developers and reduce their understanding costs, we encapsulate some OBD commands into the obd.sh script and store the script in the oceanbase/tools/deploy directory of the OceanBase source code. This article runs the mysqltest test by calling the obd test mysqltest commands in OBD.
Concepts
mysqltest is a test in the OceanBase database access test. Simply put, it takes the written case file as input and compares the output of the database with the expected output. The cases tested by mysqltest in the OceanBase database are all located in the tools/deploy/mysql_test directory of the OceanBase source code.
case is the smallest execution unit of mysqltest. A case contains at least one test file and one result file. Classifying cases forms a suite, and a suite is a collection of cases.
When running the mysqltest test, it is divided into different modes according to the selected nodes. The common mysqltest modes are as follows.
-
c mode: Connect to the server where the Primary Zone is located to run mysqltest. For example, use the configuration file distributed.yaml to deploy the cluster and then connect to server1 to run the test.
./obd.sh mysqltest -n <name> --suite acs --test-server=server1 -
Slave mode: Connect to a server other than the Primary Zone to run mysqltest. For example, use the configuration file distributed.yaml to deploy the cluster and then connect to server2 to run the test.
./obd.sh mysqltest -n <name> --suite acs --test-server=server2 -
Proxy mode: Connect to the cluster through ODP for mysqltest testing. For example, use the configuration file distributed-with-proxy.yaml to deploy the cluster and run the test.
./obd.sh mysqltest -n <name> --all
Steps
Step 1: Compile OceanBase database from source code
Please refer to build-and-run to compile the OceanBase database from source code.
Step 2: Run mysqltest test
You can choose to test in full or specify a case or suite for testing. For the specific meaning of parameters used when executing the obd.sh script, please refer to Appendix.
-
Full test, that is, run all suites in the
mysql_test/test_suitedirectory, please refer to the following command.[admin@obtest ~]$ cd oceanbase/tools/deploy [admin@obtest deploy]$ ./obd.sh mysqltest -n test --all -
Specify case for testing, for example, specify
mysql_test/test_suite/alter/t/alter_log_archive_option.test. Please refer to the following command.[admin@obtest ~]$ cd oceanbase/tools/deploy [admin@obtest deploy]$ ./obd.sh mysqltest -n test --test-dir ./mysql_test/test_suite/alter/t --result-dir ./mysql_test/test_suite/alter/r --test-set alter_log_archive_option -
To specify a suite test, for example, to execute a test on a specified suite in the
mysql_test/test_suitedirectory, please refer to the following command.[admin@obtest ~]$ cd oceanbase/tools/deploy [admin@obtest deploy]$ ./obd.sh mysqltest -n test --suite acs
Appendix
When executing the mysqltest test, you can configure some parameters according to the actual situation. The parameters are explained in the following table:
| Parameter Name | Required | Type | Default | Note |
|---|---|---|---|---|
| -n | Y | string | null | The cluster name. |
| --component | N | string | null | The name of the component to be tested. Candidates are obproxy, obproxy-ce, oceanbase, and oceanbase-ce. When empty, checks are performed in the order obproxy, obproxy-ce, oceanbase, oceanbase-ce. If it is detected that the component exists, it will no longer be traversed, and the hit component will be used for subsequent testing. |
| --test-server | N | string | The default is the first node in the server under the specified component | The machine to be tested can be set to the name value corresponding to the servers in the yaml file. If the name value is not configured after servers, the ip value will be used, which must be under the specified component. A certain node name. |
| --user | N | string | admin | The username for executing the test, generally does not need to be modified.。 |
| --password | N | string | admin | Password |
| --database | N | string | test | database |
| --mysqltest-bin | N | string | /u01/obclient/bin/mysqltest | mysqltest binary file path. |
| --obclient-bin | N | string | obclient | obclient binary file path. |
| --test-dir | N | string | ./mysql_test/t | The directory where the test-file required by mysqltest is stored. If the test file cannot be found, it will try to find it in the OBD built-in. |
| --test-file-suffix | N | string | .test | mysqltest 所需的 test-file 的后缀。 |
| --result-dir | N | string | ./mysql_test/r | The directory where the result-file required by mysqltest is stored. If the result file is not found, it will try to find it in the OBD built-in. |
| --result-file-suffix | N | string | .result | The suffix of result-file required by mysqltest. |
| --record | N | bool | false | Only the execution results of mysqltest are recorded as record-file. |
| --record-dir | N | string | ./record | The directory where the execution results of mysqltest are recorded. |
| --record-file-suffix | N | string | .record | The suffix that records the execution results of mysqltest. |
| --tmp-dir | N | string | ./tmp | tmpdir option for mysqltest. |
| --var-dir | N | string | ./var | The log directory will be created under this directory and passed to mysqltest as the logdir option. |
| --test-set | N | string | no | test case array. Use commas (,) to separate multiple cases. |
| --exclude | N | string | no | The test case array needs to be excluded. Use commas (,) to separate multiple cases. |
| --test-pattern | N | string | no | The regular expression that test filenames match. All cases matching the expression will override the test-set option. |
| --suite | N | string | no | suite array. A suite contains multiple tests, which can be separated by commas (,). |
| --suite-dir | N | string | ./mysql_test/test_suite | The directory where the suite directory is stored. If the suite directory is not found, it will try to find it in the OBD built-in. |
| --all | N | bool | false | Execute all cases under --suite-dir. The directory where the suite directory is stored. |
| --need-init | N | bool | false | Execute init sql file. A new cluster may need to execute some initialization files before executing mysqltest, such as creating the account and tenant required for the case. The directory where the suite directory is stored. Not enabled by default. |
| --init-sql-dir | N | string | ./ | The directory where the init sql file is located. When the sql file is not found, it will try to find it in the OBD built-in. |
| --init-sql-files | N | string | Default is empty | Array of init sql files to be executed when init is required. English comma (,) separation. If not filled in, if init is required, OBD will execute the built-in init according to the cluster configuration. |
| --auto-retry | N | bool | false | Automatically redeploy the cluster and try again when it fails. |
| --psmall | N | bool | false | Execute the case in psmall mode. |
| --slices | N | int | null | The number of groups into which the cases to be executed will be divided. |
| --slice-idx | N | int | null | Specify the current group id. |
| --slb-host | N | string | null | Specify the soft load balancing center. |
| --exec-id | N | string | null | Specify execution id. |
| --case-filter | N | string | ./mysql_test/filter.py | The filter.py file maintains the cases that need to be filtered. |
| --reboot-timeout | N | int | 0 | Restart timeout. |
| --reboot-retries | N | int | 5 | Number of retries for failed restarts. |
| --collect-all | N | bool | false | Whether to collect component logs. |
| --log-dir | N | string | The default is log under tmp_dir | The log storage path of mysqltest. |
| --log-pattern | N | string | *.log | Collect log file names matching the regular expression, and the hit files will be collected. |
| --case-timeout | N | int | 3600 | mysqltest timeout for a single test. |
| --disable-reboot | N | bool | false | No more restarts during test execution. |
| --collect-components | N | string | null | Used to specify the components to be collected for logs. Multiple components are separated by commas (,). |
| --init-only | N | bool | false | When true, only init SQL is executed. |
Abstract
This document describes some methods to debug OceanBase. We have many ways to debug OceanBase, such as gdb, logging, etc.
We suggest you build OceanBase with debug mode as it is easy to debug.
GDB
GDB is a powerful debugging tool, but it is difficult to debug OceanBase by gdb and the scenarios are limited.
If you want to debug a single oceanbase process and single thread, you can use gdb, otherwise it is more recommended to use logging.
I suppose that you have already deployed the oceanbase built by source code.
Debugging oceanbase is similar to debugging other C++ programs, you can use gdb as the following:
- find the process id
ps -ef | grep observer
or
pidof observer
- attach the process
gdb observer <pid>
Then you can set breakpoint, print variable, etc. Please refer to gdb manual for more information.
Debug oceanbase with debug-info package
If you want to debug oceanbase or check the coredump file deployed with oceanbase rpm, you should install or load the debug-info package first. Loading is more recommended although installation is more convenient as there will be many debug-info packages in the system and it is not easy to cleanup.
First, obtain the debug-info package from the website, and then load the package into gdb. Afterward, you will be able to debug OceanBase with ease.
Below are some tips.
How to find debug-info package
You can get the package revision by the command below.
# in the observer runtime path
clusters/local/bin [83] $ ./observer -V
./observer -V
observer (OceanBase_CE 4.1.0.1)

REVISION: 102000042023061314-43bca414d5065272a730c92a645c3e25768c1d05
BUILD_BRANCH: HEAD
BUILD_TIME: Jun 13 2023 14:26:23
BUILD_FLAGS: RelWithDebInfo
BUILD_INFO:

Copyright (c) 2011-2022 OceanBase Inc.
If you see the error below
./observer -V
./observer: error while loading shared libraries: libmariadb.so.3: cannot open shared object file: No such file or directory
You can run command below to get the revision
clusters/local/bin [83] $ LD_LIBRARY_PATH=../lib:$LD_LIBRARY_PATH ./observer -V
./observer -V
observer (OceanBase_CE 4.1.0.1)

REVISION: 102000042023061314-43bca414d5065272a730c92a645c3e25768c1d05
BUILD_BRANCH: HEAD
BUILD_TIME: Jun 13 2023 14:26:23
BUILD_FLAGS: RelWithDebInfo
BUILD_INFO:

Copyright (c) 2011-2022 OceanBase Inc.
Download debug-info package
From the version information above, we can get the first field of the revision. That is
REVISION: 102000042023061314-43bca414d5065272a730c92a645c3e25768c1d05
We need 102000042023061314.
Then we search 102000042023061314 on the oceanbase rpm website like below.
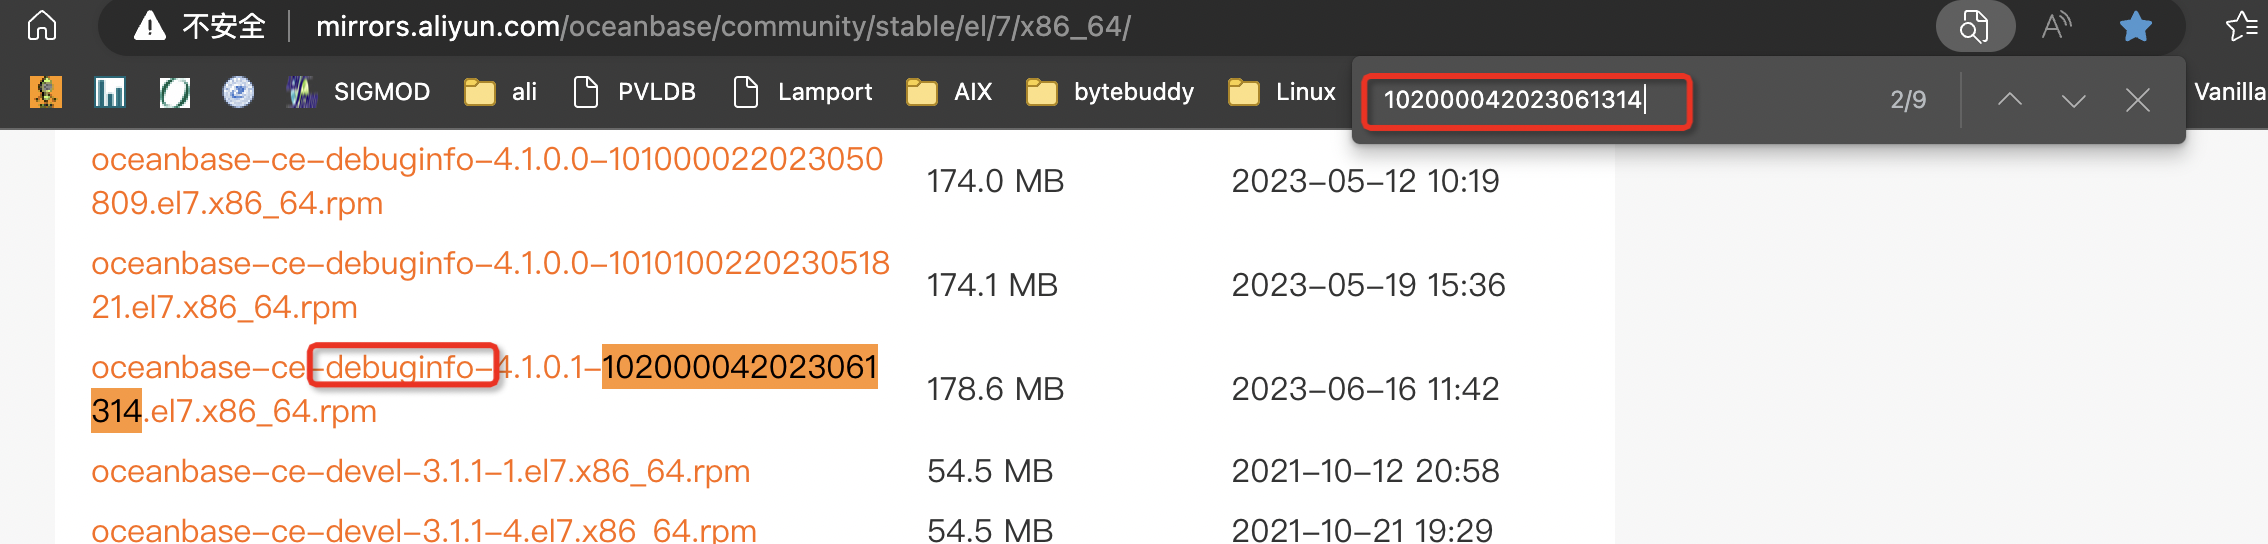
Here is a rpm website list.
Extract debug-info package from rpm
Extract debug-info package from rpm, for example.
rpm2cpio oceanbase-ce-debuginfo-4.1.0.1-102000042023061314.el7.x86_64.rpm | cpio -div
Then you can get this.
~/tmp/debug-info [83] $ tree -a
.
└── usr
    └── lib
        └── debug
            ├── .build-id
            │   └── ee
            │       ├── f87ee72d228069aab083d8e6d2fa2fcb5c03f2 -> ../../../../../home/admin/oceanbase/bin/observer
            │       └── f87ee72d228069aab083d8e6d2fa2fcb5c03f2.debug -> ../../home/admin/oceanbase/bin/observer.debug
            └── home
                └── admin
                    └── oceanbase
                        └── bin
                            └── observer.debug
observer.debug is the debug-info package we need and f87ee72d228069aab083d8e6d2fa2fcb5c03f2.debug is a symbolic link.
Debug oceanbase with debug-info package
Now, you can attach a process or a coredump file with gdb with commands below.
# attach a process
gdb ./observer `pidof observer`
or
# open a coredump file
gdb ./observer <coredump file name>
Usually, you will get this message.
Type "apropos word" to search for commands related to "word"...
Reading symbols from clusters/local/bin/observer...
(No debugging symbols found in clusters/local/bin/observer)
Attaching to program: clusters/local/bin/observer, process 57296
This means that there are no debugging symbols.
If we run some debug command in gdb, such as bt, we could get this.
(gdb) bt
#0  0x00007fb6e9c36d62 in pthread_cond_timedwait@@GLIBC_2.3.2 () from /lib64/libpthread.so.0
#1  0x00007fb6f9f44862 in ob_pthread_cond_timedwait ()
#2  0x00007fb6eee8d206 in oceanbase::common::ObThreadCond::wait_us(unsigned long) ()
#3  0x00007fb6f34b21c8 in oceanbase::observer::ObUniqTaskQueue<oceanbase::observer::ObServerSchemaTask, oceanbase::observer::ObServerSchemaUpdater>::run1() ()
#4  0x00007fb6f9f44259 in oceanbase::lib::Threads::run(long) ()
#5  0x00007fb6f9f40aca in oceanbase::lib::Thread::__th_start(void*) ()
We cannot get the source code file name or function parameters information.
Let's load the debug-info package.
(gdb) symbol-file usr/lib/debug/home/admin/oceanbase/bin/observer.debug
Reading symbols from usr/lib/debug/home/admin/oceanbase/bin/observer.debug...
It's better to use the full path of the debug info file.
Let's run the debug command again and we can get detailed information.
(gdb) bt
#0  0x00007fb6e9c36d62 in pthread_cond_timedwait@@GLIBC_2.3.2 () from /lib64/libpthread.so.0
#1  0x00007fb6f9f44862 in ob_pthread_cond_timedwait (__cond=0x7fb6fb1d5340, __mutex=0x7fb6fb1d5318, __abstime=0x7fb6b3ed41d0)
    at deps/oblib/src/lib/thread/ob_tenant_hook.cpp:124
#2  0x00007fb6eee8d206 in oceanbase::common::ObThreadCond::wait_us (this=<optimized out>, time_us=140422679606016)
    at deps/oblib/src/lib/lock/ob_thread_cond.cpp:106
#3  0x00007fb6f34b21c8 in oceanbase::common::ObThreadCond::wait (this=0x7fb6fb1d5310, time_ms=200)
    at deps/oblib/src/lib/lock/ob_thread_cond.h:69
#4  oceanbase::observer::ObUniqTaskQueue<oceanbase::observer::ObServerSchemaTask, oceanbase::observer::ObServerSchemaUpdater>::run1 (
    this=<optimized out>) at src/observer/ob_uniq_task_queue.h:417
Logging
Logging is the most common way to debug OceanBase, and it is easy to use and can be used in most scenarios. In common scenarios, we can add logs in the code and print the variable, then rebuild and redeploy the oceanbase.
How to add logs
You can prefer the logging code in the source code, such as
LOG_DEBUG("insert sql generated", K(insert_sql));
Here LOG_DEBUG is a macro to print log in debug level.
You can see that it is a little different from other programs. The first parameter is a string, and the other parameters are usually K(variable_name). K is a macro to print the variable name and value.
How to search logs
The logs are stored in the log directory which is under the home_path directory. You can search the logs by grep command.
Below is a log example:
[2023-07-05 16:40:42.635136] INFO [SQL.EXE] explicit_start_trans (ob_sql_trans_control.cpp:194) [88022][T1003_ArbSer][T1003][YD9F97F000001-0005FFB71FCF95C7-0-0] [lt=42] start_trans(ret=0, tx_id={txid:2118151}, session={this:0x7ff2663d6188, id:1, tenant:"sys", tenant_id:1, effective_tenant:"sys", effective_tenant_id:1003, database:"oceanbase", user:"root@%", consistency_level:3, session_state:0, autocommit:true, tx:0x7ff26b0e4300}, read_only=false, ctx.get_execution_id()=18446744073709551615)
You can see the timestamp([2023-07-05 16:40:42.635136]), log level(INFO), module name([SQL.EXE]), function name(explicit_start_trans), file(ob_sql_trans_control.cpp), line number(194), thread id(88022), thread name(T1003_ArbSer), trace id(YD9F97F000001-0005FFB71FCF95C7-0-0), etc.
The trace id is a unique id for each SQL request. You can search a specific trace id to find all logs about this SQL request.
Tips with logging
Trace ID
You can use the SQL command below to get the trace id of the last SQL request.
select last_trace_id();
Log Level
You can use the SQL command below to adjust the log level dynamically.
set ob_log_level=debug;
Log Traffic Control
If you can not find your log, it may be limited because of the log traffic control, you can use the SQL command below to change the behavior of the log traffic control.
alter system set syslog_io_bandwidth_limit='1G';
alter system set diag_syslog_per_error_limit=1000;
Print Log Synchronously
You can use SQL command below to print log synchronously.
alter system set enable_async_syslog='False';
Print Call Stack
You can print the call stack information in the log, such as:
LOG_DEBUG("insert sql generated", K(insert_sql), K(lbt()));
You may got this:
lbt()="0x14371609 0xe4ce783 0x54fd9b6 0x54ebb1b 0x905e62e 0x92a4dc8 0x905df11 0x905dc94 0x13d2278e 0x13d22be3 0x6b10b81 0x6b0f0f7 0x62e2491 0x10ff6409 0x1475f87a 0x10ff6428 0x1475f1c2 0x1476ba83 0x14767fb5 0x14767ae8 0x7ff340250e25 0x7ff33fd0ff1d"
Then you can use the command below to get the call stack information:
addr2line -pCfe ./bin/observer 0x14371609 0xe4ce783 0x54fd9b6 0x54ebb1b 0x905e62e 0x92a4dc8 0x905df11 0x905dc94 0x13d2278e 0x13d22be3 0x6b10b81 0x6b0f0f7 0x62e2491 0x10ff6409 0x1475f87a 0x10ff6428 0x1475f1c2 0x1476ba83 0x14767fb5 0x14767ae8 0x7ff340250e25 0x7ff33fd0ff1d
I got this:
oceanbase::common::lbt() at /home/distcc/tmp/./deps/oblib/src/lib/utility/ob_backtrace.cpp:130 (discriminator 2)
operator() at /home/distcc/tmp/./src/sql/session/ob_basic_session_info.cpp:599 (discriminator 2)
oceanbase::sql::ObBasicSessionInfo::switch_tenant(unsigned long) at /home/distcc/tmp/./src/sql/session/ob_basic_session_info.cpp:604
oceanbase::observer::ObInnerSQLConnection::switch_tenant(unsigned long) at /home/distcc/tmp/./src/observer/ob_inner_sql_connection.cpp:1813 (discriminator 2)
...
oceanbase::lib::Thread::run() at /home/distcc/tmp/./deps/oblib/src/lib/thread/thread.cpp:162
oceanbase::lib::Thread::__th_start(void*) at /home/distcc/tmp/./deps/oblib/src/lib/thread/thread.cpp:312
?? ??:0
?? ??:0
SQL
You can get some debug information by SQL command. First run the command below to enable the trace:
-- on 4.x
set ob_enable_show_trace=1;
And then run a SQL command, such as:
select * from t, t1 where t.id=t1.id;
After that, you can run the command below to get the trace information:
show trace;
You may got this:
obclient> show trace;
+-------------------------------------------+----------------------------+------------+
| Operation                                 | StartTime                  | ElapseTime |
+-------------------------------------------+----------------------------+------------+
| com_query_process                         | 2023-07-06 15:30:49.907532 | 9.547 ms   |
| └── mpquery_single_stmt                   | 2023-07-06 15:30:49.907552 | 9.506 ms   |
|     ├── sql_compile                       | 2023-07-06 15:30:49.907615 | 6.605 ms   |
|     │   ├── pc_get_plan                   | 2023-07-06 15:30:49.907658 | 0.024 ms   |
|     │   └── hard_parse                    | 2023-07-06 15:30:49.907763 | 6.421 ms   |
|     │       ├── parse                     | 2023-07-06 15:30:49.907773 | 0.119 ms   |
|     │       ├── resolve                   | 2023-07-06 15:30:49.907952 | 0.780 ms   |
|     │       ├── rewrite                   | 2023-07-06 15:30:49.908857 | 1.320 ms   |
|     │       ├── optimize                  | 2023-07-06 15:30:49.910209 | 3.002 ms   |
|     │       ├── code_generate             | 2023-07-06 15:30:49.913243 | 0.459 ms   |
|     │       └── pc_add_plan               | 2023-07-06 15:30:49.914016 | 0.140 ms   |
|     └── sql_execute                       | 2023-07-06 15:30:49.914239 | 2.675 ms   |
|         ├── open                          | 2023-07-06 15:30:49.914246 | 0.217 ms   |
|         ├── response_result               | 2023-07-06 15:30:49.914496 | 1.956 ms   |
|         │   └── do_local_das_task         | 2023-07-06 15:30:49.914584 | 0.862 ms   |
|         └── close                         | 2023-07-06 15:30:49.916474 | 0.415 ms   |
|             ├── close_das_task            | 2023-07-06 15:30:49.916486 | 0.037 ms   |
|             └── end_transaction           | 2023-07-06 15:30:49.916796 | 0.064 ms   |
+-------------------------------------------+----------------------------+------------+
18 rows in set (0.01 sec)
Debug Sync
If you use gdb to debug OceanBase, it maybe cannot work normally because gdb will hang the process and OceanBase depends on the heartbeat to work normally. So we provide a debug sync mechanism to solve this problem.
The specific thread of OceanBase process will hang on the point if you add a debug sync point in the code, and then you can do something to debug the process, such as attach the process by gdb, or execute some SQL commands to get some information.
Debug Sync can work on release mode, so it is enabled on production environment.
How to use
Add a debug sync definition in the code
You can open the file ob_debug_sync_point.h and append your debug sync definition in the macro OB_DEBUG_SYNC_POINT_DEF. For example:
#define OB_DEBUG_SYNC_POINT_DEF(ACT)                               \
    ACT(INVALID_DEBUG_SYNC_POINT, = 0)                             \
    ACT(NOW,)                                                      \
    ACT(MAJOR_FREEZE_BEFORE_SYS_COORDINATE_COMMIT,)                \
    ACT(BEFORE_REBALANCE_TASK_EXECUTE,)                            \
    ACT(REBALANCE_TASK_MGR_BEFORE_EXECUTE_OVER,)                   \
    ACT(UNIT_BALANCE_BEFORE_PARTITION_BALANCE,)
Add a debug sync point in the code
If you want debug some functions, then add your debug sync point there. For example:
int ObRootService::do_restart()
{
  int ret = OB_SUCCESS;

  const int64_t tenant_id = OB_SYS_TENANT_ID;
  SpinWLockGuard rs_list_guard(broadcast_rs_list_lock_);
  ...
  DEBUG_SYNC(BEFORE_UNIT_MANAGER_LOAD);
  ...
}
You can put the same debug sync point anywhere you want.
Enable Debug Sync
Debug sync is disabled by default, you can enable it by the SQL command below:
alter system set debug_sync_timeout='100000s';
The debug sync will be enabled if debug_sync_timeout larger than 0.
NOTE: the unit of
debug_sync_timeoutis microsecond.
Enable your debug sync point
You can enable your debug sync point by the SQL command below:
set ob_global_debug_sync = 'BEFORE_UNIT_MANAGER_LOAD wait_for signal_name execute 10000';
execute means the debug sync action will be disabled after 10000 execution.
signal_name is the name to wakeup.
The specific thread will hang on the debug sync point when it executes the debug sync point and then you can do something to debug the process.
Signal the debug sync point
You can signal the debug sync point by the SQL command below:
set ob_global_debug_sync = 'now signal signal_name';
-- or
set ob_global_debug_sync = 'now broadcast signal_name';
signal_name is the name you set when you enable the debug sync point.
And then the specific thread will continue to execute.
Clear your debug sync point
You should clear your debug sync point after you debug the process, you can clear it by the SQL command below:
set ob_global_debug_sync = 'BEFORE_UNIT_MANAGER_LOAD clear';
Disable debug sync
You can disable debug sync by the SQL command below:
alter system set debug_sync_timeout=0;
How debug sync works
The process will use condition_variable to wait for the signal when it executes the debug sync point, and then it will hang on the debug sync point. The process will continue to execute after it receives the signal.
If you want to know more about the debug sync mechanism, you can refer to the code in ob_debug_sync.cpp/.h.
OceanBase System Log Introduction
Introduction
This document mainly introduces the system logs of Oceanbase, including the classification and level of the log, how to output logs in the program, and the details of some log implementation.
System Log Introduction
Similar to common application systems, system logs are one of the important means for Oceanbase developers to investigate problems. Oceanbase's system log is stored under the log directory under the observer installation path. The system log is mainly divided into two categories:
-
Ordinary logs: with ".log" suffix, printed all logs (including warning logs) of a certain module.
-
Warning log: with ".log.wf" suffix, only printed the warn level of a module and above.
| log file name | record information |
|---|---|
| observer.log[.wf] | General logs (warning logs, general query logs, other logs) |
| rootservice.log[.wf] | rootservice module log (including global DDL log) |
| election.log[.wf] | Election related logs |
| trace.log | Full link tracking log |
Especially, trace.log does not have the corresponding ".wf" log.
In addition to output ordinary logs, wf logs also have a special info log, that is, every time the log file is created, some current systems and processes information will be recorded.
Log Parameters
There are 7 parameters related to syslog, which are dynamically effective, that is, it can be adjusted dynamically during runtime.
| Configuration Item | Type | Range | Default Value | Describtion |
|---|---|---|---|---|
| enable_syslog_recycle | Boolean | False | Whether to recycle the old log files | |
| enable_syslog_wf | Boolean | True | Whether to print the WARN log level and above to a separate WF file | |
| enable_async_syslog | Boolean | True | Whether to print the log asynchronous | |
| max_syslog_file_count | Integer | [0, +∞) | 0 | The maximum number of each log file |
| syslog_io_bandwidth_limit | String | 0, Other legal size | "30MB" | Log IO bandwidth limit |
| syslog_level | String | DEBUG, TRACE, WDIAG, EDIAG, INFO, WARN, ERROR | WDIAG | Log level |
| diag_syslog_per_error_limit | Integer | [0, +∞) | 200 | The maximum number of each error code of DIAG system log per second. |
All the parameters here are cluster-level and dynamic effect. Refer to ob_parameter_seed.ipp file for more details.
Log File Recycle
OceanBase's log can be configured with the upper limit of the number of files to prevent the log file from occupying too much disk space.
If enable_syslog_recycle = true and max_syslog_file_count > 0, the number of each type log files can not exceed max_syslog_file_count. OceanBase will detect and delete old log files periodically.
The new log files will print a special log at the beginning. The information contains the IP and ports of the current node, version number, and some system information. Refer to ObLogger::log_new_file_info for more details.
[2023-12-26 13:15:58.612579] INFO New syslog file info: [address: "127.0.0.1:2882", observer version: OceanBase_CE 4.2.1.1, revision: 101010012023111012-2f6924cd5a576f09d6e7f212fac83f1a15ff531a, sysname: Linux, os release: 3.10.0-327.ali2019.alios7.x86_64, machine: x86_64, tz GMT offset: 08:00]
Log Level
Similar to the common system, Oceanbase also provides log macro to print different levels of logs:
| Level | Macro | Describtion |
|---|---|---|
| DEBUG | LOG_DEBUG | Developers debug logs |
| TRACE | LOG_TRACE | Incident tracking logs are usually viewed by developers |
| INFO | LOG_INFO | System state change log |
| WARN | LOG_DBA_WARN | For DBA. observer can provide services, but the behavior not meet expectations |
| ERROR | LOG_DBA_ERROR | For DBA. observer cannot provide services, such as the disk full of monitoring ports occupied. Need DBA intervention to restore service |
| WDIAG | LOG_WARN | Warning Diagnosis. Assisting the diagnostic information of fault investigation, and the errors in the expected expectations, if the function returns failure. The level is the same as WARN |
| EDIAG | LOG_ERROR | Error Diagnosis. Assisting the diagnostic information of faulty investigation, unexpected logical errors, such as the function parameters do not meet the expected, are usually Oceanbase program bugs. The level is the same as ERROR |
Only the most commonly used log levels are introduced here. For more detailed information, please refer to the configuration of syslog_level in
ob_parameter_seed.ipp, and macro definitions such asLOG_ERRORin theob_log_module.hfile.
How to set up log level?
There are three ways to adjust the log level:
- When the OceanBase process starts, it reads the log level config from configuration file or command line parameters. The configuration item name is
syslog_level; - After startup, you can also connect through the MySQL client and execute the SQL command
alter system set syslog_level='DEBUG'; - Modify the log level when the request is executed through the SQL Hint. For example
select /*+ log_level("ERROR") */ * from foo;. This method is only effective for the current SQL request related logs.
You can refer to the code of dynamic modification log settings ObReloadConfig::reload_ob_logger_set。
if (OB_FAIL(OB_LOGGER.parse_set(conf_->syslog_level,
                                    static_cast<int32_t>(STRLEN(conf_->syslog_level)),
                                    (conf_->syslog_level).version()))) {
      OB_LOG(ERROR, "fail to parse_set syslog_level",
             K(conf_->syslog_level.str()), K((conf_->syslog_level).version()), K(ret));
How to Print Logs
Common systems use C ++ Stream mode or C fprintf style printing log, but Oceanbase is slightly different. Let's start with the example to see how to print logs.
An Example of Printing Log
Unlike fprintf, Oceanbase's system log does not have a format string, but only "info" parameter, and each parameter information. For example:
LOG_INFO("start stmt", K(ret),
             K(auto_commit),
             K(session_id),
             K(snapshot),
             K(savepoint),
             KPC(tx_desc),
             K(plan_type),
             K(stmt_type),
             K(has_for_update),
             K(query_start_time),
             K(use_das),
             K(nested_level),
             KPC(session),
             K(plan),
             "consistency_level_in_plan_ctx", plan_ctx->get_consistency_level(),
             K(trans_result));
Among the example, "start stmt" is the INFO information, and we uses the K macro to print objects.
Log Field Introduction
A output of the example code above:
[2023-12-11 18:00:55.711877] INFO  [SQL.EXE] start_stmt (ob_sql_trans_control.cpp:619)
[99178][T1004_TeRec][T1003][YD9F97F000001-00060C36119D4757-0-0] [lt=15]
start stmt(ret=0, auto_commit=true, session_id=1,
snapshot={this:0x7f3184fca0e8, valid:true, source:2,
core:{version:{val:1702288855549635029, v:0}, tx_id:{txid:167035},
scn:1702288855704049}, uncertain_bound:0, snapshot_lsid:{id:1},
snapshot_ls_role:0, parts:[{left:{id:1}, right:491146514786417}]},
savepoint=1702288855704049, tx_desc={this:0x7f31df697420,
tx_id:{txid:167035}, state:2, addr:"127.0.0.1:55801", tenant_id:1003,
session_id:1, assoc_session_id:1, xid:NULL, xa_mode:"",
xa_start_addr:"0.0.0.0:0", access_mode:0, tx_consistency_type:0,
isolation:1, snapshot_version:{val:18446744073709551615, v:3},
snapshot_scn:0, active_scn:1702288855704040, op_sn:6, alloc_ts:1702288855706134,
active_ts:1702288855706134, commit_ts:-1, finish_ts:-1, timeout_us:29999942,
lock_timeout_us:-1, expire_ts:1702288885706076, coord_id:{id:-1},
parts:[{id:{id:1}, addr:"127.0.0.1:55801", epoch:491146514786417,
first_scn:1702288855704043, last_scn:1702288855704048, last_touch_ts:1702288855704044}],
exec_info_reap_ts:1702288855704043, commit_version:{val:18446744073709551615, v:3},
commit_times:0, commit_cb:null, cluster_id:1, cluster_version:17180065792,
flags_.SHADOW:false, flags_.INTERRUPTED:false, flags_.BLOCK:false,
flags_.REPLICA:false, can_elr:true, cflict_txs:[], abort_cause:0,
commit_expire_ts:0, commit_task_.is_registered():false, ref:2},
plan_type=1, stmt_type=5, has_for_update=false, query_start_time=1702288855711692,
use_das=false, nested_level=0, session={this:0x7f31de2521a0, id:1,
deser:false, tenant:"sys", tenant_id:1, effective_tenant:"sys",
effective_tenant_id:1003, database:"oceanbase", user:"root@%",
consistency_level:3, session_state:0, autocommit:true, tx:0x7f31df697420},
plan=0x7f31565ba050, consistency_level_in_plan_ctx=3,
trans_result={incomplete:false, parts:[], touched_ls_list:[],
cflict_txs:[]})
NOTE: The log output is wrapped for readability.
A log mainly contains the following parts:
| field | example | description |
|---|---|---|
| time | [2023-12-11 18:00:55.711877] | The time of printing this log |
| level | INFO | The log level |
| module | [SQL.EXE] | The module printing the log |
| function name | start_stmt | The function printing the log |
| code location | (ob_sql_trans_control.cpp:619) | The location of code, including file name and line |
| thread identifier | [99178][T1004_TeRec] | The thread ID and name |
| tenant id | [T1003] | The tenant ID |
| Trace ID | [YD9F97F000001-00060C36119D4757-0-0] | The global ID of a specific request. You can usually get all logs related one request according the trace ID |
| The cost of printing log | [lt=15] | The cost in microsecond of printing last log |
| information | start stmt(...) | The log information |
Commonly Used Log Parameters Macro Introduction
For developers, we only need to care about how to output our object information. Usually we write K(obj) to output the information we want in the log. Below are some details。
In order to avoid some errors in format string, OceanBase uses automatic recognition of types and then serialization to solve this problem. Any parameter in the log will be identified as multiple Key Value pairs, where Key is the name of the field to be printed and Value is the value of the field. For example, "consistency_level_in_plan_ctx", plan_ctx->get_consistency_level() in the above example prints the name and value of a field. OceanBase automatically recognizes the type of Value and converts it to a string. The final output in the log may be "consistency_level_in_plan_ctx=3".
Because most logs print the original name and value of the specified object, OceanBase provides some macros to simplify the operation of printing logs. The most commonly used one is K. Taking the above example K(ret), its expansion in the code is:
"ret", ret
The final information in the log is:
ret=-5595
OceanBase also provides some other macros, which are used in different scenarios.
Log parameter macro definitions can be found in the
ob_log_module.hfile.
| macro | example | description |
|---|---|---|
| K | K(ret) | After expansion, it is "ret", ret. The parameter can be a simple value or an ordinary object |
| K_ | K_(consistency_level) | After expansion, it is "consistency_level", consistency_level_. Different from K, the _ suffix will be automatically added after the expanded Value, which is used for printing class member variables. |
| KR | KR(ret) | After expansion, it is "ret", ret, "ret", common::ob_error_name(ret). This macro is for the convenience of printing error code and error code name. In OceanBase, ret is usually used as the return value of a function, and each return value has a corresponding string description. ob_error_name can get the string description corresponding to the error code. Note that this macro can only be used in non-lib code |
| KCSTRING/ KCSTRING_ | KCSTRING(consistency_level_name) | After expansion, it is "consistency_level_name", consistency_level_name. This macro is used to print C-formatted strings. Since a variable of type const char * does not necessarily represent a string in C++, such as a binary buffer, when printing the value of this variable, if it is printed as a C string, an illegal memory access error will occur, so this macro has been added to explicitly print C strings |
| KP/KP_ | KP(plan) | After expansion, it is "plan", plan, where plan is a pointer. This macro will print out the hexadecimal value of a pointer |
| KPC/KPC_ | KPC(session) | The input parameters are object pointers. If it is NULL, "NULL" will be output. Otherwise, the to_string method of the pointer will be called to output the string. |
| KTIME | KTIME(cur_time) | Convert timestamp converted to string. Timestamp unit microseconds |
| KTIMERANGE/ KTIMERANGE_ | KTIMERANGE(cur_time, HOUR, SECOND) | Convert the timestamp to a string and only obtain the specified range, such as the hour to second period in the example |
| KPHEX/KPHEX_ | KPHEX(buf, 20) | Print buf content in hexadecimal |
| KERRMSG | KERRMSG | Output system error code information |
| KERRNOMSG | KERRNOMSG(2) | Specify error code to output system error information |
Some Implementation Details in the Log
How to Convert Value to String
OceanBase automatically identifies the type of value you want to print in the log and converts it to a string. For example, in the above example, ret is an int type variable, and plan_ctx->get_consistency_level() returns an enum type variable. Both variables will be converted to strings.
However, since OceanBase does not know how to convert an ordinary object into a string, the user needs to implement a TO_STRING_KV function to convert the object into a string. For example, in the above example, snapshot is an object of type ObTxReadSnapshot. This object implements the TO_STRING_KV function, so it can be printed directly.
Convert normal value to string
OceanBase can automatically identify simple type values, such as int, int64_t, double, bool, const char *, etc., and convert them into strings. For enumeration types, they will be treated as numbers. For pointers, the pointer value will be output in hexadecimal format.
Convert class object to string
Since C++ does not have a reflection mechanism, it cannot automatically identify the member variables of a class object and convert them into strings. Therefore, the user needs to implement a TO_STRING_KV function to convert the object into a string. For example, in the above example, snapshot is an object of type ObTxReadSnapshot. This object implements the TO_STRING_KV function. You can refer to the implementation code as follows:
class ObTxReadSnapshot {
   ...
   TO_STRING_KV(KP(this),
               K_(valid),
               K_(source),
               K_(core),
               K_(uncertain_bound),
               K_(snapshot_lsid),
               K_(parts));
};
As you can see, in TO_STRING_KV, you can directly use a macro similar to printing logs to "list" the member variable names you want to output.
NOTE: TO_STRING_KV is actually a macro definition. For specific implementation, please refer to
ob_print_utils.h. TO_STRING_KV converts input parameters into strings and outputs them to a buffer.
Log Module
OceanBase's logs are module-specific and can support sub-modules. For example, in the above example, [SQL.EXE] is a module, SQL is a main module, and EXE is a submodule. For the definition of the log module, please refer to the LOG_MOD_BEGIN and DEFINE_LOG_SUB_MOD related codes in the ob_log_module.h file.
How does the log module output to the log?
Normally, we just use macros like LOG_WARN to print logs, and different modules will be output, which is also achieved through macro definitions. Still taking the above log as an example, you can see a macro definition #define USING_LOG_PREFIX SQL_EXE at the beginning of the ob_sql_trans_control.cpp file. This macro defines the log module of the current file, that is, all logs in the current file the module [SQL.EXE] will be printed.
There is also an issue here, that is, the header file introduced in the current implementation file will also use this module to print logs by default.
How to specify module name explicitly?
The above method is indeed a bit inflexible. OceanBase has another way to specify the module name, which is to use the macro OB_MOD_LOG or OB_SUB_MOD_LOG. The usage of these two macros is similar to LOG_WARN, except that there are additional module parameters and log levels:
OB_MOD_LOG(parMod, level, info_string, args...)
OB_SUB_MOD_LOG(parMod, subMod, level, info_string, args...)
Set the module's log level
In addition to setting the global and current thread log levels, OceanBase can also adjust the log level of a certain module. Currently, you can use SQL HINT to modify the log level of a module when executing a request, for example:
select /*+ log_level("SHARE.SCHEMA:ERROR") */ * from foo;
Where SHARE is the main module, SCHEMA is the submodule, and ERROR is the log level. The function of this SQL HINT is to set the log level of the SHARE.SCHEMA module to ERROR, and is only valid for the current request.
Log Time
OceanBase's log time is the number of microseconds in the current local time.
Since converting a timestamp into a string is a time-consuming task, OceanBase caches the timestamp conversion to speed up the process. For details, please refer to the ob_fast_localtime function.
Thread Identifier
Currently, two information related to thread will be recorded:
- Thread ID: the information returned by the system call
__NR_gettid(the system call is relatively inefficient, and this value will be cached); - Thread name: The thread name field may contain the tenant ID, thread pool type, and thread pool index. The thread name of OceanBase is set through the
set_thread_namefunction and will also be displayed in thetopcommand.
NOTE:The thread name is determined by the created thread. Since the tenant of the created thread may be different from the tenant of subsequent runs of this thread, the tenant in the thread name may be incorrect.
Log Rate Limit
OceanBase supports two log rate limits: a common system log disk IO bandwidth limit and a WDIAG system log limit.
System log bandwidth rate limit
OceanBase will limit log output according to disk bandwidth. The log bandwidth rate limit does not limit the rate for different log levels. If the log rate is limited, the rate limit log may be printed with the keyword REACH SYSLOG RATE LIMIT.
Rate limit log example:
[2023-12-26 09:46:04.621435] INFO [SHARE.LOCATION] fetch_vtable_location_ (ob_vtable_location_service.cpp:281) [35675][VTblLocAsyncUp0][T0][YB427F000001-00060D52A9614571-0-0] [lt=0] REACH SYSLOG RATE LIMIT [bandwidth]
The rate limit can be adjusted through the configuration item syslog_io_bandwidth_limit.
Please refer to the check_tl_log_limiter function for rate limiting code details.
WDIAG log rate limit
OceanBase has implemented a current limit for WARN level logs. Each error code is limited to 200 logs per second by default. If the limit is exceeded, the current limiting log will be output, keyword Throttled WDIAG logs in last second. The current limiting threshold can be adjusted through the configuration item diag_syslog_per_error_limit.
Limiting log example:
[2023-12-25 18:01:15.527519] WDIAG [SHARE] refresh (ob_task_define.cpp:402) [35585][LogLimiterRefre][T0][Y0-0000000000000000-0-0] [lt=8][errcode=0] Throttled WDIAG logs in last second(details {error code, dropped logs, earliest tid}=[{errcode:-4006, dropped:31438, tid:35585}])
Limiting code reference ObSyslogPerErrLimiter::do_acquire。
Some Other Details
Logs for DBA
There are also two types of special logs in OceanBase, LOG_DBA_WARN and LOG_DBA_ERROR, which correspond to WARN and ERROR logs respectively. Since the volume of OceanBase logs is extremely large, and most of them can only be understood by R&D personnel, it brings a certain burden to DBA operation and maintenance troubleshooting problems. Therefore, these two types of logs are added, hoping that the DBA can only focus on a small amount of these two types of logs to troubleshoot system problems. The logs output using LOG_WARN and LOG_ERROR are converted into WDIAG and EDIAG logs to help developers troubleshoot problems.
Output Prompt Information to the User Terminal
Sometimes we want to output the error message directly to the user's terminal, so that it can be more convenient for users to understand what error is currently occurring. At this time we can use LOG_USER_ERROR, LOG_USER_WARN, LOG_USER_INFO and other macros to print logs. Each error code has a corresponding USER_ERROR_MSG. If this USER_ERROR_MSG requires input parameters, then we also need to provide the corresponding parameters when printing the log. For example, the error code OB_NOT_SINGLE_RESOURCE_POOL has the corresponding OB_NOT_SINGLE_RESOURCE_POOL__USER_ERROR_MSG, and it's message is "create tenant only support single resource pool now, but pool list is %s", we just need to provide a string.
The LOG_USER_ERROR macro is defined as follows:
#define LOG_USER_ERROR(errcode, args...)
The usage of other macros is similar.
Error code definitions can be found in
src/share/ob_errno.h.
Since LOG_USER_XXX provides fixed error information, if we want to output some customized information, we can use FORWARD_USER_XXX, such as FORWARD_USER_ERROR, FORWARD_USER_WARN, etc. Taking FORWARD_USER_ERROR as an example, its definition is as follows:
#define FORWARD_USER_ERROR(errcode, args...)
Health Log
OceanBase will periodically output some internal status information, such as the memory information of each module and tenant, to the log to facilitate problem finding. This kind of log usually outputs multiple lines of data in one log, such as:
[2023-12-26 13:15:58.608131] INFO  [LIB] print_usage (ob_tenant_ctx_allocator.cpp:176) [35582][MemDumpTimer][T0][Y0-0000000000000000-0-0] [lt=116]
[MEMORY] tenant_id=  500 ctx_id=                    GLIBC hold=      4,194,304 used=      1,209,328 limit= 9,223,372,036,854,775,807
[MEMORY] idle_size=         0 free_size=         0
[MEMORY] wash_related_chunks=         0 washed_blocks=         0 washed_size=         0
[MEMORY] hold=        858,240 used=        575,033 count=   3,043 avg_used=            188 block_cnt=      93 chunk_cnt=       2 mod=glibc_malloc
[MEMORY] hold=        351,088 used=        104,389 count=   3,290 avg_used=             31 block_cnt=      51 chunk_cnt=       1 mod=Buffer
[MEMORY] hold=      1,209,328 used=        679,422 count=   6,333 avg_used=            107 mod=SUMMARY
This kind of data can be helpful for finding historical issues.
ERROR Log
For general errors that occur in the system, such as an exception when processing a certain request, logs will be output at WARN level. Only when the normal operation of the OceanBase process is affected, or if there is a serious problem, the log will be output at the ERROR level. Therefore, if a process exits abnormally or cannot be started, searching the ERROR log will more effectively find the cause of the problem.
Introduction
Memory management is one of the most important modules in any large C++ project. Since OceanBase also needs to deal with the issue of multi-tenant memory resource isolation, OceanBase's memory management is more complicated than ordinary C++ projects. Generally, a good memory management module needs to consider the following issues:
- Easy to use. The designed interface must be understood and used by the container, otherwise the code will be difficult to read and maintain, and memory errors will be more likely to occur;
- Efficient. An efficient memory allocator has a crucial impact on performance, especially in high-concurrency scenarios;
- Diagnosis. As the amount of code increases, bugs are inevitable. Common memory errors, such as memory leaks, memory out-of-bounds, wild pointers and other problems cause headaches for development and operation and maintenance. How to write a function that can help us avoid or troubleshoot these problems is also an important indicator to measure the quality of the memory management module.
For the multi-tenant model, the impact of memory management design mainly includes the following aspects:
- Transparent interface design. How to make developers have no awareness or little need to care about the memory management of different tenants;
- Efficient and accurate. Sufficient memory must be applied successfully, and tenant memory exhaustion must be detected in time, which is the most basic condition for multi-tenant memory management.
This article will introduce the commonly used memory allocation interfaces and memory management related idioms in OceanBase. For technical details of memory management, please refer to Memory Management( In Chinese).
Common Interfaces and Methods of OceanBase Memory Management
OceanBase provides different memory allocators for different scenarios. In addition, in order to improve program execution efficiency, there are some conventional implementations, such as reset/reuse, etc.
ob_malloc
OceanBase has developed a set of libc-style interface functions ob_malloc/ob_free/ob_realloc. This set of interfaces will dynamically apply for memory blocks of size based on tenant_id, ctx_id, label and other attributes, and mark the memory blocks to determine ownership. This not only facilitates multi-tenant resource management, but is also very helpful in diagnosing memory problems. ob_malloc will index to the corresponding ObTenantCtxAllocator based on tenant_id and ctx_id, and ObTenantCtxAllocator will allocate memory according to the current tenant context.
ob_free uses offset operation to find the object allocator corresponding to the memory to be released, and then returns the memory to the memory pool.
ob_realloc is different from libc's realloc. It does not expand the original address, but first copies the data to another memory through ob_malloc+memcpy, and then calls ob_free to release the original memory.
inline void *ob_malloc(const int64_t nbyte, const ObMemAttr &attr = default_memattr);
inline void ob_free(void *ptr);
inline void *ob_realloc(void *ptr, const int64_t nbyte, const ObMemAttr &attr);
OB_NEW/OB_NEWx
Similar to ob_malloc, OB_NEW provides a set of "C++" interfaces that call the object's constructor and destructor when allocating and releasing memory.
/// T is the type, label is the memory label and it can be a const string
#define OB_NEW(T, label, ...)
#define OB_NEW_ALIGN32(T, label, ...)
#define OB_DELETE(T, label, ptr)
#define OB_DELETE_ALIGN32(T, label, ptr)

/// T is the type, pool is the memory pool allocator
#define OB_NEWx(T, pool, ...)
There is no OB_DELETEx, but you can release the memory by yourself.
ObArenaAllocator
The design feature is to allocate release multiple times and only release once. Only reset or destruction can truly release the memory. The memory allocated before will not have any effect even if free is actively called.
ObArenaAllocator is suitable for scenarios where many small memory allocates are released in a short period of time. For example, in a SQL request, many small block memories will be frequently allocated, and the life cycle of these small memories will last for the entire request period. Usually, the processing time of an SQL request is also very short. This memory allocation method is very effective for small memory and avoiding memory leaks. In OceanBase's code, don't be surprised if you see there is only apply for memory but cannot find a place to release it.
Code reference
page_arena.h
ObMemAttr Introduction
OceanBase uses ObMemAttr to mark a section of memory.
struct ObMemAttr
{
  uint64_t    tenant_id_;  // tenant
  ObLabel     label_;      // label or module
  uint64_t    ctx_id_;     // refer to ob_mod_define.h, each ctx id is corresponding to a ObTenantCtxAllocator
  uint64_t    sub_ctx_id_; // please ignore it
  ObAllocPrio prio_;       // priority
};
reference file alloc_struct.h
tenant_id
Memory allocation management perform resource statistics and restrictions based on tenant maintenance.
label
At the beginning, OceanBase uses a predefined method to create memory labels for each module. However, as the amount of code increases, the method of predefined labels is not suitable. Currently, ObLabel is constructed directly using constant strings. When using ob_malloc, you can also directly pass in a constant string as the ObLabel parameter, such as buf = ob_malloc(disk_addr.size_, "ReadBuf");.
ctx_id
ctx id is predefined, please refer to alloc_struct.h. Each ctx_id of each tenant will create an ObTenantCtxAllocator object, which can separately count the related memory allocation usage. Normally use DEFAULT_CTX_ID as ctx id. For some special modules, for example, if we want to more conveniently observe memory usage or troubleshoot problems, we define special ctx ids for them, such as libeasy communication library (LIBEASY) and Plan Cache cache usage (PLAN_CACHE_CTX_ID). We can see periodic memory statistics in log files, such as:
[2024-01-02 20:05:50.375549] INFO  [LIB] operator() (ob_malloc_allocator.cpp:537) [47814][MemDumpTimer][T0][Y0-0000000000000000-0-0] [lt=10] [MEMORY] tenant: 500, limit: 9,223,372,036,854,775,807 hold: 800,768,000 rpc_hold: 0 cache_hold: 0 cache_used: 0 cache_item_count: 0
[MEMORY] ctx_id=           DEFAULT_CTX_ID hold_bytes=    270,385,152 limit=             2,147,483,648
[MEMORY] ctx_id=                    GLIBC hold_bytes=      8,388,608 limit= 9,223,372,036,854,775,807
[MEMORY] ctx_id=                 CO_STACK hold_bytes=    106,954,752 limit= 9,223,372,036,854,775,807
[MEMORY] ctx_id=                  LIBEASY hold_bytes=      4,194,304 limit= 9,223,372,036,854,775,807
[MEMORY] ctx_id=            LOGGER_CTX_ID hold_bytes=     12,582,912 limit= 9,223,372,036,854,775,807
[MEMORY] ctx_id=                  PKT_NIO hold_bytes=     17,969,152 limit= 9,223,372,036,854,775,807
[MEMORY] ctx_id=           SCHEMA_SERVICE hold_bytes=    135,024,640 limit= 9,223,372,036,854,775,807
[MEMORY] ctx_id=        UNEXPECTED_IN_500 hold_bytes=    245,268,480 limit= 9,223,372,036,854,775,807
prio
Currently, two memory allocation priorities are supported, Normal and High. The default is Normal. For definition, please refer to the enum ObAllocPrio in file alloc_struct.h. High priority memory can allocate memory from urgent (memory_reserved) memory, otherwise it cannot. Refer to AChunkMgr::update_hold implementation.
You can use the configuration item
memory_reservedto view the reserved memory size.
init/destroy/reset/reuse
Caching is one of the important methods to improve program performance. Object reuse is also a way of caching. On the one hand, it reduces the frequency of memory allocate and release, and on the other hand, it can reduce some construction and destruction overhead. There is a lot of object reuse in OceanBase, and some conventions have been formed, such as the reset and reuse functions.
reset
Used to reset objects. Restore the object's state to the state after the constructor or init function was executed. For example ObNewRow::reset.
reuse
Compared with reset, it is more lightweight. Try not to release some expensive resources, such as PageArena::reuse.
init/destroy
There are two other common interfaces in OceanBase: init and destroy. init is used to initizalize object and destory to release resources. Only do some very lightweight initialization work in the constructor, such as initializing the pointer to nullptr.
SMART_VAR/HEAP_VAR
SMART_VAR is an auxiliary interface for defining local variables. Variables using this interface are always allocated from the stack first. When the stack memory is insufficient, they will be allocated from the heap. For those large local variables (>8K) that are not easy to optimize, this interface not only ensures the performance of regular scenarios, but also safely reduces the stack capacity. The interface is defined as follows:
SMART_VAR(Type, Name, Args...) {
  // do...
}
It allocate from the stack when the following conditions are met, otherwise allocate from the heap
sizeof(T) < 8K || (stack_used < 256K && stack_free > sizeof(T) + 64K)
SMART_VAR was created to solve historical problems. It try to reduce the amount of stack memory occupied by large memory objects.
HEAP_VAR is similar to SMART_VAR, except that it must allocate memory on the heap.
SMART_CALL
SMART_CALL is used to "quasi-transparently" resolve recursive function calls that may explode the stack on threads with very small stacks. This interface accepts a function call as a parameter. It will automatically check the current stack usage before calling the function. Once it is found that the available stack space is insufficient, a new stack execution function will be created on this thread immediately. After the function ends, it will continue to return to the original stack. This ensures performance when the stack is sufficient, and can also avoid stack explosion scenarios.
SMART_CALL(func(args...))
Notice:
- The return value of func must be an int type representing the error code.
- SMART_CALL will return an error code. This may be an internal mechanism or a func call.
- It supports stack cascade expansion, each time a 2M stack is expanded (there is a hard-coded total upper limit of 10M)
Compared with direct calling, SMART_CALL only call check_stack_overflow to check stack.
Introduction
C++ STL provides many convenient containers, such as vector, map, unordered_map, etc. Due to OceanBase programming style and memory control, the use of STL containers is prohibited in OceanBase. OceanBase provides some container implementations, including arrays, linked lists, HashMap, etc. This document will introduce some of these containers.
This document assumes that you already have a certain understanding of C++ STL containers.
pair does not belong to the container, so it can be used in OceanBase.
Due to historical reasons, OceanBase contains some container code that is no longer recommended but has not been deleted.
String
The string class provided by OceanBase is ObString. Code reference ob_string.h.
Before introducing ObString's interface, let's first look at ObSring's memory management method, which will make it easier to understand ObString's interface design.
There are two biggest differences from STL string:
- ObString does not manage memory, memory is transferred from the outside, and the life cycle of the memory buffer is also controlled externally;
- ObString does not end with '\0'.
This is also an important point to pay attention to when using ObString.
The memory of ObString is passed in from the outside, and three member variables are stored internally:
   char *ptr_;                /// memory pointer
   obstr_size_t buffer_size_; /// Memory buffer length
   obstr_size_t data_length_; /// Valid data length
obstr_size_t is used in ObString to represent the length, and its type is int32_t
Refer to the current memory maintenance mode of ObString and the commonly used interfaces for strings. The commonly used interfaces of ObString are as follows:
/**
  * Constructor
  *
  * Construct the buffer data and effective data length of the string
  *
  * There are also some derived constructors, such as omitting the buffer length
  * (the buffer length is consistent with the data length)
  */
ObString(const obstr_size_t size, const obstr_size_t length, char *ptr);

/**
 * an empty string?
 */
bool empty() const;

/**
 * Reassign a new buffer/string
 */
void assign_buffer(char *buffer, const obstr_size_t size);

/**
 * The length of the valid data, or the length of the string
 */
obstr_size_t length() const;

/**
 * The length of the memory buffer
 */
obstr_size_t size() const;

/**
 * Data pointer
 */
const char *ptr() const;

/**
 * Case insensitively comparison
 *
 * @NOTE: Although ObString does not specify that it ends with '\0',
 * strncasecmp is used in the implementation here, so please pay attention
 * when using this function.
 */
int case_compare(const ObString &obstr) const;
int case_compare(const char *str) const;

/**
 * Case-sensitive comparison
 *
 * @NOTE: Compared with case_compare, strncmp is not used here,
 * but memcmp is used to compare the buffer length.
 */
int compare(const ObString &obstr) const;
int32_t compare(const char *str) const;
ObString also has some other interfaces, just browse the ob_string.h code if needed.
Array
OceanBase's array interface design is similar to STL vector, but it is more in line with OceanBase's style. For example, the interface will have an int return value indicating success or failure of execution. OceanBase provides multiple arrays with different implementations, but the interfaces they provide are similar.
Commonly used array implementation classes all inherit the same interface ObIArray. Let's take a look at the interface definition first, and then introduce the differences between different array implementations.
ObIArray
There is no memory allocator specified in the interface class of the array.
/**
 * The default constructor
 */
ObIArray();

/**
 * Accept the specified array
 *
 * The interface class will not take over data-related memory.
 * Memory processing depends on the specific implementation class.
 */
ObIArray(T *data, const int64_t count);

/**
 * Similar to vector::push_back, adds an element at the end
 * @return Return OB_SUCCESS when successfully
 */
int push_back(const T &obj);

/**
 * Remove the last element
 * @NOTE It is very likely that the destructor will not be called.
 * You need to look at the specific implementation class.
 */
void pop_back();

/**
 * Remove the last element and copy the last element to obj
 * @return Return OB_SUCCESS when successfully
 */
int pop_back(T &obj);

/**
 * Remove element at specified position
 */
int remove(int64_t idx);

/**
 * Get the element at the specified position
 * @return OB_SUCCESS is returned successfully.
 * If the specified location does not exist, a failure will be returned.
 */
int at(int64_t idx, T &obj);

/**
 * Reset the array. Similar to vector::clear
 */
void reset();

/**
 * Reuse arrays. Depends on the implementation
 */
void reuse();

/**
 * Destroy this array, which has the same effect as calling the destructor
 */
void destroy();

/**
 * Reserve a specified amount of memory space. Does not do object initialization
 */
int reserve(int64_t capacity);

/**
 * Reserve a specified size of memory space, usually the implementation
 * class will execute the object's constructor
 */
int prepare_allocate(int64_t capacity);

/**
 * Copy and destroy current data from another array
 */
int assign(const ObIArray &other);
ObArray
ObArray manages memory by itself. When declaring the ObArray template class, you need to specify an allocator, or use the default allocator ModulePageAllocator. Since OceanBase requires all actions to determine the return value, it is not recommended to use ObArray's operator= and other functions without return values.
Many behaviors of ObArray are similar to STL vectors. Each time the memory is expanded, the behavior is similar. It will expand twice the current data size, but up to block_size_ size. A block_size_ default value is OB_MALLOC_NORMAL_BLOCK_SIZE (think of it as 8K).
Code reference ob_array.h.
ObSEArray
Similar to ObArray, it will be doubled in size when expanded, not exceeding block_size_.
Different from ObArray, ObSEArray has an additional template parameter LOCAL_ARRAY_SIZE, which can accommodate a certain amount of elements without additional memory allocation. Therefore OBSEArray may be able to directly use stack memory instead of heap memory:
char local_data_buf_[LOCAL_ARRAY_SIZE * sizeof(T)];
If there is insufficient subsequent space and needs to be expanded, local_data_buf_ will no longer store valid data but will apply for additional memory. Therefore, we must consider it comprehensively and give a reasonable LOCAL_ARRAY_SIZE to make ObSEArray more efficient.
Reference code ob_se_array.h.
ObFixedArray
As the name suggests, it is a fixed-size array. Once the capacity size is determined, it cannot be changed. Code reference ob_fixed_array.h.
ObVector
ObVector does not belong to the subclass of ObIArray. Its performance and interface design are very similar to ObIArray, so you can use the subclass of ObIArray. If you are interested, please read the source code ob_vector.h and its implementation file ob_vector.ipp.
List
Unlike arrays, linked lists do not have a unified interface. However, the interface design here is also very similar to that in STL. There are two most commonly used linked lists, one is ObList and the other is ObDList.
ObList
ObList is an ordinary circular double linked list, refer to ob_list.h for the code. During construction, the memory allocator needs to be passed in. Commonly used interfaces are as follows.
/**
  * Class statement
  * @param T element type
  * @param Allocator memory allocator
  */
template <class T, class Allocator = ObMalloc>
class ObList;

/**
 * Constructor. You must pass a memory allocator
 */
ObList(Allocator &allocator);

/**
 * Insert the specified element at the end of the linked list
 */
int push_back(const value_type &value);

/**
 * Insert the specified element at the beginning of the linked list
 */
int push_front(const value_type &value);

/**
 * Release the last element
 * @note The destructor of the element is not executed
 */
int pop_back();

/**
 * Both pop_front functions delete the first element.
 * The difference is that one will copy the object and the other will not.
 */
int pop_front(value_type &value);
int pop_front();

/**
 * Inserts the specified element at the specified position
 */
int insert(iterator iter, const value_type &value);

/**
  * Delete the element at the specified position
  * @return Returns deletion success or failure
  */
int erase(iterator iter);

/**
  * Delete the first element with the same value as value
  * @return Success will be returned even if the element is not found
  */
int erase(const value_type &value);

/**
 * Get the first element
 */
T &get_first();
const T &get_first() const;

/**
 * Get the last element
 */
T &get_last();

/**
 * Similar to STL, ObList supports iterator-related interfaces
 */
iterator begin();
const_iterator begin();
iterator end();
const_iterator end() const;

/**
 * Delete all elements
 */
void clear();

/**
 * Determine whether the linked list is empty
 */
bool empty() const;

/**
 * Number of elements
 */
int64_t size() const;
ObDList
Code reference
ob_dlist.h.
ObDList is also a double linked list. Unlike ObList, its element memory layout and memory management method are different. The ObList object is passed in by the user. ObList internally applies for a memory copy object and constructs the front and rear pointers of the linked list nodes. ObDList is an object containing the previous and next node pointers directly passed in by the user. Due to this feature of ObDList, it will be different from the method of using STL list.
ObDList does not manage memory and does not need to manage memory at all. Its template parameters do not have a memory allocator, only one DLinkNode. DLinkNode needs to contain the element objects you need, front and rear node pointers and implement some common operations (with assistance Implement base class), the declaration and some interfaces of ObDList are as follows:
template <typename DLinkNode>
class ObDList;

/// Move all elements on the current linked list to list
int move(ObDList &list);

/// Get the head node (not the first element)
DLinkNode *get_header();
const DLinkNode *get_header() const;

/// Get the last element
DLinkNode *get_last();

/// Get the first element
const DLinkNode *get_first() const;
const DLinkNode *get_first_const() const;

/// Add a node to the tail
bool add_last(DLinkNode *e);

/// Add a node to the head
bool add_first(DLinkNode *e);

/// Add node at specified location
bool add_before(const DLinkNode *pos, DLinkNode *e);

/// Move the specified node to the front
bool move_to_first(DLinkNode *e);
/// Move the specified node to the end
bool move_to_last(DLinkNode *e);

/// Delete the last node
DLinkNode *remove_last();
/// Delete the first node
DLinkNode *remove_first();

/// Delete specified element
DLinkNode *remove(DLinkNode *e);

/// Clear linked list
void clear();

/// Insert another linked list at the beginning of the linked list
void push_range(ObDList<DLinkNode> &range);

/// Delete the specified number of elements from the beginning
/// and place the deleted elements in the range
void pop_range(int32_t num, ObDList<DLinkNode> &range);

/// Whether the linked list is empty
bool is_empty() const
/// Number of elements
int32_t get_size() const
OceanBase provides auxiliary DLinkNode implementations ObDLinkNode and ObDLinkDerived, making it easy to use ObDList simply by using either replication class.
Before introducing these two auxiliary classes, let's take a brief look at a basic auxiliary interface implementation ObDLinkBase, which is the base class of the above two auxiliary classes. It contains the front and rear node pointers required by ObDList and some basic node operations. Both auxiliary classes are implemented by inheriting the base class, and only use different methods.
The first auxiliary class, ObDLinkNode, is declared as follows:
template<typename T>
struct ObDLinkNode: public ObDLinkBase<ObDLinkNode<T> >
Just give your own real linked list element type. The disadvantage is that when getting the linked list elements, you need to use ObDLinkNode::get_data to get your own object, such as
class MyObj;
ObDList<ObDLinkNode<MyObj>> alist;

ObDLinkNode<MyObj> *anode = OB_NEW(ObDLinkNode<MyObj>, ...);
alist.add_last(anode);

ObDLinkNode<MyObj> *nodep = alist.get_first();
MyObj &myobj = nodep->get_data();
// do something with myobj
The second auxiliary class, ObDLinkDerived, is simpler to use than ObDLinkNode. Its declaration is as follows:
template<typename T>
struct ObDLinkDerived: public ObDLinkBase<T>, T
Note that it directly inherits the template class T itself, that is, there is no need to obtain the real object through get_data like ObDLinkNode. You can directly use the method of T and copy the above example:
class MyObj;
ObDList<ObDLinkDerived<MyObj>> alist;

ObDLinkDerived<MyObj> *anode = OB_NEW(ObDLinkDerived<MyObj>, ...);
alist.add_last(anode);

ObDLinkDerived<MyObj> *nodep = alist.get_first();
// MyObj &myobj = nodep->get_data(); // no need any more
// MyObj *myobj = nodep; // nodep is a pointer to MyObj too
// do something with myobj or directly with nodep
Since ObDList does not manage the memory of nodes, you need to be careful when using it particularly. Pay attention to managing the life cycle of each element. Before performing cleanup actions, such as clear and reset, the memory must be released first. The interface declaration of ObDList is very clear, but it is different from the naming convention of STL::list. You can directly refer to the interface declaration in the code ob_dlist.h and use it without listing it.
Map
Map is a commonly used data structure, and its insertion and query efficiency are very high. Normally, there are two implementation methods for Map. One is a balanced search tree, typically a red-black tree. Common compilers use this method to implement it. The other is a hash table, which is unordered_map in STL.
There are many Maps implemented in OceanBase, including the balanced search tree implementation ObRbTree and hash maps suitable for different scenarios, such as ObHashMap, ObLinkHashMap and ObLinearHashMap.
OceanBase implements many types of hash maps, but it is recommended to use the few introduced here unless you have a clear understanding of other implementations.
ObHashMap
The implementation of ObHashMap is in ob_hashmap.h. In order to facilitate the understanding of the implementation of ObHashMap, I will introduce it with reference to STL::unordered_map.
ObHashMap Introduction
In STL, unordered_map is declared as follows:
template<
    class Key,
    class T,
    class Hash = std::hash<Key>,          /// Calculate hash value of Key
    class KeyEqual = std::equal_to<Key>,  /// Determine whether Key is equal
    class Allocator = std::allocator<std::pair<const Key, T>> /// memory allocator
> class unordered_map;
Key in the template parameters is our key, T is the type of our value, Hash is a class or function that calculates the hash value based on the key, KeyEqual is a method to determine whether two key values are equal, and Allocator is an allocator. An object is a pair of keys and values.
The declaration in OceanBase is similar:
template <class _key_type,
          class _value_type,
          class _defendmode = LatchReadWriteDefendMode,
          class _hashfunc = hash_func<_key_type>,
          class _equal = equal_to<_key_type>,
          class _allocer = SimpleAllocer<typename HashMapTypes<_key_type, _value_type>::AllocType>,
          template <class> class _bucket_array = NormalPointer,
          class _bucket_allocer = oceanbase::common::ObMalloc,
          int64_t EXTEND_RATIO = 1>
class ObHashMap;
Among them, _key_type, _value_type, _hashfunc, _equal have the same meaning as the declared parameters of STL::unordered_map. There are some more parameters here:
_defendmode: OceanBase provides a thread-safe hashmap implementation with limited conditions. You can use the default value and ignore it for now, which will be introduced later;_allocerand_bucket_allocer: STL::unordered_map requires only one allocator, but here requires two allocators. In a hashmap, there is usually an array as a bucket array. After the elements are hashed, the corresponding bucket is found, and then the element is "mounted" on the corresponding bucket._bucket_alloceris the allocator of the bucket array, and_alloceris the allocator of elements, that is, the allocator of key value pairs;- EXTEND_RATIO: If EXTEND_RATIO is 1, no expansion will occur. Otherwise, the hash map is not thread-safe.
ObHashMap Interface Introduction
/**
  * The constructor of ObHashMap does nothing.
  * You must call create for actual initialization.
  * The parameters of the create function are mainly the number of buckets
  * (bucket_num) and the parameters of the memory allocator.
  * Providing a reasonable number of buckets can make hashmap run more efficiently
  * without wasting too much memory.
  *
  * As you can see from the following interfaces, two memory allocators can be
  * provided, one is the allocator of the bucket array,
  * and the other is the allocator of element nodes.
  */
int create(int64_t bucket_num,
           const ObMemAttr &bucket_attr,
           const ObMemAttr &node_attr);
int create(int64_t bucket_num, const ObMemAttr &bucket_attr);
int create(int64_t bucket_num,
           const lib::ObLabel &bucket_label,
           const lib::ObLabel &node_label = ObModIds::OB_HASH_NODE,
           uint64_t tenant_id = OB_SERVER_TENANT_ID,
           uint64_t ctx_id = ObCtxIds::DEFAULT_CTX_ID);
int create(int64_t bucket_num,
           _allocer *allocer,
           const lib::ObLabel &bucket_label,
           const lib::ObLabel &node_label = ObModIds::OB_HASH_NODE);
int create(int64_t bucket_num,
           _allocer *allocer,
           _bucket_allocer *bucket_allocer);

/// Destroy the current object directly
int destroy();

/// Both functions will delete all elements
int clear();
int reuse();

/**
  * Get the element value of the specified key value
  * Although the get function is also provided, it is recommended to use the current
  * function.
  * @param timeout_us: Timeout for getting elements. The implementation principle
  * of timeout will be introduced later.
  * @return found and returned successfully
  */
int get_refactored(const _key_type &key, _value_type &value, const int64_t timeout_us = 0) const;

/**
  * Set the value of a certain key value
  * @param flag: 0 means it already exists and will not be overwritten,
  *              otherwise the original value will be overwritten.
  * @param broadcast: whether to wake up the thread waiting to obtain the
  *                   current key
  * @param overwrite_key: not used. Please refer to flag
  * @param callback: After the insertion or update is successful, you can
  * use callback to perform some additional operations on the value.
  */
template <typename _callback = void>
int set_refactored(const _key_type &key,
                   const _value_type &value,
                   int flag = 0,
                   int broadcast = 0,
                   int overwrite_key = 0,
                   _callback *callback = nullptr);

/**
  * Traverse all elements
  * @note
  * 1. You cannot delete elements, insert, etc. during the traversal process.
  * Because some locks will be added during the traversal process, and locks
  * will also be added for insertion, deletion and other actions, lock
  * conflicts may occur;
  * 2. The callback action should be as small as possible because it works
  * within the lock scope.
  */
template<class _callback>
int foreach_refactored(_callback &callback) const;

/**
  * Delete the specified key value.
  * If the value pointer is not null, the corresponding element will be returned
  * @return If the element does not exist, OB_HASH_NOT_EXIST will be returned
  */
int erase_refactored(const _key_type &key, _value_type *value = NULL);

/**
 * Insert if it does not exist, otherwise call callback to update
 */
template <class _callback>
int set_or_update(const _key_type &key, const _value_type &value,
                  _callback &callback);

/**
 * Delete elements with specified key values and meeting specific conditions
 */
template<class _pred>
int erase_if(const _key_type &key, _pred &pred, bool &is_erased, _value_type *value = NULL);

/**
 * There is no need to copy elements, directly access the elements with
 * specified key values through callback.
 * @note callback executed under write lock protection
 */
template <class _callback>
int atomic_refactored(const _key_type &key, _callback &callback);

/**
 * There is no need to copy the element value, just get the element directly
 * and access it through callback.
 * @note callback executed under write lock protection
 */
template <class _callback>
int read_atomic(const _key_type &key, _callback &callback);
Implementation of ObHashMap
Persons who are familiar with the implementation principle of STL unordered_map can definitely guess the implementation principle of ObHashMap. The implementation of ObHashMap is also a linear table, as a bucket array, and then uses the zipper table method to solve key hash conflicts. But here are some details, hoping to help everyone understand its implementation and use ObHashMap more efficiently.
ObHashMap relies on ObHashTable at the bottom. For the code, refer to ob_hashtable.h. ObHashMap just encapsulates the semantics of Key Value on ObHashTable.
Conditional thread safe
If the template parameter _defendmode selects a valid lock mode, and ObHashTable has a read-write lock for each bucket, then ObHashTable will provide conditional thread safety. When accessing elements on the bucket, corresponding locks will be added, including interfaces with callback, so the actions in callback should be as light as possible and other elements of ObHashTable should not be accessed to prevent deadlock.
ObHashMap is not thread-safe when scaling. If the provided template parameter EXTEND_RATIO is not 1, the capacity will be expanded when needed, and this is transparent to the user.
The default value of ObHashMap _defendmode is an effective thread-safe protection mode LatchReadWriteDefendMode.
_defendmode
_defendmode defines different bucket locking methods, and 6 modes are provided in ob_hashutils.h:
- LatchReadWriteDefendMode
- ReadWriteDefendMode
- SpinReadWriteDefendMode
- SpinMutexDefendMode
- MultiWriteDefendMode
- NoPthreadDefendMode
The first five of them can provide thread safety protection, but they use different lock modes. In different business scenarios and different thread read and write concurrency, choosing a reasonable mode can improve efficiency and stability. The sixth mode, NoPthreadDefendMode, does not provide any protection.
get timeout waiting
If the specified element does not exist when getting an element, you can set a waiting time. ObHashTable will insert a fake element into the corresponding bucket and wait. When another thread inserts the corresponding element, the waiting thread will be awakened. However, the thread inserting the element needs to explicitly specify that it needs to be awakened, that is, the broadcast value of set_refactor is set to non-zero.
ObHashSet
Similar to ObHashMap, ObHashSet is based on ObHashTable and encapsulates an implementation with only keys and no values. Please refer to the code ob_hashset.h for details.
ObLinkHashMap
ObLinkHashMap is a lock-free hash map that takes into account both read and write performance and is thread-safe (including expansion). It uses the zipper method to resolve hash conflicts.
Here are the characteristics of this class:
- Taking into account both reading and writing performance;
- Implement thread safety based on lock-free solution;
- Introducing the retirement station, the node will be delayed in release, so it is recommended that the Key be as small as possible;
- There is a certain amount of memory waste;
- When expanding or shrinking capacity, batch relocation is used;
- When there is a hotspot key, the get performance is poor due to reference counting issues;
- When the bucket is expanded too much, initializing Array will be slower.
Regarding retire station, please refer to the paper Reclaiming Memory for Lock-Free Data Structures:There has to be a Better Way。
Below are some commonly used interfaces and precautions when using them.
/**
  *Declaration of ObLinkHashMap
  * Template parameters:
  * @param Key Key type
  * @param Value The type of value, which needs to be inherited from
  * LinkHashValue (refer to ob_link_hashmap_deps.h)
  * @param AllocHandle Class to allocate release values and nodes
  * (refer to ob_link_hashmap_deps.h)
  * @param RefHandle Reference counting function. Don't modify it if you
  * don't deeply understand its principles.
  * @param SHRINK_THRESHOLD When the number of current nodes is too many or too
  * few, it will expand or shrink. Try to keep the current nodes at
  * Between the ratio [1/SHRINK_THRESHOLD, 1] (non-precise control)
  */
template<typename Key,
         typename Value,
         typename AllocHandle=AllocHandle<Key, Value>,
         typename RefHandle=RefHandle,
         int64_t SHRINK_THRESHOLD = 8>
class ObLinkHashMap;


/// Number of elements
int64_t size() const;

/**
 * Insert an element
 * @noteIf it returns successfully, you need to execute hash.revert(value)
 */
int insert_and_get(const Key &key, Value* value);

/// Delete specified element
int del(const Key &key);

/**
  * Get the specified element
  * @note If the return is successful, revert needs to be executed
  */
int get(const Key &key, Value*& value);

/// Releases the introduction count of the specified element.
/// Can be released across threads
void revert(Value* value);

/**
 * Determine whether the specified element exists
 * @return OB_ENTRY_EXIST indicating exists
 */
int contains_key(const Key &key);

/**
  * Traverse all elements
  * @param fn: bool fn(Key &key, Value *value); The bool return value
  * indicates whether to continue traversing
  */
template <typename Function> int for_each(Function &fn);

/**
  * Delete elements that meet the conditions
  * @param fn bool fn(Key &key, Value *value); The bool return value
  * indicates whether it needs to be deleted
  */
template <typename Function> int remove_if(Function &fn);
ObRbTree
ObRbTree is a red-black tree implementation that supports basic operations such as insertion, deletion, and search, and is not thread-safe. Since ObRbTree is not used in OceanBase, it will not be introduced again. If you are interested, please read the source code ob_rbtree.h.
Others
OceanBase also has many basic container implementations, such as some queues (ObFixedQueue, ObLightyQueue, ObLinkQueue), bitmap (ObBitmap), tuple (ObTuple), etc. If the common containers don't meet your needs, you can find more in the deps/oblib/src/lib directory.
| Number | Document Version | Revised Chapter | Reason for Revision | Revision Date |
|---|---|---|---|---|
| 1 | 1.0 | New | June 15th, 2023 |
1 Introduction
This coding standard is applicable to the OceanBase project of Ant Group. It provides some coding constraints and defines coding styles. In the OceanBase project, the kernel code must comply with the coding style of this document, the test code is recommended to comply with the coding constraints of this document, and other codes must also comply with the coding constraints and coding style of this document.
This coding standard is committed to writing C/C++ code that is easy to understand, reduces traps, and has a unified format. Therefore:
- The most common and understandable way is used to write the code;
- Avoid using any obscure ways, such as "foo(int x = 1)";
- Avoid very technical ways, such as "a += b; b = a-b; a -= b;" or "a ^= b; b ^= a; a ^= b;" to exchange the values of variables a and b.
Finally, this document summarizes the coding constraints for quick reference. This coding standard will be continuously supplemented and improved as needed.
2 Directory and Files
2.1 Directory Structure
The subdirectories of the OceanBase system are as follows:
- src: contains source code, including header files and implementation files
- unittest: contains unit test code and small-scale integration test code written by developers
- tools: contains external tools
- docs: contains documentation
- rpm: contains RPM spec files
- script: contains operation and maintenance scripts for OceanBase.
Implementation files for C code are named ".c", header files are named ".h", implementation files for C++ code are named ".cpp", and header files are named ".h". In principle, header files and implementation files must correspond one-to-one, and directories under "src" and "unittest" must correspond one-to-one. All file names are written in lowercase English letters, with words separated by underscores ('_').
For example, under the "src/common" directory, there is a header file named "ob_schema.h" and an implementation file named "ob_schema.cpp". Correspondingly, under the "unittest/common" directory, there is a unit test file named "test_schema.cpp".
Of course, developers may also perform module-level or multi-module integration testing. These testing codes are also placed under the "unittest" directory, but subdirectories and file names are not required to correspond one-to-one with those under "src". For example, integration testing code for the Baseline Storage Engine is placed under the "unittest/storagetest" directory.
2.2 Copyright Information
Currently (as of May 2023), all source code files in Observer must include the following copyright information in the file header:
Copyright (c) 2021 OceanBase
OceanBase is licensed under Mulan PubL v2.
You can use this software according to the terms and conditions of the Mulan PubL v2.
You may obtain a copy of Mulan PubL v2 at:
         http://license.coscl.org.cn/MulanPubL-2.0
THIS SOFTWARE IS PROVIDED ON AN "AS IS" BASIS, WITHOUT WARRANTIES OF ANY KIND,
EITHER EXPRESS OR IMPLIED, INCLUDING BUT NOT LIMITED TO NON-INFRINGEMENT,
MERCHANTABILITY OR FIT FOR A PARTICULAR PURPOSE.
See the Mulan PubL v2 for more details.
2.3 Header File Code
Header files should not contain implementation code, with the exception of inline functions or C++ templates. Additionally, if the template code is too long, some or all of the template functions can be extracted to a dedicated .ipp file, as demonstrated in "common/ob_vector.h" and "common/ob_vector.ipp".
Header files should be as concise and clear as possible, making them easy for users to understand. If the implementation code of some functions is short and you wish to place them directly in the header file, the functions must be declared as inline functions and comply with the standards for inline functions.
2.4 Define Protection
All header files should use #define to prevent multiple inclusions of the same file. The naming format should be: _. For example, the header file "common/ob_schema.h" in the common module should be protected in the following way:
#ifndef OCEANBASE_COMMON_OB_SCHEMA_
#define OCEANBASE_COMMON_OB_SCHEMA_
…
#endif // OCEANBASE_COMMON_OB_SCHEMA_
2.5 Header File Dependencies
When using other classes in a header file, try to use forward declaration instead of #include.
When a header file is included, new dependencies may be introduced. If this header file is modified, the code will be recompiled. If this header file also includes other header files, any changes to those header files will cause all code that includes that header file to be recompiled. Therefore, we tend to reduce the number of included header files, especially in header files that include other header files.
Using forward declaration can significantly reduce the number of header files needed. For example, if a header file uses the class "ObFoo" but does not need to access the declaration of "ObFoo", the header file only needs to include the forward declaration class ObFoo;, without needing to #include "ob_foo.h".
Without being able to access the class definition, what operations can we perform on a class "ObFoo" in a header file?
- We can declare the data member type as
ObFoo *orObFoo &. - We can declare the function parameter/return value type as ObFoo (but cannot define the implementation).
- We can declare the type of a static data member as ObFoo, because the definition of the static data member is outside the class definition.
On the other hand, if your class is a subclass of ObFoo or contains a non-static data member of type ObFoo, you must include the "ob_foo.h" header file.
Of course, if using pointer members instead of object members reduces code readability or execution efficiency, do not do so just to avoid #include.
2.6 Inline Functions
In order to improve execution efficiency, sometimes we need to use inline functions, but it is important to understand how inline functions work. It is recommended to only use inline functions in performance-critical areas, with the executed code being less than 10 lines and not including loops or switch statements, and without using recursive mechanisms.
Inline functions are most commonly used in C++ classes to define access functions. On one hand, inlining the function can avoid function call overhead, making the target code more efficient; on the other hand, each inline function call will copy the code, leading to an increase in the total program code. If the code inside the function body is relatively long, or there are loops in the function body, the time to execute the code in the function body will be greater than the overhead of the function call, making it unsuitable for inlining.
Constructors and destructors of classes can be misleading. They may appear to be short, but be careful as they may hide some behavior, such as "secretly" executing the constructors and destructors of base classes or member objects.
2.7 #include Path and Order
Header files within a project should be imported according to the project directory tree structure and should not use special paths such as ".", "..", etc. It is recommended to include header files in the following order: the header file corresponding to the current file, system C header files, system C++ header files, other library header files (libeasy, tbsys), and other internal header files of OceanBase, to avoid multiple inclusions. The system C header files use angle brackets and end with ".h", system C++ header files use angle brackets and do not end with ".h", and other cases use quotes. For example:
#include <stdio.h>
#include <algorithm>
#include "common/ob_schema.h"
The reason for placing the header file corresponding to the current file in the priority position is to reduce hidden dependencies. We hope that each header file can be compiled independently. The simplest way to achieve this is to include it as the first .h file in the corresponding .cpp file.
For example, the include order of "ob_schema.cpp" is as follows:
#include "common/ob_schema.h"

#include <string.h>
#include <stdlib.h>
#include <assert.h>

#include <algorithm>

#include "config.h"
#include "tblog.h"

#include "common/utility.h"
#include "common/ob_obj_type.h"
#include "common/ob_schema_helper.h"
#include "common/ob_define.h"
#include "common/file_directory_utils.h"
2.8 Summary
The subdirectories in src and unittest correspond to each other, and "tests" is used to store test code.
Header files should not include implementation code, with the exception of inline functions and templates.
Use #define to protect header files from being included multiple times.
Reduce compilation dependencies through forward declaration to prevent a change in one file triggering a domino effect.
Proper use of inline functions can improve execution efficiency.
The include paths for files within a project should use relative paths, and the include order should be: the header file corresponding to the current file, system C header files, system C++ header files, other library header files (Libeasy, tbsys), and other internal header files of OceanBase.
3 Scope
3.1 Namespace
All variables, functions, and classes in the OceanBase source code are distinguished by namespaces, with namespaces corresponding to the directories where the code is located. For example, the namespace corresponding to "ob_schema.h" in the "src/common" directory is "oceanbase::common".
// .h file
namespace oceanbase
{
// Please do not indent
namespace common
{
// All declarations should be placed in namespaces, and please do not indent.
class ObSchemaManager
{
public:
  int func();
};
} // namespace common
} // namespace oceanbase

// .cpp file
namespace oceanbase
{
namespace common
{
// All function implementations should also be placed in namespaces.
int ObSchemaManager::func()
{
  ...
}

} // namespace common
} // namespace oceanbase
It is prohibited to use anonymous namespaces because the compiler will assign a random name string to the anonymous namespace, which can affect GDB debugging.
Both header and implementation files may include references to classes in other namespaces. For example, declare classes in other namespaces in header files, as follows:
namespace oceanbase
{
namespace common
{
class ObConfigManager; // Forward declaration of the class common::ObConfigManager
}

namespace chunkserver
{

class ObChunkServer
{
public:
  int func();
};

} // namespace chunkserver
} // namespace oceanbase
C++ allows the use of using, which can be divided into two categories:
-
Using directive: For example, using namespace common, which allows the compiler to automatically search for symbols in the common namespace from now on.
-
Using declaration: For example, using
common::ObSchemaManager, which makesObSchemaManagerequivalent tocommon::ObSchemaManagerfrom now on.
Because using directive is likely to pollute the scope, it is prohibited to use it in header files, but using declaration is allowed. In .cpp files, using directive is allowed, for example, when implementing ObChunkServer, it may need to use classes from the common namespace. However, it is important to note that only other namespaces can be introduced using directives in .cpp files. The code in the .cpp file itself still needs to be put in its own namespace. For example:
// incorrect ways of using
// The implementation code should be put in the chunkserver namespace
// instead of using the using namespace chunkserver directive.
namespace oceanbase
{
using namespace common;
using namespace chunkserver;

// using symbols from the common namespace
int ObChunkServer::func()
{
  ...
}

} // namespace oceanbase

// The correct way is to put the implementation code in the chunkserver namespace.
namespace oceanbase
{
using namespace common;

namespace chunkserver
{
// Using symbols from the common namespace
int ObChunkServer::func()
{
  ...
}

} // namespace chunkserver
} // namespace oceanbase
3.2 Nested Classes
If a class is a member of another class, it can be defined as a nested class. Nested classes are also known as member classes.
class ObFoo
{
private:
  // ObBar is a nested class/member class inside ObFoo,
  // and ObFoo is referred to as the host class/outer class."
  class ObBar
  {
   ...
  };
};
When a nested class is only used by the outer class, it is recommended to place it within the scope of the outer class to avoid polluting other scopes with the same class name. It is also recommended to forward declare the nested class in the outer class's .h file, and define the nested class's implementation in the .cpp file, to improve readability by avoiding the inclusion of the nested class's implementation in the outer class's .h file.
Additionally, it is generally advised to avoid defining nested classes as public, unless they are part of the external interface.
3.3 Global Variables and Functions
The use of global variables or functions should be strictly limited. New global variables and functions should not be added, except for those that already exist.
If it is necessary to violate this guideline, please discuss and obtain approval beforehand, and provide detailed comments explaining the reason.
Global variables and functions can cause a range of issues, such as naming conflicts and uncertainties in the initialization order for global objects. If it is necessary to share a variable globally, it should be placed in a server singleton, such as ObUpdateServerMain in UpdateServer.
Global constants should be defined in ob_define.h, and global functions should be defined in the common/ob_define.h and utility methods (common/utility.h, common/ob_print_utils.h).
It is prohibited to define global const variables in header files.
Similar to the reason for prohibiting the use of static variables in header files, global const variables (including constexpr) without explicit extern have internal linkage, and multiple copies will be generated in the binary program.
Experimental analysis
// "a.h"
const int zzz = 1000;
extern const int bbb;
// "a.cpp"
#include "a.h"
#include <stdio.h>
const int bbb = 2000;
void func1()
{
  printf("a.cpp &zzz=%p\n", &zzz);
  printf("a.cpp &bbb=%p\n", &bbb);
}
// "b.cpp"
#include "a.h"
#include <stdio.h>
void func2()
{
  printf("b.cpp &zzz=%p\n", &zzz);
  printf("b.cpp &bbb=%p\n", &bbb);
}
// "main.cpp"
void func2();
void func1();
int main(int argc, char *argv[])
{
  func1();
  func2();
  return 0;
}
The compiled and executed program shows that multiple instances of the variable "zzz" are created, while only one instance of the variable "bbb" exists.
[OceanBase224004 tmp]$ ./a.out
a.cpp &zzz=0x4007e8
a.cpp &bbb=0x400798
b.cpp &zzz=0x400838
b.cpp &bbb=0x400798
3.4 Local Variables
It is recommended to declare variables at the beginning of a statement block.
Simple variable declarations should be initialized when declared.
OceanBase believes that declaring variables at the beginning of each statement block leads to more readable code. Additionally, OceanBase allows for code such as for (int i = 0; i < 10; ++i) where the variable 'i' is declared at the beginning of the loop statement block. If the declaration and use of a variable are far apart, it indicates that the statement block contains too much code, which often means that the code needs to be refactored.
Declaring variables inside a loop body can be inefficient, as the constructor and destructor of an object will be called each time the loop iterates, and the variable will need to be pushed and popped from the stack each time. Therefore, it is recommended to extract such variables from the loop body to improve efficiency. It is prohibited to declare complex variables (e.g. class variables) inside a loop body, but if it is necessary to do so, approval from the team leader must be obtained, and a detailed comment explaining the reason must be provided. For the sake of code readability, declaring references inside a loop body is allowed.
// Inefficient implementation
for (int i = 0; i < 100000; ++i) {
  ObFoo f;  // The constructor and destructor are called every time the loop is entered
  f.do_something();
}

// Efficient implementation
ObFoo f;
for (int i = 0; i < 100000; ++i) {
  f.do_something();
}

// For readability, references can be declared inside the loop
for(int i = 0; i < N; ++i) {
   const T &t = very_long_variable_name.at(i);
   t.f1();
   t.f2();
   ...
}
In addition, OceanBase sets limits on the size of local variables and does not recommend defining excessively large local variables.
- The function stack should not exceed 32K.
- A single local variable should not exceed 8K.
3.5 Static Variables
Defining static variables in header files is prohibited Initializing static variables (whether const or not) is not allowed in .h header files, except for the following one exception. Otherwise, such static variables will produce a static stored variable in each compilation unit (.o file) and result in multiple instances of static variables after linking. If it is a const variable, it will cause the binary program file to bloat. If it is not a const variable, it may cause severe bugs.
Note that defining (define) is prohibited, not declaring (declare).
[Exception] Static const/constexpr static member variables
Static member variables such as const int (including int32_t, int64_t, uint32_t, uint64_t, etc.), static constexpr double, etc. are often used to define hardcode array lengths. They do not occupy storage, do not have addresses (can be regarded as #define macro constants), and are allowed to be initialized in header files.
Does that mean the following form (pseudocode) is allowed.
class Foo {
  static const/constexpr xxx = yyy;
};
The explanation for this exception is as follows: In C++98, it is allowed to define the value of a static const integer variable when it is declared.
class ObBar
{
public:
  static const int CONST_V = 1;
};
The fact is that the C++ compiler considers the following code equivalent to the previous one.
class ObBar
{
  enum { CONST_V = 1 };
}
If the address of this type of variable is taken in the program, an "Undefined reference" error will occur during linking. In such cases, the correct approach is to place the definition of the variable in the .cpp file.
// in the header file
class ObBar
{
  static const int CONST_V;
}
// in the implementation file
const int ObBar::CONST_V = 1;
Before C++11, the C++98 standard only allowed static const variables of integral type to be initialized with definitions included in the class declaration. In C++11, constexpr is introduced, and static constexpr member variables (including types such as double) can also be initialized in the declaration. This kind of variable will not generate static area storage after compilation.
Before C++11, the values of variables could be used in constant expressions only if the variables are declared const, have an initializer which is a constant expression, and are of integral or enumeration type. C++11 removes the restriction that the variables must be of integral or enumeration type if they are defined with the constexpr keyword:
constexpr double earth_gravitational_acceleration = 9.8; constexpr double moon_gravitational_acceleration = earth_gravitational_acceleration / 6.0;
Such data variables are implicitly const, and must have an initializer which must be a constant expression.
Case 1
According to the current code style of OceanBase, we will define static variables (such as ob_define.h) in the header file, so that each cpp file will generate a declaration and definition of this variable when including this header file. In particular, some large objects (latch, wait event, etc.) generate a static definition in the header file, resulting in the generation of binary and memory expansion.
Simply move the definition of several static variables from the header file to the cpp file, and change the header file to extern definition, the effect is quite obvious: binary size: 2.6G->2.4G, reduce 200M. Observer initial running memory: 6.3G->5.9G, reduced by 400M.
Case 2 In the example below, different cpps see different copies of global variables. It was originally expected to communicate through global static, but it turned out to be different. This will also result in a "false" singleton implementation.
Analysis of behavior of static variables Let's write a small program to verify the performance of static variable definitions in .h.
// "a.h"
static unsigned char xxx[256]=
{
  1, 2, 3
};
static unsigned char yyy = 10;
static const unsigned char ccc = 100;
// "a.cpp"
#include "a.h"
#include <stdio.h>
void func1()
{
  printf("a.cpp &xxx=%p\n", xxx);
  printf("a.cpp &yyy=%p\n", &yyy);
  printf("a.cpp &ccc=%p\n", &ccc);
}
// "b.cpp"
#include "a.h"
#include <stdio.h>
void func2()
{
  printf("b.cpp xxx=%p\n", xxx);
  printf("b.cpp &yyy=%p\n", &yyy);
  printf("b.cpp &ccc=%p\n", &ccc);
}
// "main.cpp"
void func2();
void func1();
int main(int argc, char *argv[])
{
  func1();
  func2();
  return 0;
}
Compile and execute, and you can see that whether it is a static integer or an array, whether there is const or not, multiple instances are generated.
[OceanBase224004 tmp]$ g++ a.cpp b.cpp main.cpp
[OceanBase224004 tmp]$ ./a.out
a.cpp &xxx=0x601060
a.cpp &yyy=0x601160
a.cpp &ccc=0x400775
b.cpp xxx=0x601180
b.cpp &yyy=0x601280
b.cpp &ccc=0x4007a2
3.6 Resource recovery and parameter recovery
Resource management follows the principle of "who applies for release" and releases resources uniformly at the end of the statement block. If it must be violated, please obtain the consent of the group leader in advance, and explain the reason in detail. The code structure of each statement block is as follows:
- Variable definition
- Resource application
- Business logic
- Resource release
// wrong
void *ptr = ob_malloc(sizeof(ObStruct), ObModIds::OB_COMMON_ARRAY);
if (NULL == ptr) {
  // print error log
} else {
  if (OB_SUCCESS != (ret = do_something1(ptr))) {
    // print error log
    ob_tc_free(ptr, ObModIds::OB_COMMON_ARRAY);
    ptr = NULL;
  } else if (OB_SUCCESS != (ret = do_something2(ptr))) {
    // print error log
    ob_free(ptr, ObModIds::OB_COMMON_ARRAY);
    ptr = NULL;
  } else { }
}
// correct
void *ptr = ob_malloc(100, ObModIds::OB_COMMON_ARRAY);
if (NULL == ptr) {
  // print error log
} else {
  if (OB_SUCCESS != (ret = do_something1(ptr))) {
    // print error log
  } else if (OB_SUCCESS != (ret = do_something2(ptr))) {
    // print error log
  } else { }
}
// release resource
if (NULL != ptr) {
  ob_free(ptr, ObModIds::OB_COMMON_ARRAY);
  ptr = NULL;
}
In the above example, the outermost if branch only judges the failure of resource application, and the else branch handles the business logic. Therefore, the code for resource release can also be placed at the end of the outermost else branch.
// Another correct way of writing requires the if branch
// to simply handle resource application failures
void *ptr = ob_malloc(100, ObModIds::OB_COMMON_ARRAY);
if (NULL == ptr) {
  // print error log
} else {
  if (OB_SUCCESS != (ret = do_something1(ptr))) {
    // print error log
  } else if (OB_SUCCESS != (ret = do_something2(ptr))) {
    // print error log
  } else { }
  // release resources
  ob_free(ptr, ObModIds::OB_COMMON_ARRAY);
  ptr = NULL;
}
Therefore, if resources need to be released, the resources should be released uniformly before the function returns or at the end of the outermost else branch.
In some cases, it is necessary to save the input parameters at the beginning of the statement block and restore the parameters in case of an exception. Similar to resource reclamation, parameters can only be restored at the end of a statement block. The most typical example is the serialization function, such as:
// wrong
int serialize(char *buf, const int64_t buf_len, int64_t &pos)
{
  int ret = OB_SUCCESS;
  const int64_t ori_pos = pos;

  if (OB_SUCCESS != (ret = serialize_one(buf, buf_len, pos)) {
    pos = ori_pos;
    ...
  } else if (OB_SUCCESS != (ret = serialize_two(buf, buf_len, pos)) {
    pos = ori_pos;
    ...
  } else {
    ...
  }
  return ret;
}
The problem with this usage is that it is likely to forget to restore the value of pos in a certain branch. The correct way to write it is as follows.
// Correct
int serialize(char *buf, const int64_t buf_len, int64_t &pos)
{
  int ret = OB_SUCCESS;
  const int64_t ori_pos = pos;

  if (OB_SUCCESS != (ret = serialize_one(buf, buf_len, pos)) {
    ...
  } else if (OB_SUCCESS != (ret = serialize_two(buf, buf_len, pos)) {
    ...
  } else {
    ...
  }

  if (OB_SUCCESS != ret) {
    pos = ori_pos;
  }
  return ret;
}
So if you need to restore the input parameters, do so before the function returns.
3.7 Summary
- Namespaces correspond to directories. Anonymous namespaces are prohibited. Using directives are prohibited in .h files, and only using declarations are allowed.
- Nested classes are suitable for scenarios that are only used by external classes. It is recommended to pre-declare in .h files and implement them in .cpp files. Try not to use public.
- In addition to the existing global variables and global functions, no new global variables and global functions shall be added. If it must be violated, please obtain the consent of the group leader in advance, and explain the reason in detail.
- Local variables are declared at the beginning of the statement block, and it is mandatory to initialize simple variables when they are declared.
- It is forbidden to declare non-simple variables in the loop body. If it must be violated, please obtain the consent of the group leader in advance, and explain the reason in detail.
- Resource management follows the principle of "who applies for release". If resources need to be released, release them before the function returns or at the end of the outermost else branch. So if you need to restore the input parameters, do so before the function returns. If it must be violated, please obtain the consent of the group leader in advance, and explain the reason in detail.
4 Class
4.1 Constructors and Destructors
The constructor only performs trivial initialization work, such as initializing pointers to NULL and variables to 0 or -1. Non-trivial initialization operations are not allowed in the constructor. If necessary, define a separate int init() method and add an is_inited_ variable to identify whether the object has been initialized successfully. This is because, if object construction fails, an indeterminate state may occur.
Every class (including interface classes) is required to define a constructor, even if the class does not have any member variables, it also needs to define an empty default constructor. This is because, if no constructor is defined, the compiler will automatically generate a default constructor, which often has some side effects, such as initializing some member variables to random values.
Every class (including interface classes) is required to define a destructor, even if the class does not have any member variables, it also needs to define an empty destructor. In addition, if there is no special reason (performance is particularly critical, it will not be inherited and does not contain virtual functions), the destructor of the class should be declared as virtual.
4.2 explicit keyword
Use the C++ keyword explicit for single-argument constructors.
Usually, a constructor with only one parameter can be used for conversion. For example, if ObFoo::ObFoo(ObString name) is defined, when an ObString is passed to a function that needs to pass in an ObFoo object, the constructor ObFoo::ObFoo( ObString name) will be automatically called and the string will be converted to a temporary ObFoo object passed to the calling function. This implicit conversion always brings some potential bugs.
4.3 Copy Constructor
In principle, the copy constructor should not be used (except for the base classes that have already been defined). If it must be violated, please obtain the consent of the group leader in advance, and explain the reason in detail. In addition, classes that do not need a copy constructor should use the DISALLOW_COPY_AND_ASSIGN macro (ob_define.h), except for interface classes.
#define DISALLOW_COPY_AND_ASSIGN(type_name) \
  type_name(const type_name&)               \
  void operator=(const type_name&)

class ObFoo
{
public:
  ObFoo();
  ~ObFoo();

private:
  DISALLOW_COPY_AND_ASSIGN(ObFoo);
};
4.4 reuse & reset & clear
reset is used to reset the object, reuse is used to reuse the object, and clear is prohibited. described as follows.
- Both
resetandreuseare used for object reuse. Thisreuseis often introduced in order to optimize performance because the memory allocation and construction of objects of certain key classes is too time-consuming. - The meaning of reset is to restore the state of the object to the initial state after the execution of the constructor or init function. Refer to
ObRow::reset; - Use
reusein other situations exceptreset. Unlikereset,reuseoften does not release some resources that are time-consuming to reapply, such as memory. Refer toPageArena::reuse; clearis widely used in the container class of C++ STL, and often means to clear the size of the container class to 0, but it does not clear the internal objects or release the memory. The difference betweenclearandreset/reuseis very subtle. In order to simplify understanding, the use ofclearis prohibited, and the used ones are gradually removed.
4.5 Member Initialization
All members must be initialized, and the order in which member variables are initialized is consistent with the order in which they are defined.
The constructor, init method, and reset/reuse method of each class may perform some initialization operations on the class, and it is necessary to ensure that all members have been initialized. If the constructor only initializes some members, then the is_inited_ variable must be set to false, and the init method will continue to complete the initialization of other members. The members of the struct type can be initialized by the reset method (if the initialization is only to clear the struct members to 0, they can also be initialized by using memset); the members of the class type can be initialized by init/reset/reuse and other methods.
The initialization order of member variables needs to be consistent with the definition order. The advantage of this is that it is easy to find out whether you have forgotten which members have been initialized.
4.6 Structures and Classes
Use struct only when there is only data, and use class for everything else.
Struct is used on passive objects that only contain data, which may include associated constants, and reset/is_valid, serialization/deserialization these general functions. If you need more functions, class is more suitable. If in doubt, use class directly.
If combined with STL, you can use struct instead of class for functor and traits.
It should be noted that the data members inside the class can only be defined as private (private, except for static members), and can be accessed through the access functions get_xxx and set_xxx.
4.7 Common Functions
The common functions contained in each class must adopt standard prototypes, and the serialization/deserialization functions must be implemented using macros.
The general functions contained in each class include: init, destroy, reuse, reset, deep_copy, shallow_copy, to_string, is_valid. The prototypes of these functions are as follows:
class ObFoo
{
public:
  int  init(init_param_list);
  bool is_inited();
  void destroy();

  void reset();
  void reuse();

  int deep_copy(const ObFoo &src);
  int shallow_copy(const ObFoo &src);

  bool is_valid();

  int64_t to_string(char *buf, const int64_t buf_len) const;

  NEED_SERIALIZE_AND_DESERIALIZE;
};
It should be noted that to_string will always add '\0' at the end, and the function returns the actual printed byte length (excluding '\0'). It is implemented internally by calling databuff_printf related functions, please refer to common/ob_print_utils.h for details.
Serialization and deserialization functions need to be implemented through macros, for example:
class ObSort
{
public:
  NEED_SERIALIZE_AND_DESERIALIZE;
private:
  common::ObSArray<ObSortColumn> sort_columns_;
  int64_t mem_size_limit_;
  int64_t sort_row_count_;
};
For class ObSort, the three fields that need to be serialized are
sort_columns_, mem_size_limit_, sort_row_count_. Just write in ob_sort.cpp:
DEFINE_SERIALIZE_AND_DESERIALIZE(ObSort, sort_columns_, mem_size_limit_, sort_row_count_);
The serialization and deserialization can be completed and the realization of the three functions that have calculated the length after serialization can be completed. The generic functions of structures are the same as the generic functions of classes.
4.8 Common Macro
For the convenience of coding, some defined macros can be used in OceanBase, but it is not recommended for students to add macros by themselves. If it is really necessary to add macros, please confirm with the team leader before adding them.
Here are some commonly used macros:
-
OB_SUCCIt is usually used to judge whether the return value is
OB_SUCCESS, which is equivalent toOB_SUCCESS == (ret = func()). Note that ret needs to be pre-defined in the function when usingOB_SUCC, for example, the following writing method.ret = OB_SUCCESS; if (OB_SUCC(func())) { // do something } -
OB_FAILIt is usually used to judge whether the return value is not
OB_SUCCESS, which is equivalent toOB_SUCCESS != (ret = func()). Note that ret needs to be pre-defined in the function when usingOB_FAIL, for example, the following writing method.ret = OB_SUCCESS; if (OB_FAIL(func())) { // do something } -
OB_ISNULLIt is usually used to judge whether the pointer is empty, which is equivalent to nullptr ==, for example, the following writing method.
if (OB_ISNULL(ptr)) { // do something } -
OB_NOT_NULLIt is usually used to judge whether the pointer is not empty, which is equivalent to nullptr !=, for example, the following writing method
if (OB_NOT_NULL(ptr)) { // do something } -
IS_INITIt is usually used to judge whether the class has been initialized, which is equivalent to
is_inited_. Note that the memberis_inited_needs to exist in the class, for example, the following writing method.if (IS_INIT) { // do something } -
IS_NOT_INITIt is usually used to judge whether the class has been initialized, which is equivalent to
!is_inited_. Note that the memberis_inited_needs to exist in the class, for example, the following writing method.if (IS_NOT_INIT) { // do something } -
REACH_TIME_INTERVALIt is used to judge whether a certain time interval has been exceeded. The parameter is
us. Note that there will be a static variable to record the time inside the macro, so the judgment of time is global. It is usually used to control the log output frequency. For example, the following writing method will Let the system do some actions after more than 1s interval.if (REACH_TIME_INTERVAL(1000 * 1000)) { // do something } -
OZIt is used to simplify the log output after
OB_FAIL. When you only need to simply output the log after an error is reported, you can useOZ. Note that when usingOZ, you need to defineUSING_LOG_PREFIXat the beginning of the cpp file. For example, the following writing method.OZ(func());Equivalent to
if (OB_FAIL(func())) { LOG_WARN("fail to exec func, ", K(ret)); } -
KUsually used for log output, output variable name and variable value, such as the following writing.
if (OB_FAIL(ret)) { LOG_WARN("fail to exec func, ", K(ret)); } -
KPUsually used for log output, output variable names and pointers, such as the following writing method.
if (OB_FAIL(ret)) {
  LOG_WARN("fail to exec func, ", K(ret), KP(ptr));
}
4.9 Inherit
All inheritance must be public, and inheritance must be used with care: use inheritance only if it "is one", use composition if it "has one".
When a subclass inherits from a parent class, the subclass contains all the data and operation definitions of the parent class. In C++ practice, inheritance is mainly used in two scenarios: implementation inheritance, where the subclass inherits the implementation code of the parent class; interface inheritance, where the subclass inherits the method name of the parent class. For implementation inheritance, because the code that implements the subclass is extended between the parent class and the subclass, it becomes more difficult to understand its implementation, and it should be used with caution.
Multiple inheritance is also used in OceanBase. The scenario is rare, and requires at most one base class to contain implementation, and other base classes are pure interface classes.
4.10 Operator Overloading
Except for container classes, custom data types (ObString, ObNumber, etc.) and a few global basic classes such as ObRowkey, ObObj, ObRange, etc., do not overload operators (except simple structure assignment operations). If it must be violated, please discuss and approve it in advance, and explain the reasons in detail.
C++ STL template classes have a large number of overloaded operators, such as comparison functions, four operators, self-increment, and self-decrement. Such codes seem to be more intuitive, but in fact they often confuse the caller, such as making the caller mistaken for some time-consuming Operations are as efficient as built-in operations.
Avoid overloading the assignment operator (operator=) for anything but simple constructs. If necessary, copy functions such as deep_copy, shallow_copy, etc. can be defined. Among them, deep_copy indicates that all members need deep copy, and shallow_copy indicates other situations. If some members need a shallow copy and some need a deep copy, then use shallow_copy.
4.11 Declaration Order
Use a specific declaration order in the header file, public before private, and member functions before data members.
The order of definition is as follows: public block, protected block, private block, and the internal order of each block is as follows:
- typedefs and enums;
- constant;
- constructor;
- destructor;
- For member functions, static member functions come first, and ordinary member functions follow;
- For data members, static data members come first, and ordinary data members follow;
The macro
DISALLOW_COPY_AND_ASSIGNis placed after theprivate:block as the last part of the class.
The function definitions in the .cpp file should be as consistent as possible with the declaration order in the .h.
The reason why the constant definition should be placed in front of the function definition (constructor/destructor, member function) instead of in the data member is because the constant may be referenced by the function.
4.12 Summary
- The constructor only does trivial initialization. Each class needs to define at least one constructor, and the destructor with virtual function or subclass is declared as virtual.
- In order to avoid implicit type conversion, the single-argument constructor needs to be declared as explicit.
- In principle, the copy constructor shall not be used (except for the base classes that have been defined and used). If it must be violated, please discuss and approve it in advance, and explain the reasons in detail.
- Use
DISALLOW_COPY_AND_ASSIGNto avoid abuse of copy constructor and assignment operation; - Use reset for class reset, reuse for reuse, and clear for prohibition.
- It is necessary to ensure that all members are initialized, and the initialization sequence of member variables is consistent with the definition sequence.
- Use struct only when there is only data, and use class in all other cases.
- The common functions contained in each class must use standard prototypes, and the serialization/deserialization functions must be implemented using macros.
- Prefer composition and only use inheritance for "is-a" relationships. Avoid private inheritance and multiple inheritance. When multiple inheritance is used, it is required that except for one base class with implementation, the other base classes are pure interface classes.
- Except for existing container classes, custom types, and a small number of global basic classes, overloading of operators is not allowed (except for simple structure assignment operations). If it must be violated, please obtain the consent of the group leader in advance, and explain the reason in detail.
- Declaration order:
public,protected,private.
5 Function
5.1 Single Entry and Single Exit
It is mandatory for all functions to return at the end, and it is forbidden to call global jump instructions such as return, goto, and exit halfway. If it must be violated, please discuss it in advance and explain the reason in detail.
OceanBase believes that large-scale project development should give priority to avoiding common pitfalls, and it is worthwhile to sacrifice programming complexity. The single entry and single exit can make it difficult for developers to forget to release resources or restore function input parameters. At any time, the function is required to have only one exit.
5.2 Function Return Value
Except for the following exceptions, the function must return the ret error code:
- Simple access function
set_xxx()/get_xxx(). If theset/getfunction is complex or error-prone, it must still return an error code. - The
at(i)function that has been defined and used (to define and use a new one, please obtain the consent of the team leader in advance, and explain the reason in detail). - Operator overloading that has been defined and used (to define and use new ones, please obtain the consent of the team leader in advance, and explain the reasons in detail).
- For other small amount of functions, such as general function
void reset(); void reuse();etc., refer to section 4.7 general function.
The function caller must check the return value (error code) of the function and handle it.
Only ret variables of type int can be used to represent errors, and ret can only represent errors (except for iterator functions due to historical reasons). If you need to return other types of values, such as the compare function returning a value of type bool, you need to use other variable names, such as bool_ret. For example:
// wrong
bool operator()(const RowRun &r1, const RowRun &r2) const
{
  bool ret = false;
  int err = do_something();
  return ret;
}

// correct
bool operator()(const RowRun &r1, const RowRun &r2) const
{
  bool bool_ret = false;
  int ret = do_something();
  return bool_ret;
}
If some error codes need to be temporarily saved during function execution, try to use variables with clear meanings, such as hash_ret and alloc_ret. If the meaning is not clear, then ret1 and ret2 can also be used in sequence to avoid confusion caused by using err to represent error codes. For example:
int func()
{
  int ret = OB_SUCCESS;

  ret = do_something();
  if (OB_SUCCESS != ret) {
    int alloc_ret = clear_some_resource ();
    if (OB_SUCCESS != alloc_ret) {
      // print error log
    }
  } else {
    ...
  }
  return ret;
}
5.3 Sequential Statement
If multiple sequential statements are doing the same thing, condensed writing can be used in some cases. This makes sequential code tedious due to the need to judge errors during function execution. For example:
// verbose code
int ret = OB_SUCCESS;

ret = do_something1();
if (OB_SUCCESS != ret) {
  // print error log
}

if (OB_SUCCESS == ret) {
  ret = do_something2();
  if (OB_SUCCESS != ret) {
    // print error log
  }
}
// more code ...
It can be seen that there are only two lines of code that are really effective, but the overall code size is several times that of the effective code. This will make a screen contain too little valid code, affecting readability. If each step in the sequence statement requires only one line of code, it is recommended to simplify the code in the following way:
// Use shorthand when there is only one line of code per step in sequential logic
int ret = OB_SUCCESS;

if (OB_FAIL(do_something1())) {
  // print error log
} else if (OB_FAIL(do_something2())) {
  // print error log
} else if (OB_SUCCESS != (ret = do_something3())) {
  // print error log
} else { }
If some steps of the sequence statement take more than one line of code, then some changes are required:
// When some steps in the sequential logic exceed one line of code,
// use simplified writing and make certain changes
int ret = OB_SUCCESS;

if (OB_SUCCESS != (ret = do_something1())) {
  // print error log
} else if (OB_SUCCESS != (ret = do_something2())) {
  // print error log
} else {
  // Step 3 executes more than one line of code
  if (OB_SUCCESS != (ret = do_something3_1())) {
    // print error log
  } else if (OB_SUCCESS != (ret = do_something3_2()) {
    // print error log
} else { }
}

if (OB_SUCCESS == ret) {  // start a new logic
  if (OB_SUCCESS != (ret = do_something4())) {
    // print error log
  } else if (OB_SUCCESS != (ret = do_something5())) {
    // print error log
  } else { }
}
In the actual coding process, when should concise writing be used? OceanBase believes that when each step of a sequential statement has only one line of statement, and these steps are logically coupled tightly, the concise writing method should be used as much as possible. However, if it logically belongs to multiple sections, each of which does a different thing, then brevity should only be used within each section, not brevity for the sake of brevity. It should be noted that if the sequential statement is followed by a conditional statement. If sequential statements are reduced to conditional statements, then they cannot be combined into one large conditional statement, but should be separated in code structure. For example:
// wrong
if (OB_SUCCESS != (ret = do_something1())) {
  // print error log
} else if (OB_SUCCESS != (ret = do_something2())) {
   // print error log
} else if (cond) {
   // do something if cond
} else {
   // do something if !cond
}

// The first correct way
if (OB_SUCCESS != (ret = do_something1())) {
  // print error log
} else if (OB_SUCCESS != (ret = do_something2())) {
  // print error log
} else {
  if (cond) {
    // do something if cond
  } else {
    // do something if !cond
  }
}

// The second correct way
if (OB_SUCCESS != (ret = do_something1())) {
  // print error log
} else if (OB_SUCCESS != (ret = do_something2())) {
  // print error log
} else { }

if (OB_SUCCESS == ret) {
  if (cond) {
    // do something if cond
  } else {
    // do something if !cond
  }
}
5.4 Loop Statement
Judge OB_SUCCESS == ret in the loop condition to prevent the error code from being overwritten.
OceanBase has discovered a large number of problems where error codes are covered. These problems often lead to serious consequences, such as data inconsistency, and are very difficult to find. For example:
// error code is overwritten
for (int i = 0; i < 100; ++i) {
  ret = do_something();
  if (OB_SUCCESS != ret) {
    // print error log
  } else {
	...
  }
}
In the above example, the if branch in the for loop is wrong, but forget to break, so that the code will enter the next loop, and the error code of the previous execution will be overwritten.
Therefore, the standard for loop statement is written as follows:
for (int i = 0; OB_SUCCESS == ret && i < xxx; ++i) {
  ...
}
In addition, the standard while loop statement is written as follows:
while (OB_SUCCESS == ret && other_cond) {
  ...
}
A break or continue may be used in a loop statement to change the execution path. OceanBase believes that it should be used as little as possible, which is the same as the principle of single entry and single exit of a function. It is equivalent to the input source of the subsequent code of the loop statement being multiple entries, which increases the complexity of the code. If it is really necessary to use break and continue, it is required to explain the reason in detail through comments, and you need to pay special attention when writing code or reviewing code. In addition, considering that the input source of the follow-up code is multiple entries, it is necessary to ensure that it is clear what conditions the input of the follow-up code satisfies.
5.5 Conditional Statements
Conditional statements need to follow the MECE principle.
The word MECE comes from the McKinsey analysis method, which means mutually independent and completely exhaustive (Mutually Exclusive Collectively Exhaustive). In principle, every if/else branch of a conditional statement needs to fully exhaust all possibilities.
Some bad programming style, such as:
// bad programming style
if (OB_SUCCESS != ret && x > 0) {
   // do something
}

if (OB_SUCCESS == ret && x < 0 ) {
   // do something
}

if (OB_SUCCESS == ret && x == 0) {
   // do something
}
Such code does not conform to the MECE principle, it is difficult to analyze whether all possibilities are exhausted, and it is easy to miss some scenarios. If there is only one condition, the correct way to write it is:
// The correct way to write a judgment condition
if (cond) {
  // do something
} else {
  // do something
}
In principle, every if/else branch is complete, even if the last else branch does nothing. However, there is one exception. If the if condition is just some error judgment or parameter checking, and there is no other logic, then the else branch can be omitted.
// The if statement is only to judge the error code, the else branch can be omitted
if (OB_SUCCESS != ret) {
   // handle errors
}
If two judgment conditions are included, compare the following two possible writing methods:
// The first way of writing the two judgment conditions (correct)
if (cond1) {
  if (cond2) {
    // do something
  } else {
    // do something
  }
} else {
  if (cond2) {
    // do something
  } else {
    // do something
  }
}

// The second way of writing the two judgment conditions (wrong)
if (cond1 && cond2) {
   // do something
} else if (cond1 && !cond2) {
   // do something
} else if (!cond1 && cond2) {
   // do something
} else {
   // do something
}
The first writing method is divided into two layers, and the second writing method is divided into one layer. OceanBase only allows the first writing method. Of course, cond1 and cond2 here are from the perspective of business logic, referring to two independent business logics, rather than saying that cond1 and cond2 cannot contain && or || operators. For example:
// Whether app_name is empty, including ||
if (NULL == app_name || app_name[0] == '\0') {
   ...
}

// Judging whether table_name or column_name is empty, it is considered a business logic
if (NULL != table_name || NULL != column_name) {
   ...
}
In any case, the number of if/else branches in each layer should not exceed 5. Why choose 5? This number also comes from the McKinsey analysis method. Generally speaking, the branch logic of the same level is generally between 3 and 5. If it exceeds, the division is often unreasonable.
5.6 Const Declaration
Declare function parameters that do not change as const. In addition, if the function does not modify member variables, it should also be declared as a const function. Declaring parameters as const can avoid some unnecessary errors, such as constant parameters being changed due to code errors. For simple data type value transfer, many people have disputes about whether to declare const, because in this case, declaring const has no effect. Considering that most of the existing code in OceanBase has been declared as const, and it is easier to operate this way, as long as the function parameters do not change, they are uniformly declared as const.
5.7 Function Parameters
The number of function parameters should not exceed 7. The recommended order is: input parameters first, output parameters last. If some parameters are both input parameters and output parameters, they will be treated as input parameters and placed at the front like other input parameters. Add a new The parameters also need to follow this principle.
The principle of coding: don't trust anyone in the code! Every function (whether public or private, except inline functions) must check the legality of each input parameter, and it is strongly recommended that inline functions also perform these checks (unless there are serious performance problems). All functions (whether public or private) must check the legality of values obtained from class member variables or through function calls (such as get return values or output parameters), even if the return value is successful, the legality of output parameters must still be checked . Variable (parameter) check, only needs to be checked once in a function (if the value obtained by calling one or several functions multiple times, then check each time).
These checks include but are not limited to:
- Whether the pointer is
NULL, and whether the string is empty - Whether the parameter value of the numeric type exceeds the value range. In particular, whether the subscript of the
array/string/bufferis out of bounds - Whether the parameter of the object type is valid. Generally, the object can define a
bool is_valid()method (refer tocommon::TableSchema)
If an implicit check has been made within the function, for example by a check function, it should be stated where the variable is assigned. For example:
// Variables that have been implicitly checked should be explained
// where the variable is assigned:
if (!param.is_valid() || !context.is_valid()) {
     ret = OB_INVALID_ARGUMENT;
     STORAGE_LOG(WARN, "Invalid argument", K(ret), K(param), K(param));
   } else {
     // block_cache_ not empty has been checked in the previous context.is_valid()
     ObMicroBlockCache *block_cache = context.cache_context_.block_cache_;
     ...
}
Use the if statement to check the validity of the input parameters (the function itself) and the output parameters (the function caller), and prohibit the use of assert and the previously defined OB_ASSERT macro at any time.
Examples are as follows:
// function that needs to return an error
int _func(void *ptr)
{
  int ret = OB_SUCCESS;

  if (NULL == ptr) {
    // print error log
    ret = OB_INVALID_ARGUMENT;
  }
  else {
    // Execute business logic
  }
  return ret;
}
5.8 Function Call
When calling the function, you should try to avoid passing in some meaningless special values, such as NULL, true/false, 0/-1, etc., and use constants instead. If you must pass in a special value, you need to use annotation instructions.
For example:
// wrong
int ret = do_something(param1, 100, NULL);

// Correct
ObCallback *null_callback = NULL;
int ret = do_something(param1, NUM_TIMES, null_callback);
5.9 Pointer or Reference
Function parameters can choose pointers or references. Use more references while respecting idioms.
Pointer parameters and reference parameters can often achieve the same effect. Considering that the OceanBase coding specification has strict requirements for error judgment, more references are used to reduce some redundant error judgment codes. Provided, of course, that idioms are followed, such as:
- The method of applying for an object often returns a pointer, and the corresponding release method also passes in a pointer.
- If the member of the object is a pointer, the corresponding
set_xxxinput is also a pointer.
5.10 Function Length
It is mandatory that a single function does not exceed 120 lines. If it must be violated, please obtain the consent of the group leader in advance, and explain the reasons in detail.
Most open source projects limit the number of lines of a single function. Generally speaking, functions with more than 80 lines are often inappropriate. Considering that OceanBase has a lot of redundant error judgment codes, a single function is limited to no more than 120 lines. If the function is too long, consider splitting it into several smaller and more manageable functions, or re-examine the design and modify the structure of the class.
5.11 Summary
- Strictly abide by the single-entry single-exit function. If it must be violated, please obtain the consent of the project leader and project architect in advance, and explain the reasons in detail.
- Except for the simple access functions
set_xxx()/get_xxx()and a few exceptions (such as operator overloading, existing at(i) functions, general functionreset()/reuse()of classes, etc.), all functions (public and private) should useretto return the error code. If the set/get is complicated or may make an error,retshould still be used to return the error code. Only ret variables of type int can be used to represent errors, and ret can only represent errors (except for iterator functions due to historical reasons). - If multiple sequential statements are doing the same thing, then, in some cases, you can use simplified writing.
- Judge
OB_SUCCESS == retin the loop condition to prevent the error code from being overwritten. - The conditional statement needs to abide by the MECE principle: each condition is independent of each other and completely exhausted, and the number of branches of a single
if/elseshould not exceed 5 as far as possible. - Declare functions/function parameters as const whenever possible.
- The principle of coding: do not trust anyone in the code! Every function (whether public or private, except inline functions) must check the legality of each input parameter, and it is strongly recommended that inline functions also perform these checks (unless there are serious performance problems). All functions (whether public or private) must check the legality of values obtained from class member variables or through function calls (such as get return values or output parameters), even if the return value is successful, the legality of output parameters must still be checked . Variable (parameter) check, only needs to be checked once in a function (if the value obtained by calling one or several functions multiple times, then check each time). When defining functions, the recommended order is: input parameters first, output parameters last.
- Prohibit the use of assert and OB_ASSERT.
- When calling the function, you should try to avoid passing in some meaningless special values, and use constants instead.
- On the premise of respecting idiomatic usage, use more references.
- It is mandatory that a single function does not exceed 120 lines. If it must be violated, please obtain the consent of the group leader in advance, and explain the reasons in detail.
6 C&C++ Features
The advantage of C++ is flexibility, and the disadvantage is also flexibility. For many functions of C++, OceanBase is conservative, and this section describes some of them. There are two principles for choosing these features:
- Principle of caution: This feature is relatively "safe", even for beginners, there are not too many "pitfalls"
- Necessity: It has "sufficient" benefits to improve the coding quality of OceanBase
6.1 Smart Pointers and Resource Guard
Smart pointers are not allowed, allowing automatic release of resources through the Guard class.
The boost library supports smart pointers, including scoped_ptr, shared_ptr, and auto_ptr. Many people think that smart pointers can be used safely, especially scoped_ptr. However, most of OceanBase's existing code releases resources manually, and smart pointers are prone to side effects if they are not used well. Therefore, smart pointers are not allowed.
Users are allowed to write some Guard classes by hand. The methods of these classes will apply for some resources, and these resources will be released automatically when the class is destroyed, such as LockGuard and SessionGuard.
6.2 Memory Allocation and Release
It is required to use the memory allocator to allocate memory, and immediately set the pointer to NULL after the memory is released.
The methods OceanBase can use for memory allocation include ob_malloc and various memory allocators. It is required to use the memory allocator to allocate memory, and specify the module it belongs to when allocating. The advantage of this is that it is convenient for the system to manage memory. If there is a memory leak, it is easy to see which module it is. In addition, it is necessary to prevent reference to the memory space that has been released, and it is required to set the pointer to NULL immediately after free.
void *ptr = ob_malloc(100, ObModIds::OB_COMMON_ARRAY);

// do something

if (NULL != ptr) {
  // Release resources
  ob_free(ptr, ObModIds::OB_COMMON_ARRAY);
  ptr = NULL; // empty the pointer immediately after free
}
6.3 String
The std::string class is prohibited, and ObString is used instead. In addition, when manipulating C strings, it is required to use length-limited string functions.
C++'s std::string class is very convenient to use. The problem is that it is impossible to figure out its internal behavior, such as copying and implicit conversion. OceanBase requires the use of ObString as much as possible, and the memory used in it needs to be manually managed by developers.
Sometimes C strings are used. Be careful not to use string manipulation functions with unlimited length, including strcpy/strcat/strdup/sprintf/strncpy, but use the corresponding string manipulation functions with limited length strncat/strndup/snprintf/memcpy. You can use strlen to get the length of a string. The reason why strncpy is not used is that if the incoming buffer is not enough, it will not automatically '\0', and there are performance problems, so it needs to be replaced by memcpy/snprintf.
6.4 Array/String/Buffer Access
When a function passes an array/string/buffer as a parameter, the length of the array/string/buffer must be passed at the same time. When accessing the contents of an array/string/buffer, you must check whether the subscript is out of bounds.
6.5 Friend
Friend can only be used in the same file. If it must be violated, please obtain the consent of the group leader in advance and explain the reason in detail. Declaring unit test classes as friends is an exception, but should be used with caution.
Friend is usually defined in the same file to prevent code readers from going to other files to find their use of a class's private members. Scenarios where friend is often used include:
- Iterator: The iterator class is often declared as a friend, for example,
ObQueryEnginedeclaresObQueryEngineIteratoras afriend(friend classObQueryEngineIterator). - Factory mode: For example, declare
ObFooBuilderas a friend ofObFooso thatObFooBuildercan access the internal state ofObFoo.
In some cases, it may be convenient to declare a unit test class as a friend of the class under test in order to improve test coverage. However, this approach needs to be approached with caution. In most cases, we should indirectly test private functions through various input combinations of public functions, otherwise, these unit test codes will be difficult to maintain.
6.6 Exception
C++ exceptions are prohibited. Some programming languages encourage the use of exceptions, such as Java. Exceptions do make writing code more convenient, but only in the code writing stage, subsequent debugging and bug correction will be very inconvenient. Exceptions make the program control flow more complicated, and it is easy to forget to catch some exceptions. Therefore, it is forbidden to use ret error codes to return errors.
6.7 Runtime Type Identification
The use of Run-Time Type Identification (RTTI) is prohibited. Runtime type recognition often indicates a problem with the design itself, and if it must be used, it usually indicates that the design of the class needs to be reconsidered.
6.8 Type Conversion
Use static_cast<> and other C++ type conversions, prohibiting the use of int-like C cast of y = (int) x.
C++-style type conversions include:
static_cast: Similar to the C style, it can do value cast, or a clear upcast from the subclass of the pointer to the parent class.const_cast: Remove the const attribute.reinterpret_cast: Unsafe conversion between pointer types and integers or other pointers, so be careful when using it.dynamic_cast: Except for test code, it is forbidden to use.
const_cast needs to be used with caution. In particular, for an input parameter declared as const. In principle, it is forbidden to use const_cast to remove const.
const_cast will cause cognitive difficulties for code readers: for a const input parameter of a function, when analyzing the code logic, it will be considered that this parameter is generated outside the function and will not be modified inside the function; using const_cast will destroy this assumption, resulting in code readers cannot notice the modification of const input parameters inside the function. For example, const_cast in the following code fragment is prohibited.
int foo(const char* bar, int64_t len)
{
  ...
  memcpy(const_cast<char*>(bar), src, len);
  ...
  return OB_SUCCESS;
}
6.9 Output
Try to use to_cstring output.
In principle, every class that supports printing needs to implement to_string,
An example of using to_cstring is as follows:
FILL_TRACE_LOG("cur_trans_id=%s", to_cstring(my_session->get_trans_id()));
FILL_TRACE_LOG("session_trans_id=%s", to_cstring(physical_plan->get_trans_id()));
6.10 Integers
Use int for the returned ret error code, and use int64_t for function parameters and loop times as much as possible. In other cases, use a signed number with a specified length, such as int32_t, int64_t. Avoid unsigned numbers, except for a few idioms.
The reason why function parameters and loop times use int64_t as much as possible is to avoid a large number of data type conversions in function calls and loop statements. Of course, idioms can be exceptions, such as ports being int32_t. In a structure such as struct, there is often a need for 8-byte alignment or memory saving, so a signed number of a specified length can be used.
Except for idioms such as bit sets or numbers (such as table_id), the use of unsigned numbers should be avoided. Unsigned numbers may bring some hidden dangers, such as:
for (unsigned int i = foo. length() – 1; i >= 0; --i)
The above code never terminates.
For numbering, some current codes use 0 as an illegal value, and some use MAX_UINT64 as an illegal value. In the future, it will be uniformly stipulated that both 0 and MAX_UINT64 are illegal values, and the inline function is_valid_id is provided in the utility for checking. In addition, uniformly initialize the number value to the macro OB_INVALID_ID, and adjust the initial value of the macro OB_INVALID_ID to 0.
6.11 sizeof
Try to use sizeof(var_name) instead of sizeof(type).
This is because, if the type of var_name changes, sizeof(var_name) will automatically synchronize, but sizeof(type) will not, which may bring some hidden dangers.
ObStruct data;
memset(&data, 0, sizeof(data)); // correct way
memset(&data, 0, sizeof(ObStruct)); // Wrong way
It should be noted that instead of using sizeof to calculate the length of a string, use strlen instead. For example:
char *p = "abcdefg";
// sizeof(p) indicates the pointer size, which is equal to 8 on a 64-bit machine
int64_t nsize = sizeof(p);
6.12 0 and nullptr
Use 0 for integers, 0.0 for real numbers, nullptr for pointers (replacing the previous NULL), and '\0' for strings.
6.13 Preprocessing Macros
In addition to existing macros, no new macros shall be defined, and inline functions, enumerations, and constants shall be substituted. If it is necessary to define a new macro, please obtain the agreement of the group leader in advance, and explain the reason in detail.
Macros can do things that other techniques cannot, such as stringifying (using #), concatenation (using ##). Macros are often used for output and serialization, such as common/ob_print_utils.h, rpc-related classes. However, in many cases, other methods can be used instead of macros: macro inline efficiency-critical code can be replaced by inline functions, and macro storage constants can be used const variable substitution.
The principle of judgment is: in addition to output and serialization, as long as macros can be used, try not to use macros.
6.14 Boost and STL
In STL, only algorithm functions defined in the
OceanBase has a conservative attitude towards libraries like boost and STL, and we believe that writing code correctly is far more important than writing code conveniently. Except for the algorithm class functions defined by STL
6.15 auto
What is The specific type is omitted when declaring the variable, and the compiler automatically deduces the type according to the initialization expression.
Example
auto i = 42; // i is an int
auto l = 42LL; // l is a long long
auto p = new foo(); // p is a foo*
Is it allowed Prohibited. Although it is possible to make the declaration of some template types shorter, we hope that the type declaration matches the user's intention. For example, in the above examples 1 and 2, the type should be explicitly declared.
6.16 Range-based for Loops
What is
The new for loop syntax is used to easily traverse the container that provides begin(), end().
Example
for(const auto& kvp : map) {
  std::cout << kvp. first << std::endl;
}
Is it allowed
Prohibited.
This feature is just a syntactic sugar. The FOREACH macro defined by ourselves has been widely used in the previous OceanBase code, which can achieve similar effects.
6.17 Override and Final
What is
override is used to indicate that a virtual function is an overload of a virtual function in the base class; final indicates that a virtual function cannot be overloaded by a derived class.
Example
class B
{
public:
  virtual void f(short) {std::cout << "B::f" << std::endl;}
  virtual void f2(short) override final {std::cout << "B::f2" << std::endl;}
};
class D : public B
{
public:
  virtual void f(int) override {std::cout << "D::f" << std::endl;}
};
class F : public B
{
public:
  virtual void f2(int) override {std::cout << "D::f2" << std::endl;} // compiler error
};
Is it allowed
Allow. override and final are not only allowed, but strongly recommended, and should be added wherever they can be used.
According to previous experience, the overloading of the virtual function in the OceanBase missed the const, resulting in endless errors of overloading errors. It is required that in the new code, all overloads must be added with override to avoid this wrong overload situation.
In addition to being used for virtual functions, when a class is added with the final keyword, it means that it cannot be further derived, which is conducive to compiler optimization. When such a class has no parent class, the destructor does not need to add virtual.
class ObLinearRetry final: public ObIRetryPolicy
{
   //...
};

class ObCData final
{
  ~ObCData();
}
6.18 Strongly-typed Enums
What is Traditional enumerated types have too many shortcomings to be true types. For example, it is implicitly converted to an integer; the enumeration value is in the same scope as the place where its type is defined. Example
enum class Options {None, One, All};
Options o = Options::All;
Is it allowed Allow. The original enumeration type is a bug in the C++ language. The new enumeration type makes the compiler's inspection more strict, and uses new keyword definitions, which do not conflict with the original enum.
6.19 Lambdas
What is A concept borrowed from functional programming for conveniently writing anonymous functions. Example
std::function<int(int)> lfib = [&lfib](int n) {return n < 2 ? 1 : lfib(n-1) + lfib(n-2);};
Is it allowed prohibited. The novel syntax of lambda makes C code look like a new language, and most people don't have enough understanding of functional programming, so the cost of learning is relatively high. Does not meet principle (1). In addition, lambda is essentially equivalent to defining a functor, which is a syntactic sugar that does not increase the abstraction ability of C. Does not meet principle (2).
6.20 Non-member begin() and end()
What is
The global functions std::begin() and std::end() are used to conveniently abstract operations on containers.
Example
int arr[] = {1,2,3};
std::for_each(std::begin(arr), std::end(arr), [](int n) {std::cout << n << std::endl;});
Is it allowed Prohibited. This feature is mainly to make STL easier to use, but OceanBase prohibits the use of STL containers.
6.21 static_assert and Type Traits
What is
The compile-time assert and compile-time constraint checking supported by the compiler.
Example
template <typename T, size_t Size>
class Vector
{
  static_assert(Size < 3, "Size is too small");
  T_points[Size];
};
Is it allowed
allow. Although the OB code has defined STATIC_ASSERT by itself, it is only a simulation of the compiler check, and the error report is not friendly. And type_traits brings great benefits to the use of templates.
6.22 Move Semantics
What is The move constructor and move assignment operator are one of the most important new features of C++11. Along with it, the concept of rvalue is introduced. Move semantics can make many container implementations much more efficient than before. Example
// move constructor
Buffer(Buffer&& temp):
    name(std::move(temp.name)),
    size(temp. size),
    buffer(std::move(temp.buffer))
{
  temp._buffer = nullptr;
  temp._size   = 0;
}
Is it allowed Prohibited. Banning it may bring some controversy. Mainly based on the following considerations:
- OceanBase does not use STL containers, so the optimization of the standard library using move semantics does not bring us benefits.
- The semantics of move semantic and rvalue are more complicated, and it is easy to introduce pitfalls
- Using it to transform some existing containers of OceanBase can indeed improve performance. However, the memory management method of OceanBase has made the use of move semantics smaller. In many cases, we have optimized it during implementation, and only store pointers in the container, not large objects.
It is recommended to consider other C++11 features after a period of familiarity, when the coding standard is revised next time.
6.23 constexpr
What is More standardized compile-time constant expression evaluation support, no longer need to use various template tricks to achieve the effect of compile-time evaluation. Example
constexpr int getDefaultArraySize (int multiplier)
{
  return 10 * multiplier;
}

int my_array[ getDefaultArraySize( 3 ) ];
Is it allowed allow. Constants are always more friendly to compiler optimization. In the above example, the use of macros is also avoided. In addition, constexpr supports floating-point calculations, which cannot be replaced by static const.
6.23 Uniform Initialization Syntax and Semantics
What is The initialization of variables of any type in any context can use the unified {} syntax. Example
X x1 = X{1,2};
X x2 = {1,2}; // the = is optional
X x3{1,2};
X* p = new X{1,2};
Is it allowed Prohibited. Syntactically more uniform, but again without any significant benefit. At the same time, it will significantly affect the style of OceanBase code and affect readability.
6.24 Right Angle Brackets
What is Fix a common syntax problem in original C. It turns out that when the templates of C-defined templates are nested, the ending >> must be separated by spaces, which is no longer needed. Example
typedef std::vector<std::vector<bool>> Flags;
Is it allowed allow.
6.25 Variadic Templates
What is Variadic templates.
Example
template<typename Arg1, typename... Args>
void func(const Arg1& arg1, const Args&... args)
{
  process( arg1 );
  func(args...); // note: arg1 does not appear here!
}
Is it allowed
Allow. This is a key feature for template programming. Because there is no variable-length template parameter, some basic libraries of OceanBase, such as to_string, to_yson, RPC framework, log library, etc., need to be implemented with some tricks and macros. And more type safe.
6.26 Unrestricted Unions
What is Before, union could not contain classes with constructors as members, but now it can. Example
struct Point {
  Point() {}
  Point(int x, int y): x(x), y(y) {}
  int x, y;
};
union_{
  int z;
  double w;
  Point p; // Illegal in C03; legal in C11.
  U() {} // Due to the Point member, a constructor definition is now needed.
  U(const Point& pt) : p(pt) {} // Construct Point object using initializer list.
  U& operator=(const Point& pt) { new(&p) Point(pt); return *this; } // Assign Point object using placement 'new'.
};
Is it allowed
Allow. There are many places in the OceanBase code that have to define redundant domains because of this limitation, or use tricky methods to bypass (define char array placeholders). See sql::ObPostExprItem for a miserable example.
6.27 Explicitly Defaulted and Deleted Special Member Functions
What is One of the most disturbing things about C++ before is that the compiler implicitly and automatically generates constructors, copy constructors, assignment operators, destructors, etc. for you. They can now be explicitly required or disallowed. Example
struct NonCopyable {
  NonCopyable() = default;
  NonCopyable(const NonCopyable&) = delete;
  NonCopyable& operator=(const NonCopyable&) = delete;
};
struct NoInt {
  void f(double i);
  void f(int) = delete;
};
Is it allowed Allowed. This feature is like tailor-made for OceanBase; the function of disabling a certain function is also very useful.
6.28 Type Alias (Alias Declaration)
What is Use the new alias declaration syntax to define an alias of a type, similar to the previous typedef; moreover, you can also define an alias template. Example
// C++11
using func = void(*)(int);
// C++03 equivalent:
// typedef void (*func)(int);
template using ptr = T*;
// the name 'ptr' is now an alias for pointer to T
ptr ptr_int;
Is it allowed Prohibited. For the time being, there is no need for alias templates, and the same effect can be achieved by using typedef for non-template aliases.
6.29 Summary
- Smart pointers are not allowed, and resources are allowed to be released automatically through the Guard class.
- It is required to use the memory allocator to allocate memory, and immediately set the pointer to
NULLafter the memory is released. - Prohibit the use of std::string class, use ObString instead. In addition, when manipulating C strings, it is required to use length-limited string functions.
- When passing an array/string/buffer as a parameter, the length must be passed at the same time. When reading and writing the content of the array/string/buffer, check whether the subscript is out of bounds.
friendcan only be used in the same file. If it must be violated, please obtain the consent of the code owner in advance and explain the reason in detail. Declaring unit test classes asfriendis an exception, but should be used with caution.- C++ exceptions are prohibited.
- Prohibit the use of runtime type identification (RTTI).
- Use C++ type conversions such as
static_cast<>, and prohibit the use of int C cast ofy = (int) x. - Try to use
to_cstringoutput. - Use int for the returned ret error code, and use
int64_tfor function parameters and loop times as much as possible. In other cases, use a signed number with a specified length, such asint32_t,int64_t. Try to avoid using unsigned numbers. - Try to use
sizeof(var_name)instead ofsizeof(type). - Use 0 for integers, 0.0 for real numbers,
NULLfor pointers, and '\0' for strings. - In addition to the existing macros, no new macros shall be defined, and inline functions, enumerations, and constants shall be used instead. If it must be violated, please obtain the consent of the group leader in advance, and explain the reasons in detail.
- Except for the algorithm class functions defined in the
header file in STL, the use of STL and boost is prohibited. If it must be violated, please obtain the consent of the project leader and project architect in advance, and explain the reasons in detail.
7 Naming Rules
7.1 General Rules
Function naming, variable naming, file naming should be descriptive and not overly abbreviated, types and variables should be nouns, and functions can use "imperative" verbs. Identifier naming sometimes uses some common abbreviations, but it is not allowed to use too professional or unpopular ones. For example we can use the following ranges:
- temp can be abbreviated as tmp;
- statistic can be abbreviated as stat;
- increment can be abbreviated as inc;
- message can be abbreviated as msg;
- count can be abbreviated as cnt;
- buffer can be abbreviated as buf instead of buff;
- current can be abbreviated as cur instead of curr; When using abbreviations, consider whether each project team member can understand them. Avoid abbreviations if you're not sure.
Types and variables are generally nouns, for example, ObFileReader, num_errors.
Function names are usually imperative, eg open_file(), set_num_errors().
7.2 File Naming
Self-describing well composed of all lowercase words separated by '_', for example
ob_update_server.h and ob_update_server.cpp.
The .h file and the .cpp file correspond to each other. If the template class code is long, it can be placed in the .ipp file, such as ob_vector.h and ob_vector.ipp.
7.3 Type Naming
Use self-describing well-formed words. In order to distinguish it from variables, it is recommended to use the first letter of the word capitalized and no separator in the middle. Nested classes do not need to add "Ob" prefix, other classes need to add "Ob" prefix. For example:
// class and structs
class ObArenaAllocator
{
  ...
};
struct ObUpsInfo
{
  ...
};

// typedefs
typedef ObStringBufT<> ObStringBuf;

// enums
enum ObPacketCode
{
};

// inner class
class ObOuterClass
{
private:
   class InnerClass
   {
   };
};
The interface class needs to be preceded by an "I" modifier, and other classes should not be added, for example:
class ObIAllocator
{
  ...
};
7.4 Variable Naming
7.4.1 Intra-class Variable Naming
Self-describing good all lowercase words, separated by '_', in order to avoid confusion with other variables, it is required to add '_' in the back end to distinguish, for example:
class ObArenaAllocator
{
private:
   ModuleArena arena_;
};

struct ObUpsInfo
{
   common::ObServer addr_;
   int32_t inner_port_;
};
7.4.2 Common Variable Naming
Self-describing well-formed all-lowercase words separated by '_'.
7.4.3 Global Variable Naming
New global variables must not be used in addition to existing global variables. If it must be violated, please obtain the consent of the code owner in advance, and explain the reasons in detail. Global variables are composed of self-describing all-lowercase words separated by '_'. In order to mark the global nature, it is required to add the 'g_' modifier at the front end. For example:
// globe thread number
int64_t g_thread_number;
7.5 Function Naming
7.5.1 Function Naming within a Class
Self-describing well-formed all-lowercase words separated by '_', for example:
class ObArenaAllocator
{
public:
  int64_t used() const;
  int64_t total() const;
};
7.5.2 Access Function Naming
The name of the access function needs to correspond to the class member variable. If the class member variable is xxx, then the access function is set_xxx and get_xxx respectively.
7.5.3 Ordinary Function Naming
Self-describing well-formed all-lowercase words separated by '_'.
7.6 Constant Naming
All compile-time constants, whether local, global or in a class, are required to be composed of all uppercase letters, separated by '_' between words. For example:
static const int NUM_TEST_CASES = 6;
7.7 Macro Naming
Try to avoid using macros. Macro names are all composed of uppercase letters, and words are separated by '_'. Note that parameters must be enclosed in parentheses when defining a macro. For example:
// Correct spelling
#define MAX(a, b) (((a) > (b)) ? (a) : (b))
// wrong wording
#define MAX(a, b) ((a > b) ? a : b)
7.8 Precautions
There are a few points that are easy to forget, as follows:
- Try not to use abbreviations unless they are clear enough and widely accepted by project team members.
- In addition to the exception that the name of the interface class needs to be modified with I, other classes, structures, and enumeration types do not need modifiers
- The variable names in the struct also need to be underlined
8 Typography Style
8.1 Code Indentation
Do not use the Tab key for indentation, you can use spaces instead, and different coding tools can be set, requiring the use of two spaces for indentation (4 spaces for indentation will appear a bit compact when the single-line code is relatively long).
8.2 Empty Lines
Minimize unnecessary blank lines and only do so when the logic of the code is clearly divided into multiple parts.
The internal code of the function body is determined by the visual code. Generally speaking, only when the code is logically divided into multiple parts, a blank line needs to be added between each part.
None of the following code should have blank lines:
// There should be no blank lines at the beginning and end of the function
void function()
{
  int ret = OB_SUCCESS;

}

// Do not have blank lines at the beginning and end of the code block
while (cond) {
  // do_something();

}
if (cond) {

   // do_something()
}
Empty lines below are reasonable.
// Function initialization and business logic are two parts,
// with a blank line in between
void function(const char *buf, const int64_t buf_len, int64_t &pos)
{
   int ret = OB_SUCCESS;
   int64_t ori_pos = pos;
   if (NULL == buf || buf_len <= 0 || pos >= buf_len) {
     // print error log
     ret = OB_INVALID_ARGUMENT;
   } else {
     ori_pos = pos;
   }

   // Execute business logic
   return ret;
}
8.3 Line Length
The length of each line shall not exceed 100 characters, and one Chinese character is equivalent to two characters. 100 characters is the maximum value of a single line, and the maximum limit can be increased to 120 characters in the following situations:
- If a line of comments contains commands or URLs exceeding 100 characters.
- Include long paths.
8.4 Function Declaration
The return type and the function name are on the same line, and the parameters are also placed on the same line as much as possible. The function looks like this:
int ClassName::function_name(Type par_name1, Type par_name2)
{
   int ret = OB_SUCCESS;
   do_something();
   ...
   return ret;
}
If the same line of text is too much to accommodate all parameters, you can split the parameters into multiple lines, with one parameter per line:
int ClassName::really_long_function_name(Type par_name1,
     Type par_name2, Type par_name3) // empty 4 spaces
{
   int ret = OB_SUCCESS;
   do_something();
   ...
   return ret;
}
You can also put each parameter on a separate line, and each subsequent parameter is aligned with the first parameter, as follows:
// The following parameters are aligned with the first parameter
int ClassName::really_long_function_name(Type par_name1,
Type par_name2, // align with the first parameter
Type par_name3)
{
   int ret = OB_SUCCESS;
   do_something();
   ...
   return ret;
}
If you can't even fit the first parameter:
// Start a new line for each parameter, with 4 spaces
int ClassName::really_really_long_function_name(
     Type par_name1, // empty 4 spaces
     Type par_name2,
     Type par_name3)
{
   int ret = OB_SUCCESS;
   do_something();
   ...
   return ret;
}
Note the following points:
- The return value is always on the same line as the function name;
- The opening parenthesis is always on the same line as the function name;
- There is no space between the function name and the opening parenthesis;
- There is no space between parentheses and parameters;
- The opening curly brace is always alone on the first line of the function (starting a new line);
- The closing curly brace is always alone on the last line of the function;
- All formal parameter names at function declaration and implementation must be consistent;
- All formal parameters should be aligned as much as possible;
- default indentation is 2 spaces;
- The parameters after the line break keep the indentation of 4 spaces;
- If the function is declared const, the keyword const should be on the same line as the last parameter Some parameters are not used, and these parameter names are annotated when the function is defined:
// Correct
int ObCircle::rotate(double /*radians*/)
{
}

// wrong
int ObCircle::rotate(double)
{
}
8.5 Function Calls
Try to put it on the same line. If you can't fit it, you can cut it into multiple lines. The splitting method is similar to the function declaration. The form of a function call is often like this (no spaces after the opening parenthesis and before the closing parenthesis):
int ret = function(argument1, argument2, argument3);
If it is divided into multiple lines, the following parameters can be split into the next line, as follows:
int ret = really_long_function(argument1,
    argument2, argument3); // empty 4 spaces
You can also put each parameter on a separate line, and each subsequent line is aligned with the first parameter, as follows:
int ret = really_long_function(argument1,
                               argument2, // align with the first argument
                               argument3);
If the function name is too long, all parameters can be separated into separate lines, as follows:
int ret = really_really_long_function(
     argument1,
     argument2, // empty 4 spaces
     argument3);
For placement new, a space needs to be added between new and the pointer variable, as follows:
new (ptr) ObArray();// There is a space between new and '('
8.6 Conditional Statements
{ and if or else on the same line, } start a new line. In addition, between if and "(", ")" and { are guaranteed to contain a space.
Conditional statements tend to look like this:
if (cond) { // There is no space between (and cond, cond and)
   ...
} else { // } and else, there is a space between else and {
   ...
}
In any case, both if and else statements need to have { and }, even if the branch is only one line statement. In principle, } always start a new line, but there is one exception. If the else branch does nothing, } does not need a new line, as follows:
if (OB_SUCCESS == (ret = do_something1())) {
   ...
} else if (OB_SUCCESS == (ret = do_somethng2())) {
   ...
} else { } // else branch does nothing, } does not require a new line
For the comparison statement, if it is =, !=, then the constant needs to be written in front; while >, >=, <, <=, there is no such restriction. For example:
// Correct
if (NULL == p) {
  ...
}

// wrong
if (p == NULL) {
  ...
}
8.7 Expressions
There is a space between the expression operator and the preceding and following variables, as follows:
a = b; // There is a space before and after =
a > b;
a & b;
For boolean expressions, if the maximum length of the line is exceeded, the line break format needs to be taken care of. In addition, complex expressions need to use parentheses to clarify the order of operations of the expression to avoid using the default priority. When breaking a line, the logical operator is always at the beginning of the next line, with 4 spaces:
if ((condition1 && condition2)
    || (condition3 && condition4) // && operator is at the beginning of the line, with 4 spaces
    || (condition5 && condition6)) {
  do_something();
  ...
} else {
  do_another_thing();
  ...
}
If the expression is complex, parentheses should be added to clarify the order of operations of the expression.
// correct
word = (high << 8) | low;
if ((a && b) || (c && d)) {
  ...
} else {
  ...
}

// wrong
word = high << 8 | low;
if (a && b || c && d) {
  ...
} else {
  ...
}
The ternary operator should be written in one line as much as possible. If it exceeds one line, it needs to be written in three lines. as follows:
// The ternary operator is written in one line
int64_t length = (0 == digit_idx_) ? digit_pos_ : (digit_pos_ + 1);

// The ternary operator is written in three lines
int64_t length = (0 == digit_idx_)
    ? (ObNumber::MAX_CALC_LEN - digit_pos_ - 1) // 4 spaces
    : (ObNumber::MAX_CALC_LEN - digit_pos_);

// Error: Breaking into two lines is not allowed
int64_t length = (0 == digit_idx_) ? (ObNumber::MAX_CALC_LEN – digit_pos_ - 1)
     : (ObNumber::MAX_CALC_LEN – digit_pos_);
8.8 Loops and Switch Selection Statements
Both the switch statement and the case block in it need to use {}. In addition, each case branch must add a break statement. Even if you can ensure that you will not go to the default branch, you need to write the default branch.
switch (var) {
case OB_TYPE_ONE: { // top case
     // empty 4 spaces relative to case, empty 4 spaces relative to switch
    break;
  }
case OB_TYPE_TWO: {
    ...
    break;
  }
default: {
    perform error handling;
  }
}
An empty loop body needs to write an empty comment instead of a simple semicolon. For example:
// correct way
while (cond) {
  //empty
}

for (int64_t i = 0; i < num; ++i) {
  //empty
}

// wrong way
while (cond) ;
for (int64_t i = 0; i < num; ++i) ;
8.9 Variable Declaration
Only one variable is declared per line, and the variable must be initialized when it is declared. When declaring a pointer variable or parameter, (*, &) next to the variable name. The same is true for pointers or references (*, &) when a function type is declared.
// correct way
int64_t *ptr1 = NULL;
int64_t *ptr2 = NULL;

// wrong way

int64_t *ptr1 = NULL, ptr2 = NULL; // error, declare only one variable per line
int64_t *ptr3; // Error, variable must be initialized when declared
int64_t* ptr = NULL; // error, * is next to the variable name, not next to the data type

char* get_buf(); // error, * is next to the variable name, not next to the data type
char *get_buf(); // correct

int set_buf(char* ptr); // error, * is next to the variable name, not next to the data type
int set_buf(char *ptr); // correct
8.10 Variable References
For references and pointers, you need to pay attention: there should be no spaces before and after periods (.) or arrows (->). There can be no spaces after the pointer (*) and the address operator (&), and the address operator is next to the variable name.
// correct way
p = &x;
x = *p;
x = r->y;
x = r.y;
8.11 Preprocessing Directives
Do not indent preprocessing directives, start at the beginning of the line. Even if a preprocessing directive is in an indented code block, the directive should start at the beginning of the line.
// Correct way of writing, preprocessing directive is at the beginning of the line
#if !defined(_OB_VERSION) || _OB_VERSION<=300
    do_something1();
#elif _OB_VERSION>300
    do_something2();
#endif
8.12 Class Format
The order of declarations is public, protected, and private. These three keywords are in the top case and are not indented.
The basic format of a class declaration is as follows:
class ObMyClass : public ObOtherClass // : there is a space before and after
{ // { start a new line
public: // top grid
  ObMyClass(); // Indent 2 spaces relative to public
  ~ObMyClass();
  explicit ObMyClass(int var);

  int some_function1(); // first class function function
  int some_function2();

  inline void set_some_var(int64_t var) {some_var_ = var;} // the second type of function
  inline int64_t get_some_var() const {return some_var_;}

  inline int some_inline_func(); // The third type of function

private:
  int some_internal_function(); // function defined first

  int64_t some_var_; // variables are defined after
  DISALLOW_COPY_AND_ASSIGN(ObMyClass);
};

int ObMyClass::some_inline_func()
{
  ...
}
For the declaration order of classes, please refer to Chapter 4 Declaration Order. It should be noted that only inline functions whose implementation code is one line can be placed in the class definition, and other inline functions can be placed outside the class definition in the .h file. In the above example, set_some_var and get_some_var have only one line of implementation code, so they are placed inside the class definition; the implementation code of some_inline_func exceeds one line, and need to be placed outside the class definition. This has the advantage of making class definitions more compact.
8.13 Initialization Lists
The constructor initialization list is placed on the same line or indented according to 4 spaces and lined up in several lines, and the following parameters are aligned with the first parameter. In addition, if the initialization list needs to wrap, it must start from the first parameter. Two acceptable initializer list formats are:
// initializer list on the same line
ObMyClass::ObMyClass(int var) : some_var_(var), other_var_(var+1)
{
  ...
}

// The initialization list is placed on multiple lines, indented by 4 spaces
ObMyClass::ObMyClass(int var)
    : some_var_(var),
      some_other_var_(var+1) // The second parameter is aligned with the first parameter
{
  ...
}
8.14 Namespaces
Namespace contents are not indented.
namespace oceanbase
{
namespace common
{
class ObMyClass // ObMyClass do not indent
{
  ...
}
} // namespace common
} // namespace oceanbase
8.15 Constants Instead of Numbers
Avoid confusing numbers and use meaningful symbols instead. Constants that involve physical states or have physical meanings should not use numbers directly, but must be replaced by meaningful enumerations or constants.
const int64_t OB_MAX_HOST_NAME_LENGTH = 128;
const int64_t OB_MAX_HOST_NUM = 128;
8.16 Precautions
- The
{of theif&else,for&whileandswitch&casestatements are placed at the end of the line instead of starting a new line; - Define the
public,protectedandprivatekeywords of the class with 2 spaces, and pay attention to the declaration order of the class. - When cutting a line into multiple lines, you need to pay attention to the format.
- Minimize unnecessary blank lines as much as possible, and only do this when the code logic is clearly divided into multiple parts.
- Do not indent the contents of the namespace.
9 Notes
Comments are written for others to understand the code, the following rules describe what should be commented and where.
9.1 Comment Language and Style
The comment language is required to use English, and Chinese cannot be used, and the comment style adopts //. The purpose of comments is to make your code easier for others to understand.
The comment style can use // or /* */, except for the comments of the header file, // is used in other cases.
9.2 Document Comments
Add a copyright notice at the beginning of each file, see Section 2.2 for the copyright notice. For key algorithms and business logic, it should be clearly described here, and the file header should be defined.
9.3 Class Annotations
Each class definition must be accompanied by a comment describing the function and usage of the class. For example:
// memtable iterator: the following four requirements all use MemTableGetIter iteration
// 1. [General get/scan] need to construct RNE cell, and construct mtime/ctime cell
// according to create_time, if there is column filtering, it will also construct NOP cell
// 2. [dump2text of QueryEngine] There is no column filtering and transaction id
// filtering, no NOP will be constructed, but RNE/mtime/ctime will be constructed
// 3. [Dump] Without column filtering and transaction id filtering, empty rows will be
// skipped in QueryEngine, RNE and NOP will not be constructed, but mtime/ctime
// will be constructed
// 4. [Single-line merge] Before merging, it is necessary to determine whether there
// is still data after the transaction id is filtered. If not, the GetIter
// iteration is not called to prevent the RNE from being constructed and written
// back to the memtable; in addition, RowCompaction is required to ensure that the
// order is not adjusted to prevent the mtime representing the transaction ID from
// being adjusted to the common column.
// 5. [update and return] is similar to regular get/scan, but without transaction
// id filtering
class MemTableGetIter : public common::ObIterator
{
};
Please note that the things that need to be paid attention to when using the class are indicated here, especially whether it is thread-safe, how resources are released, and so on.
9.4 Function Annotations
9.4.1 Function Declaration Comments
The function declaration comment is placed before the function declaration, and mainly describes the function declaration itself rather than how the function is completed. The content to be described includes:
- The input and output of the function.
- If the function allocated space, it needs to be freed by the caller.
- Whether the parameter can be NULL.
- Whether there are performance risks in function usage.
- Is the function reentrant and what are its synchronization prerequisites
// Returns an iterator for this table.
//Note:
// It's the client's responsibility to delete the iterator
// when it's done with it.
//
// The method is equivalent to:
// ObMyIterator *iter = table->new_iterator();
// iter->seek_to_front();
// return iter;
ObMyIterator *get_iterator() const;
Generally speaking, the external interface functions of each class need to be annotated. Of course, self-describing functions such as constructors, destructors, and accessor functions do not need comments. If the comment needs to describe the input, output parameters or return value, the format is as follows:
// Gets the value according to the specified key.
//
// @param [in] key the specified key.
// @param [in] value the result value.
// @return the error code.
int get(const ObKey &key, ObValue &value);
Examples of annotations for function reentrancy are as follows:
// This function is not thread safe, but it will be called by only one xxx thread.
int thread_unsafe_func();
9.4.2 Function Implementation Comments
If the function implementation algorithm is unique or has some bright spots, you can add function implementation comments in the .cpp file. For example, the programming skills used, the general steps of implementation, or the reasons for this implementation, such as explaining why the first half needs to be locked and the second half does not. Note that the focus here is on how to implement, rather than copying the function declaration comments in the .h file.
9.5 Variable Annotations
Local variables do not need to write comments. Member variables and global variables generally need to write comments, unless the project team members recognize that the variable is self-describing. If some values of the variable have special meaning, such as NULL, -1, then it must be stated in the comment.
Use good and unambiguous language to indicate the purpose, point of use, and scope of variables. Comments can appear on the right side of the variable definition or on the top line of the variable definition according to the number of characters in the line, for example:
// comments appear on the top line
private:
  // Keeps track of the total number of entries in the table.
  // -1 means that we don't yet know how many entries the table has.
  int num_total_entries_;

  // Comments appear to the right of the variable
  static const int NUM_TEST_CASES = 6; // the total number of test cases.
9.6 Implementation Notes
Similarly, you must make detailed comments on business-critical points, sophisticated algorithms, and poorly readable parts in the internal implementation of the function. It can also appear at the top of a code snippet or to the right of a line of code.
// it may fail, but the caller will retry until success.
ret = try_recycle_schema();
Be careful not to write comments in pseudo-code, that is too cumbersome and of little value.
9.7 TODO Comments
For functions that have not been implemented or are not perfectly implemented, sometimes we need to add TODO comments. All TODO comments must reflect the worker and the completion time. Of course, if the completion time is undecided, you can mark it clearly. For example:
// TODO(somebody): needs another network roundtrip, will be solved by 2014/12.
9.8 Precautions
- The comment language can be English or Chinese, and the comment style adopts //
- Comments are often used to describe classes, function interfaces, and key implementation points. Comments are encouraged unless it is self-describing code.
- Be sure not to forget TODO comments.
10 Multithreading
10.1 Starting and Stopping Threads
- Except for very special cases, it is forbidden to dynamically start and stop threads. Once the server is initialized, the number of threads is fixed. Special cases such as: a backdoor reserved for the server, when all threads of the server are occupied, a worker thread is added.
- In order to ensure that a thread will not be busy waiting in an infinite loop when exiting, the loop generally needs to judge the stop flag.
10.2 pthread_key
- There are only 1024
pthread_keyat most, and this limit cannot be increased, so special attention should be paid when using it. - If you want to use a large number of thread-local variables, it is recommended to use the thread number as an array subscript to obtain a thread-private variable. An
itid()function is encapsulated in the OceanBase to obtain continuously increasing thread numbers.
void *get_thread_local_variable()
{
  return global_array_[itid()];
}
10.3 Timers
Time-consuming tasks cannot be completed in the timer, and time-consuming tasks need to be submitted to the thread pool for execution.
10.4 Locking and Unlocking
It is recommended to use the Guard method to use locks
// scope is the whole function
int foo()
{
  SpinLockGuardguard(lock_);
  ...
}
// scope is a clause
while(...) {
  SpinLockGuardguard(lock_);
  ...
}
If the scope of the lock is not the entire function or a certain clause, such as locking in the middle of function execution and unlocking before the function exits, manual locking and unlocking are allowed in this case:
int foo()
{
  int ret = OB_SUCCESS;
  bool lock_succ = false;
  if (OB_SUCCESS != (ret = lock_.lock())) {
    lock_succ = false;
  } else {
    lock_succ = true;
  }
  ... // some statements are executed
  if (lock_succ) {
    lock_.unlock();
  }
  return ret;
}
10.5 Standard Usage of Cond/Signal
- Use cond/signal through
CThreadcondencapsulated by tbsys - Prohibit the use of
cond_wait()without a timeout - Use cond/signal in the following idioms
// waiting logic
cond. lock();
while(need_wait())
{
  cond.wait(timeout);
}
cond.unlock();
// wake up logic
cond.lock();
cond.signal();
cond.unlock();
10.6 Atomic Operations
Uniformly use the macros defined in ob_define.h to do atomic operations, you need to pay attention to:
- Atomic reads and writes also need to be done with
ATOMIC_LOAD()andATOMIC_STORE() - Use
ATOMIC_FAA()andATOMIC_AAF()to distinguish betweenfetch_and_addandadd_and_fetch - Use
ATOMIC_VCAS()andATOMIC_BCAS()to distinguish betweenCASoperations returning value orbool
10.7 Compiler Barriers
Generally, memory barriers are also required where compiler barriers are to be used, and memory barriers contain compiler barriers, so there should be no place where compiler barriers are required.
10.8 Memory Barriers
- Although there are various memory barriers, we only recommend using the full barrier. Because finer barriers are very error-prone, currently in the engineering practice of OceanBase, there is no code that must use finer barriers to meet performance requirements. How complicated are the various barriers, you can refer to this document memory-barriers
- The atomic operation comes with a barrier, so it is generally not necessary to manually add a barrier.
- If you need to manually add a barrier, use a macro:
#define MEM_BARRIER() __sync_synchronize()
10.9 Reference Counting and shared_ptr
First of all, shared_ptr must not be used, because shared_ptr is just syntactic sugar and does not solve the problem we hope to solve with reference counting.
- To put it simply: it is safe for multiple threads to operate different
shared_ptrat the same time, but it is not safe for multiple threads to operate the sameshared_ptrat the same time. When we consider reference counting, it is often necessary to operate the same shared_ptr with multiple threads. - For details, please refer to shared_ptr
Secondly, reference counting seems simple, but it is actually not easy to implement correctly. It is not recommended to use reference counting unless you think about it very clearly.
To use reference counting, you must first consider the following questions: How to ensure that the object is not recycled or reused before adding 1 to the reference count?
There are currently 2 methods in OceanBase that use reference counting, you can refer to:
The following simple scenarios can use reference counting:
a. Single-threaded object construction, the initial reference count of the object is 1
b. After that, the single thread increases the reference count, and passes the object to the rest of the threads for use, and the rest of the threads decrement the reference count after use.
c. Finally, the single thread decides to release the object and decrements the reference count by 1.
This is the usage of
FifoAllocatorin OceanBase. If the above simple scenario is not satisfied, a global lock is required to ensure security: a. Add a read lock in step 1 in Example 1 b. Add a write lock in step 3 in Example 1 This is what UPS does when it managesschema_mgr
10.10 Alignment
In order to avoid cache false sharing, if a variable will be frequently accessed by multiple threads, it is recommended to align it with the cache line when defining the variable.
int64_t foo CACHE_ALIGNED;
But if there are a large number of objects, in order to save memory, it is allowed not to align by cache line.
If it is an object constructed by dynamically applying for memory, you need to pay attention that at least the starting address of the object is 8-byte aligned. For example. If you use page_arena, you can allocate 8-byte aligned memory through alloc_aligned().
struct_A *p = page_arena_.alloc_aligned(sizeof(*p));
10.11 volatile
Generally speaking, it is not recommended to use volatile variables, for reasons refer to this document volatile-considered-harmful.
Use ATOMIC_LOAD()/ATOMIC_STORE() instead to ensure that reads and writes to variables are not optimized away.
// Wrong
volatile int64_ti = 0;
x = i;
i = y;
// recommended practice
int64_t i = 0;
x = ATOMIC_LOAD(&i);
ATOMIC_STORE(&i, y);
It is still reasonable to use volatile in a few cases, such as to indicate the state, but this state change has no strict timing meaning: such as a flag variable indicating thread exit.
volatile bool stop_CACHE_ALIGNED;
Or certain monitoring items.
volatile int64_t counter_CACHE_ALIGNED;
10.12 How to Use CAS
Because ATOMIC_VCAS returns the latest value of *addr in the event of an operation failure, it is not necessary to use ATOMIC_LOAD to read again every retry.
For example, to achieve atomic plus 1, use the CAS operation as follows:
int64_t tmp_val = 0;
int64_told_val = ATOMIC_LOAD(addr)
while(old_val != (tmp_val = ATOMIC_VCAS(addr, old_val, old_val + 1)))
{
  old_val = tmp_val;
}
10.13 Spin Wait and PAUSE
Add PAUSE() to the spin wait cycle. On some CPUs, PAUSE() can improve performance, and generally speaking, PAUSE() can reduce CPU power consumption.
while (need_retry()) {
  PAUSE();
}
The role of PAUSE can be seen in this answer: What is the purpose of the "PAUSE" instruction in x86
10.14 Critical Sections
Do not perform time-consuming or complicated operations in the critical section, such as opening/closing files, reading and writing files, etc.
10.15 Avoid Program Core or Exit
The restart time of the database system is often measured in hours. A large area of core or exit will cause the interruption of database services and may be exploited by malicious attackers. Therefore, the program core or exit must be avoided, such as accessing the address pointed to by a null pointer (except for temporary modification for locating bugs), or calling abort (unless an external instruction is received), etc. If it must be violated, please obtain the consent of the project leader and project architect in advance, and explain the reasons in detail.
11 Log Specification
Version 1.0 of the logging module has two major improvements: Support multi-dimensional, fine-grained printing level settings Compared with the previous version, which only supported the global uniform setting of the log level, the 1.0 version supports four different scopes of printing log settings: statement, session, tenant and global (or server). The setting methods of different ranges are as follows:
- SQL statement hint
- Set the session log level variable
- Set tenant log level variable
- Set syslog level variable
In addition, version 1.0 also supports the concepts of log modules and submodules. When printing logs in the program, it is necessary to indicate the module (or module + submodule) to which the log belongs and the log printing level to which the log belongs. The system supports users to set different printing levels for each module and sub-module.
Stricter log printing format
In version 0.5, there is a problem that the print log format is not uniform and difficult to read. For example, when printing the variable
mwhose value is 5, there are many different printing formats: "m = 5", "m=5", "m(5)", "m is 5", "m:5", etc. The new log module allows users to print the values of required variables in the form of key-value pairs.
11.1 Log Printing Level
| Log Level | User | Level Definition |
|---|---|---|
| ERROR | DBA | Any unexpected, unrecoverable error requiring human intervention. The observer cannot provide normal service exceptions, such as the disk is full and the listening port is occupied. It can also be some internal inspection errors after our productization, such as our 4377 (dml defensive check error), 4103 (data checksum error), etc., which require DBA intervention to restore |
| WARN | DBA | In an unexpected scenario, the observer can provide services, but the behavior may not meet expectations, such as our write current limit |
| INFO | DBA | (Startup default level). A small amount of flagged information about system state changes. For example, a user, a table is added, the system enters daily merge, partition migration, etc. |
| EDIAG | RD | Error Diagnosis, diagnostic information to assist in troubleshooting, unexpected logical errors, such as function parameters that do not meet expectations, etc., usually OceanBase program BUG |
| WDIAG | RD | Warning Diagnosis, diagnostic information to assist in troubleshooting, expected errors, such as function return failure |
| TRACE | RD | Requests granular debugging information, such as printing a TRACE log at different stages of executing a SQL statement |
| DEBUG | RD | General and detailed debugging information to track the internal state and data structure of the system. |
It should be noted that DEBUG logs are often used for integration testing or online system debugging, and cannot be used as a substitute for unit testing.
11.2 Division of Printing Modules (Example)
| Module | Submodule Definition |
|---|---|
| SQL | Parser, transformer, optimizer, executor, scheduler |
| STORAGE | TBD |
| TRANSACTION | TBD |
| ROOTSERVER | TBD |
| COMMON | TBD |
| DML | TBD |
The definition of sub-modules under each module will be further refined by each group. The definitions of modules and submodules are placed in the file ob_log_module.h.
11.3 Setting of Print Range
Version 1.0 supports users to set the printing level separately by statement, session and global (system) scope. The priority of reference in the system is
- statement
- session
- For system global (or server), only when the previous item is not set or the setting is invalid, the system will refer to the subsequent level settings.
11.3.1 Statement Scope Printing Level Setting
Set format
Add /*+ ... log_level=[log_level_statement]...*/ to the statement hint
(For the format of log_level_statement, see the following chapters)
Scope of action
The processing and execution process of the entire statement, including statement analysis, optimization, execution, etc. After the execution of the statement ends, this setting becomes invalid automatically.
11.3.2 Session Scope Printing Level Setting
Set format
sql> set @@session.log_level = '[log_level_statement]';
Scope of action From the setting to the end of the session.
11.3.3 Tenant-wide Printing Level Settings
Set format
sql>set @@global.log_level = '[log_level_statement]';
Scope of action It will take effect for all user sessions from the user setting until all user sessions exit.
11.3.4 System (or server) Wide Printing Level Setting
Set format
sql>alter system set log_level = '[log_level_statement]{,server_ip=xxx.xxx.xxx.xxx}';
Scope of action
When the user specifies server_ip, the setting takes effect only for the server, and remains valid until the server exits or restarts. When the user does not specify server_ip, the setting takes effect for all servers in the entire system, and remains until the entire system reboots (newly launched servers also need to obey this setting).
11.3.5 log_level_statement Format
log_level_statement =
mod_level_statement {, mod_level_statement }
mod_level_statement=
[mod[.[submod|*]]:][ERROR|WARNING|INFO|TRACE|DEBUG]
The definitions of mod and submod refer to section 12.2. If no mod or submod is specified, this setting will take effect for all mods. If multiple mod_level_statement settings conflict, the last valid setting shall prevail.
User settings do not guarantee atomicity: for example, when there are multiple settings, if the nth item setting is unsuccessful (syntax error or module does not exist), if it is a session or system-level setting, the statement will report an error, but before The effective item will not be rolled back. If it occurs in the statement hint, no error will be reported and the previous effective item will not be rolled back.
11.4 Unification of Log Format
Version 1.0 uses the "key=value" format to print logs uniformly. The log module uniformly provides an interface similar to the following:
OB_MOD_LOG(mod,submod, level, "info_string", var1_name, var1, var2, 2.3, current_range,
    range, ...);
The corresponding print information is
[2014-10-09 10:23:54.639198] DEBUG ob_tbnet_callback.cpp:203 [12530][Ytrace_id] info_string(var1_name=5, var2=2.3, current_range= "table_id:50,(MIN;MAX)" )
Among them, info_string is a summary of the main information of the log, which should be concise, clear, and easy to read. Avoid "operator failed" and other non-informative character strings.
The log header of each line (including information such as file name and line number) is automatically generated by the log printing module. For ease of use, the log module header file (ob_log_module.h) will also provide macros defined in units of modules and submodules, making the program print statements in a certain file or folder more concise, for example:
#define OB_SQL_PARSER_LOG(level, ...) OB_MOD_LOG(sql, parser, level, ...)
The choice of the name of the printed variable should consider the needs of different occasions. If you do not use the variable name itself, you should consider whether there is already a variable name with the same meaning in use in the system (for example, whether the version number is printed as "data_version" or "version", or "data version" should be as uniform as possible), so as to facilitate future debugging and monitor. In case of return due to unsuccessful operation, the log must be printed, and the error code must be printed. Since the new log supports module and range settings, it will be more effective in filtering the printed information. In principle, the necessary debug log information should be further enriched to facilitate future troubleshooting and debugging.
12 Coding Constraint Summary
12.1 Scope
- Namespaces correspond to directories. Anonymous namespaces are prohibited. Using directives are prohibited in .h files, and only using declarations are allowed.
- Nested classes are suitable for scenarios that are only used by external classes. It is recommended to pre-declare in .h files and implement them in .cpp files. Try not to use
public. - In addition to the existing global variables and global functions, no new global variables and global functions shall be added. If it must be violated, please obtain the consent of the code owner in advance, and explain the reason in detail.
- Local variables are declared at the beginning of the statement block, and it is mandatory to initialize simple variables when they are declared.
- It is forbidden to declare non-simple variables in the loop body. If it must be violated, please obtain the consent of the group leader in advance, and explain the reason in detail.
- Resource management follows the principle of "who applies for release". If resources need to be released, release them before the function returns or at the end of the outermost else branch. So if you need to restore the input parameters, do so before the function returns. If it must be violated, please obtain the consent of the group leader in advance, and explain the reason in detail.
12.2 Class
- The constructor only does trivial initialization. Each class needs to define at least one constructor, and the destructor with virtual functions or subclasses is declared as virtual.
- In order to avoid implicit type conversion, the single-parameter constructor needs to be declared as explicit.
- In principle, the copy constructor must not be used (except for the basic classes that have been defined and used). If it must be violated, please obtain the consent of the group leader in advance, and explain the reason in detail.
- Use
DISALLOW_COPY_AND_ASSIGNto avoid abuse of copy constructor and assignment operation; - Class reset uses reset, reuse uses reuse, and clear is prohibited.
- It is necessary to ensure that all members are initialized, and the initialization order of member variables is consistent with the order of definition.
- Use struct only when there is only data, and use class in all other cases.
- The common functions contained in each class must use standard prototypes, and the serialization/deserialization functions must be implemented using macros.
- Prioritize composition and only use inheritance for "is-a" relationships. Avoid private inheritance and multiple inheritance. When multiple inheritance is used, it is required that except for one base class with implementation, the other base classes are pure interface classes.
- Except for existing container classes, custom types, and a small number of global basic classes, overloading of operators is not allowed (except for simple structure assignment operations). If it must be violated, please obtain the consent of the group leader in advance, and explain the reasons in detail.
- Declaration order:
public,protected,private.
12.3 Functions
- Strictly abide by the single entry and single exit of the function. If it must be violated, please obtain the consent of the code owner and project architect in advance, and explain the reasons in detail.
- Except for simple access functions set_xxx()/get_xxx() and a few exceptions (such as operator overloading, existing at(i) functions, general function reset()/reuse() of classes, etc.), all functions (public and private) should use ret to return the error code. If the
set/getis complicated or may make an error, ret should still be used to return the error code. Only ret variables of type int can be used to represent errors, and ret can only represent errors (except for iterator functions due to historical reasons). - If multiple sequential statements are doing the same thing, then, in some cases, you can use simplified writing.
- Judging
OB_SUCCESS == retin the loop condition to prevent the error code from being overwritten. - Conditional statements need to abide by the MECE principle: each condition is independent of each other and completely exhausted, and the number of branches of a single if/else should not exceed 5 as far as possible.
- Declare functions/function parameters as const whenever possible.
- The principle of coding: do not trust anyone in the code! Every function (whether public or private, except inline functions) must check the legality of each input parameter, and it is strongly recommended that inline functions also perform these checks (unless there are serious performance problems). All functions (whether public or private) must check the legality of values obtained from class member variables or through function calls (such as get return values or output parameters), even if the return value is successful, the legality of output parameters must still be checked . Variable (parameter) check, only needs to be checked once in a function (if the value obtained by calling one or several functions multiple times, then check each time). When defining functions, the recommended order is: input parameters first, output parameters last.
- Prohibit the use of assert and OB_ASSERT.
- Try to avoid passing in some meaningless special values when calling the function, and use constants instead.
- On the premise of adhering to idioms, use more references.
- It is mandatory that a single function does not exceed 120 lines. If it must be violated, please obtain the consent of the group leader in advance, and explain the reason in detail.
12.4 C&C++ Features
- Smart pointers are not allowed, and resources are allowed to be released automatically through the Guard class.
- It is required to use the memory allocator to apply for memory, and immediately set the pointer to NULL after the memory is released.
- Prohibit the use of std::string class, use ObString instead. In addition, when manipulating C strings, it is required to use length-limited string functions.
- When passing an array/string/buffer as a parameter, the length must be passed at the same time. When reading and writing the content of the array/string/buffer, check whether the subscript is out of bounds.
- Friends can only be used in the same file. If it must be violated, please obtain the consent of the group leader in advance and explain the reason in detail. Declaring unit test classes as friends is an exception, but should be used with caution.
- Prohibit the use of C++ exceptions.
- Prohibit the use of runtime type identification (RTTI).
- Use C++ type conversions such as
static_cast<>, and prohibit the use of C-type conversions like inty = (int) x. - Try to use
to_cstringoutput. - Use int for the returned ret error code, and use
int64_tfor function parameters and loop times as much as possible. In other cases, use a signed number with a specified length, such asint32_t,int64_t. Try to avoid using unsigned numbers. - Try to use
sizeof(var_name)instead ofsizeof(type). - Use 0 for integers, 0.0 for real numbers,
NULLfor pointers, and '\0' for strings. - In addition to the existing macros, no new macros shall be defined, and inline functions, enumerations and constants shall be used instead. If it must be violated, please obtain the consent of the group leader in advance, and explain the reason in detail.
- Except for the algorithm class functions defined in the
header file in STL, the use of STL and boost is prohibited. If it must be violated, please obtain the consent of the code owner and project architect in advance, and explain the reasons in detail.
12.5 Others
- Do not perform time-consuming or complex operations in the critical section, such as opening/closing files, reading and writing files, etc.
- Do not use shared_ptr and strictly limit the use of reference counting.
- It is necessary to avoid program core or exit, such as accessing the address pointed to by a null pointer (except temporary modification for locating bugs), or calling abort (unless an external instruction is received). If it must be violated, please obtain the consent of the code owner and project architect in advance, and explain the reasons in detail.